background image

Troubleshooting and tips

Error messages on the screen

24

A26361-K554-Z100-2-7619

Error messages on the screen

Error messages and their descriptions are listed in the Technical Manual of the system board or in
the "BIOS Setup" manual and in the documentation of the installed software.

Restoring the hard disk contents

Instructions for this purpose can be found in the documentation (booklet) of the CD "Drivers &
Utilities".

Tips

The PC cannot be switched off with the ON/OFF switch

Cause: System crash

Ê 

Press the ON/OFF switch for at least four seconds, until the device switches off.

PC switches on briefly and then off again

The power cable has been plugged. For technical reasons, this brief switching on and off is
necessary.

Out of system resources

If you have too many applications running at once, you may experience problems due to a lack of
system resources. If this happens, you should close applications you do not require or call the
applications in a different order.

BIOS settings in power management do not become active

The

Auto insert notification

setting may be active for the CD-ROM drive. This setting causes

Windows 9x to inquire about any modifications on the drive at regular intervals. Because of this the
timer for the idle time cannot time out.

To activate power management, proceed as follows:

Ê 

In Windows 9x, select

Start - Settings - Control Panel - System - Device Manager - CD-ROM

.

Ê 

Select the installed CD-ROM drive from the list.

Ê 

Select

Settings

.

Ê 

Deactivate the

Auto insert notification

box.

CD-ROM drive

Information on the CD-ROM drive can be found in the manual of the CD-ROM drive or on the
"Drivers & Utilities" CD.

Other manuals

Other manuals are contained on the "Drivers & Utilities" CD.

Содержание SCENIC eT

Страница 1: ...PC PC PC PC SCENIC SCENIC SCENIC SCENIC eT eT eT eT OPERATING MANUAL OPERATING MANUAL OPERATING MANUAL OPERATING MANUAL ...

Страница 2: ... our service partners your sales partner your sales outlet The addresses of your service partners are contained in the guarantee booklet or in the service address booklet The latest information on our products tips updates etc can be found on the Internet under http www fujitsu siemens com ...

Страница 3: ......

Страница 4: ...to manuale è stato stampato su carta da riciclaggio Denna handbok är tryckt på recyclingpapper Dit handboek werd op recycling papier gedrukt Herausgegeben von Published by Fujitsu Siemens Computers GmbH Bestell Nr Order No A26361 K554 Z100 2 7619 A26361 K554 Z100 2 7619 A26361 K554 Z100 2 7619 A26361 K554 Z100 2 7619 Printed in the Federal Republic of Germany AG 0700 07 00 A26361 K554 Z100 1 7619 ...

Страница 5: ...SCENIC eT Operating Manual Introduction Important notes Preparation for use and operation Troubleshooting and tips System expansions Technical data Index July 2000 edition ...

Страница 6: ... Incorporated All other trademarks referenced are trademarks or registered trademarks of their respective owners whose protected rights are acknowledged Copyright ã Fujitsu Siemens Computers GmbH 2000 All rights including rights of translation reproduction by printing copying or similar methods even of parts are reserved Offenders will be liable for damages All rights including rights created by p...

Страница 7: ...age 12 Connecting the PC to the line voltage 13 Indicators and switches 14 Switching on the PC for the first time 15 Switching on the PC 16 Switching off the PC 16 Working with floppy disks 17 Keyboard 18 Important keys and key combinations 18 Settings in BIOS Setup 19 Property and data protection 19 Access protection under Windows 19 BIOS Setup security functions 20 Troubleshooting and tips 21 In...

Страница 8: ...emoving drives 30 Installing an accessible drive 30 Removing an accessible drive 32 Changing the floppy disk drive 33 Replacing a hard disk drive 34 Mounting a hard disk drive in a 5 slot 36 Extensions on the system board 37 Upgrading main memory 37 Replacing lithium battery 37 Replacing processor 38 Technical data 39 Index 41 ...

Страница 9: ...e BIOS Setup also allow you to protect your data by means of passwords Further information on this PC is provided in the manual Safety Guarantee and Ergonomics in the Operating Manual for the monitor in the Technical Manual for the system board in the manual BIOS Setup in the documentation of your operating system in the information files e g TXT DOC WRI HLP i Some of the manuals listed can be fou...

Страница 10: ......

Страница 11: ...ion The On Off switch does not separate the system unit completely from the line voltage To disconnect the line voltage completely remove the power plug from the grounded power outlet Replace the lithium battery on the system board in accordance with the instructions in the chapter System expansions Replacing lithium battery Caution components on the system board can get very hot Manufacturer s no...

Страница 12: ...e Disposal and recycling This device has been manufactured to the greatest possible degree from materials which can be recycled or disposed of in a manner that is not environmentally damaging The device is taken back after use to be recycled provided that it is returned in a condition that is the result of normal use Any components not reclaimed will be disposed of in an environmentally acceptable...

Страница 13: ...nterference to radio or television reception which can be determined by turning the equipment off and on the user is encouraged to try to correct the interference by one or more of the following measures Reorient or relocate the receiving antenna Increase the separation between equipment and the receiver Connect the equipment into an outlet on a circuit different from that to which the receiver is...

Страница 14: ...n the United States and Canada Table A Cord Type Size of Conductors in Cord Maximum Current Rating of Unit SJT 18 AWG 16 AWG 14 AWG 10 Amps 12 Amps 12 Amps SVT 18 AWG 17 AWG 10 Amps 12 Amps For units set at 115 V use a parallel blade grounding type attachment plug rated 15 A 125 V For units set at 230 V domestic use use a tandem blade grounding type attachment plug rated 15 A 250 V For units set a...

Страница 15: ...is appliance may not correspond with the colored markings identifying the terminals in your plug proceed as follows The wire which is colored Green and Yellow must be connected to the terminal in the plug which is marked with the letter E or by the earth symbol or colored Green or Green and Yellow The wire which is colored Blue must be connected to the terminal which is marked with the letter N or...

Страница 16: ...a dry cloth If particularly dirty use a cloth which has been moistened in mild domestic detergent and then carefully wrung out Cleaning the keyboard and the mouse Use disinfectant wipes to clean the keyboard and the mouse The mouse mechanism and the rotating ball can be cleaned by removing the retaining ring on the underside of the mouse Ê Using two fingers exert downward pressure on the notches o...

Страница 17: ...nstall drives and boards is described in the chapter System expansions Setting up the PC When installing your PC give consideration to the recommendations and safety notes in the manual Safety Guarantee and Ergonomics Set up the PC only in its correct orientation The points to observe are illustrated on the following pages Do not expose the PC to extreme environmental conditions see chapter Techni...

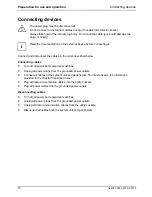
Страница 18: ... order described below Connecting cables Turn off all power and equipment switches Unplug all power plugs from the grounded power outlets Connect all cables at the system unit and peripherals You must observe the information provided in the chapter Important notes Plug all data communication cables into the utility sockets Plug all power cables into the grounded power outlets Disconnecting cables ...

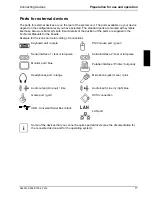
Страница 19: ...ied in the Technical Manuals for the boards Example for the icons and color coding of connections Keyboard port purple PS 2 mouse port green 1 Serial interface 1 teal or turquoise 2 Serial interface 2 teal or turquoise Monitor port blue Parallel interface Printer burgundy Headphones port orange Microphone jack mono pink Audio output Line out lime Audio input Line in light blue Game port gold SCSI ...

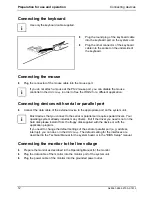
Страница 20: ...nal device to the appropriate port on the system unit i Most devices that you connect to the serial or parallel port require special drivers Your operating system already includes many drivers But if the driver you need is not on the hard disk please install it from the floppy disk supplied with the device or with the application program If you need to change the default settings of the serial or ...

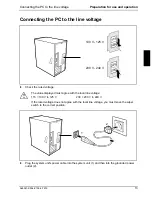
Страница 21: ...V 240 V Ê Check the rated voltage The value displayed must agree with the local line voltage 115 100 V to 125 V 230 200 V to 240 V If the rated voltage does not agree with the local line voltage you must move the wiper switch to the correct position 1 2 Ê Plug the system unit s power cable into the system unit 1 and then into the grounded power outlet 2 ...

Страница 22: ... the PC on or off With Windows 98 with ACPI or with Windows 2000 you can set additional functions of the ON OFF switch in the Control Panel 4 Power on indicator green The system unit is on orange The system unit is ready to operate In this mode the PC consumes very little power and can be switched on at the ON OFF switch flashes green orange The indicator only flashes on systems which support the ...

Страница 23: ...rted i While the PC boots the screen remains dark for up to a minute depending on the system configuration To see the start up messages you can switch off this standard setting in the BIOS Setup in the Quiet Boot entry Ê Adjust the brightness if necessary see the Operating Manual for the monitor Some variants require you to start the software installation by pressing the function key F1 F1 F1 F1 i...

Страница 24: ...g system does not automatically switch the system unit off switch the system unit to ready to operate by pressing the ON OFF switch or turn it off by pressing the main switch if present when requested to do so If the system unit is ready to operate the power on indicator lights up orange The system unit uses a minimum of electricity The ON OFF switches do not separate the system unit from the line...

Страница 25: ...oppy disk or write protect tab on a 120 Mbyte floppy disk 5 Eject button for inserted floppy disks 6 Floppy disk is write protected 7 Floppy disk is not write protected Ê To insert a floppy disk push it into the drive in the insertion direction 1 until it engages The label should be facing upward Ê To remove the floppy disk press the eject button 5 The write protect slider enables you to protect t...

Страница 26: ...ombinations can be found in the documentation of the relevant application program ON OFF switch Depending on the setting in the BIOS setup the system can be switched on off or on and off with this switch With Windows 98 with ACPI or with Windows 2000 you can set additional functions of the ON OFF switch in the Control Panel On some keyboards the ON OFF switch can only be used with ACPI Otherwise t...

Страница 27: ...s in BIOS Setup The BIOS Setup menu allows you to set your hardware configuration and system functions When the PC is delivered the default entries are valid see Technical Manual for the system board or the manual BIOS Setup You can customize these settings to your requirements in BIOS Setup The Technical Manual for the system board shows you how to call and operate BIOS Setup The menus and settin...

Страница 28: ...g unauthorized system access Preventing unauthorized access to the settings of boards with their own BIOS Preventing system booting from the diskette drive Activating virus warnings Preventing unauthorized writing of diskettes Protecting BIOS from overwriting By combining these options you can achieve optimum protection for your system You will find a detailed description of the Security menus and...

Страница 29: ...nd the Ident No of your device Ê Contact your sales outlet or our customer service center Installing new software When installing programs or drivers important files may be overwritten and modified To be able to access the original data in the case of any problems following installation you should backup your hard disk prior to installation Power on indicator remains dark after you have switched o...

Страница 30: ...n has been blanked Ê Press any key on the keyboard or Ê Deactivate screen blanking screen saver Enter the appropriate password Brightness control is set to dark Ê Set the brightness control to bright For detailed information please refer to the Operating Manual supplied with your monitor Wrong monitor has been set under Windows NT Ê Restart the PC in standard VGA mode Ê Set the desired resolution ...

Страница 31: ...use controller is Enabled Ê Check that the mouse driver is properly installed and is present when the application program is started Detailed information can be found in the User Guide of the mouse or application program The floppy disk cannot be read or written Ê Check that the write protection of the floppy disk or the floppy disk drive is activated refer also to the Technical Manual of the syst...

Страница 32: ... you have too many applications running at once you may experience problems due to a lack of system resources If this happens you should close applications you do not require or call the applications in a different order BIOS settings in power management do not become active The Auto insert notification setting may be active for the CD ROM drive This setting causes Windows 9x to inquire about any ...

Страница 33: ... To prevent damage to the system board or the components and conductors on it please take great care when you insert or remove boards Take care above all to ensure that extension boards are slotted in straight without damaging components or conductors on the system board or any other components for example EMI spring contacts Be especially careful with the locking mechanisms catches centering pins...

Страница 34: ...tally removed from the line voltage Ê If any cables attached to the system unit are obstructing you pull out the connectors on the system unit Ê Place the system unit in a convenient working position a 1 1 1 2 3 2 Ê Loosen the screws 1 Ê Push the side cover in the direction of the arrow 2 until the distance a is approximately 10 mm Ê Lift off the top cover in an upward direction 3 ...

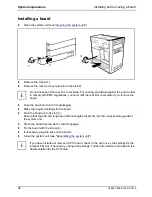
Страница 35: ... arrow 2 Ê Fasten the screws 3 Ê Return the system unit to its original position Ê If you have disconnected cables reconnect them at the rear Installing and removing a board Old ISA boards which require a 5 V power supply are not supported You can install boards which are up to 290 mm long The number position and arrangement of the board slots on system board can be found in the technical manual f...

Страница 36: ...ake the new board out of its packaging Ê Make the required settings for the board Ê Push the board up to its slot 3 Ensure that the end of a long board without angle bracket fits into the corresponding guide of the system unit Ê Press the board into the slot so that it engages Ê Fix the board with the screw 4 Ê If necessary plug the lines on the board Ê Close the system unit see Assembling the sys...

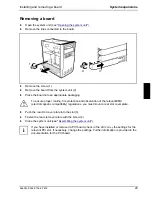
Страница 37: ...proper cooling fire protection and observation of the relevant EMC electromagnetic compatibility regulations you must mount a rear slot cover plate Ê Push the rear slot cover plate into the slot 3 Ê Fasten the rear slot cover plate with the screw 4 Ê Close the system unit see Assembling the system unit i If you have installed or removed a PCI board check in the BIOS Setup the settings for the rele...

Страница 38: ...r example CD ROMs to IDE port 2 see also the Technical Manual for the system board Installing an accessible drive Ê Open the system unit see Opening the system unit A B 1 2 Ê Pry the plastic drive cover A out of the front cover Ê Pry the shielding plate B on left hand side out of the bay i Do not throw away the covers For cooling protection against fire and in order to comply with EMC regulations ...

Страница 39: ...into the system unit 1 Ê Fasten the drive with the screws 2 Ê Plug the connectors of the data cable and the power supply cable into the drive 3 Make sure the polarity is correct Ê Close the system unit see Assembling the system unit i If necessary you must adapt the entry for the drive in the Setup menu ...

Страница 40: ...nd take the drive out of the system unit 3 For cooling protection against fire and in order to comply with EMC regulations you must refit the shielding plate A B Ê Insert the shielding plate B on the right hand side on the installation bay and press it in Ê Press the plastic drive cover A into the front panel until it snaps in place Ê Close the system unit see Assembling the system unit i If neces...

Страница 41: ... unit see Opening the system unit 2 3 1 Ê Pull the data and the power supply connectors from the floppy disk drive 1 Ê Remove the screw 2 Ê Take the drive cage out of the system unit 3 Ê Remove the screws Ê Take the new floppy disk drive out of its packaging Ê Replace the floppy disk drive Ê Fasten the drive with the screws ...

Страница 42: ...ith the screw 3 Ê Close the system unit see Assembling the system unit i If necessary you must adapt the entry for the drive in the Setup menu Replacing a hard disk drive Ê Open the system unit see Opening the system unit Removing the hard disk carrier 4 3 1 4 2 Ê Remove the screw 1 and push the hard disk carrier in the direction of the arrow 2 out of its securing lugs Ê Lift the hard disk carrier...

Страница 43: ... master slave stand alone on the drives Ê Replace the hard disk drive Ê Fasten the drive with the screws Installing the hard disk carrier 1 2 4 1 3 Ê Connect the cables to the hard disk drive 1 Ê Insert the hard disk carrier in the guide rail provided for this purpose on the casing 2 3 Ê Fasten the hard disk carrier with the screw 4 Ê Close the system unit see Assembling the system unit i If neces...

Страница 44: ...t see Opening the system unit Ê Make the required settings e g master slave on the hard disk drives Ê Fasten the drive with the four screws in the installation frame Ê Install the installation frame with the drive in the desired 5 slot see Installing an accessible drive Ê Close the slot with the panel Ensure that the cover engages Ê Close the system unit see Assembling the system unit ...

Страница 45: ...for the system board Ê Close the system unit see Assembling the system unit Replacing lithium battery Incorrect replacement of the lithium battery may lead to a risk of explosion The lithium battery may be replaced only with an identical battery or with a type recommended by the manufacturer Do not throw lithium batteries into the trashcan It must be disposed of in accordance with local regulation...

Страница 46: ...ing a board Ê Unscrew the screw on the system board rack 1 push the system board rack somewhat in the direction of the arrow 2 and then tilt it out upward 3 Replace the processor see the Technical Manual of the system board 3 2 1 Ê Fold the system board rack into the casing again 1 and push it back into its original position 2 Ê Fasten the screw 3 Ê Reinstall all boards see Installing a board Ê Cl...

Страница 47: ...ated the power consumption or the sound emission LWAd in energy saving mode may exceed the requirements for the environment symbol Blue Angel 30 W or 55 dB Processor 256 Kbyte cache Pentium III Processor at 933 MHz Main memory 128 Mbyte Floppy disk drive 1 44 Mbyte Hard disk drive 20 Gbyte Software Windows 98 SE Power management Advanced CD ROM drive 48fold LAN 10 100 Mbit Ethernet Controller Dime...

Страница 48: ......

Страница 49: ... BIOS Setup 19 configuration 19 security functions 20 system settings 19 Board 25 installing 28 removing 29 C Cable connecting 10 disconnecting 10 Casing assembling 27 CD ROM drive indicator 14 installing 30 manual 24 removing 32 CE certificate 5 Class B Compliance Statement 5 Cleaning 8 Clearance 39 Contents of delivery 9 Control key 19 Courier 1 Ctrl key 19 Cursor control keys 18 D Data electric...

Страница 50: ...ditions 39 Ergonomic video workstation 9 Error date 23 floppy 23 mouse 23 screen 22 system unit 21 time 23 Error message 24 ESD 25 Euro key 19 Expansion 25 External devices connecting 10 ports 11 F FCC statement 5 First time switching on 15 Floppy disk drive changing 33 indicator 14 removing 32 Floppy disk cannot be read or written 23 Function keys 18 G Game port 11 H Hard disk carrier installing ...

Страница 51: ... 8 connecting 12 Keyboard port 11 Keys 18 L LAN port 11 Line in 11 Line out 11 Lithium battery 37 replacing 37 M Main memory 37 Main switch 14 Manuals further 24 Manufacturer s notes 3 Memory insufficient 24 upgrading 37 Menu key 18 Microphone jack 11 Monitor connecting 12 transporting 7 Monitor port 11 Mouse cleaning 8 connecting 12 error 23 Mouse port 11 N No screen display 22 Noise level 39 Not...

Страница 52: ...PC cabling 10 cannot boot 21 cleaning 8 closing 27 connecting 10 connecting to power voltage 13 opening 26 ports 11 setting up 9 switching off 14 16 switching on 14 16 switching on for the first time 15 transporting 7 Ports external devices 11 Power cord selection 5 Power voltage connecting to 13 Power management 24 Power on indicator 14 dark 21 flashing 14 green 14 orange 14 POWERSAV SCR 4 Prepar...

Страница 53: ...l port 11 connecting devices 12 Setup see BIOS Setup Shift key 19 Soft Power Off 16 Software New Installation 21 Start key 18 Streamer installing 30 removing 32 Summer time 23 Surface 39 Symbols explanation of 1 System board rack installing 38 removing 38 System board extensions 37 System expansion 25 System unit see PC T Technical data 39 Time not correct 23 Tips 21 24 Top cover mounting 27 Trans...

Страница 54: ...Index 46 A26361 K554 Z100 2 7619 U Unpacking 9 USB Universal Serial Bus 11 V Ventilation area 39 VESA DPMS 4 Video workstation 9 W Weight 39 Winter time 23 ...

Отзывы: