background image

Inserting and removing modules

Working with the notebook

A26391-K113-Z120-5-7619

29

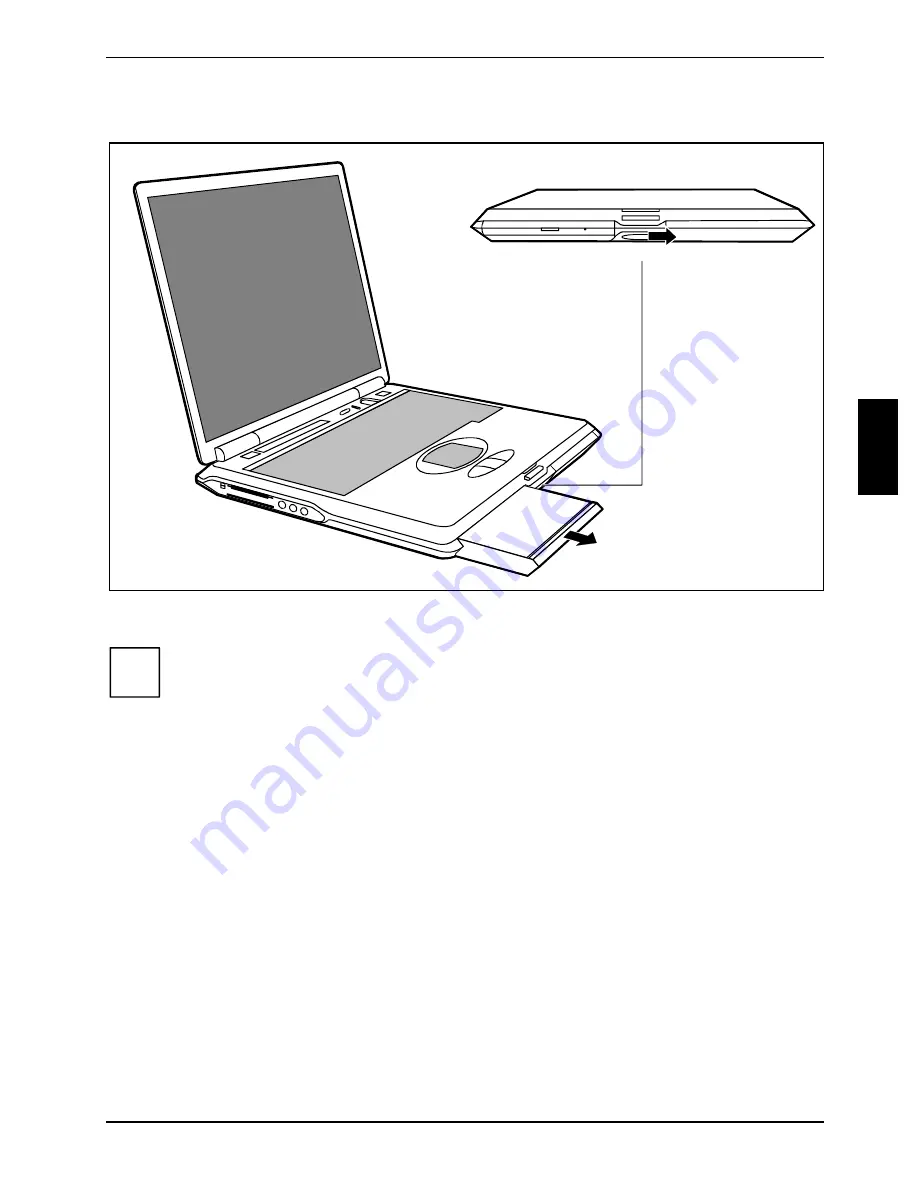
Removing modules

2

1

Ê


Push the slide in the direction of the arrow (1) up to the stop and hold it in place.

i

To remove the left-hand module, push the slide to the right. To remove the right-hand
module, push the slide to the left.

Ê


Remove the module the direction of the arrow (2).

Содержание CELSIUS Mobile A

Страница 1: ...CELSIUS EasyGuide CELSIUS Mobile A English ...

Страница 2: ...ould like to be clarified Please contact your sales partner your sales outlet Further information can be found in the Safety and Warranty manuals The latest information on our products tips updates etc can be found on the internet under http www fujitsu siemens com ...

Страница 3: ......

Страница 4: ...o impreso sobre papel reciclado Questo manuale è stato stampato su carta da riciclaggio Denna handbok är tryckt på recyclingpapper Dit handboek werd op recycling papier gedrukt Herausgegeben von Published by Fujitsu Siemens Computers GmbH Bestell Nr Order No A26391 K113 Z120 1 7619 Printed in the Federal Republic of Germany AG 1202 01202 A26391 K113 Z120 1 7619 ...

Страница 5: ...troduction Index Important notes Preparing the notebook for use Working with the notebook Security functions Connecting external devices Settings in BIOS Setup Troubleshooting and tips Memory expansion Technical data December 2002 edition ...

Страница 6: ...ation USA All other trademarks referenced are trademarks or registered trademarks of their respective owners whose protected rights are acknowledged Copyright Fujitsu Siemens Computers GmbH 2002 All rights including rights of translation reproduction by printing copying or similar methods in part or in whole are reserved Offenders will be liable for damages All rights including rights created by p...

Страница 7: ...ching the notebook off 14 Switching off the notebook via the operating system 14 Indicators 15 Keyboard 16 Key combinations 18 Touchpad and touchpad buttons 20 Display settings 21 Battery 21 Performing the battery learning cycle 22 Charging the battery 22 Monitoring the battery charging level 23 Inserting and removing the battery 23 Using the power management features 26 Energy saving modes of not...

Страница 8: ...Configuring and using fingerprint sensor 47 Activating fingerprint sensor 47 Using fingerprint sensor 49 Adding fingerprint 50 Deactivating fingerprint sensor 50 Troubleshooting 51 BIOS passwords 51 SmartCard reader 51 Fingerprint sensor 51 Connecting external devices 53 Ports 53 Connecting an external monitor 55 Connecting an external keyboard 56 Connecting an external PS 2 mouse 56 Connecting a ...

Страница 9: ...anel is difficult to read 66 The external monitor stays blank 67 The external monitor is blank or the image is unstable 67 The notebook cannot be started 68 The notebook stops working 68 The mouse does not work 69 The floppy disk cannot be written 69 The printer does not print 69 The notebook casing gets warm 69 Acoustic warnings 70 Error messages on the screen 70 Memory expansion 73 Removing and ...

Страница 10: ......

Страница 11: ...igned for fast bi directional data transfer You can connect peripheral devices such as a scanner loudspeakers gamepads keyboard or mouse via the two USB ports In addition your notebook is equipped with a TV Out connector to connect to a television For mouse control the notebook has a touchpad with touchpad buttons An audio controller two built in loudspeakers and a built in microphone provide your...

Страница 12: ...s may lead to loss of data invalidate your warranty destroy the notebook or endanger your life i Indicates important information which is required to use the system properly Ê Text which follows this symbol describes activities that must be performed in the order shown This font indicates screen outputs This font indicates programme names commands or menu items Quotation marks indicate names of ch...

Страница 13: ...evant notes in the Cleaning the notebook paragraph Only use batteries designed for this notebook Do not store batteries for longer periods in the notebook Take care not to drop the batteries or otherwise damage their casing fire risk If the rechargeable batteries are defective they must not be used Do not touch the contacts of the batteries Never interconnect the positive and negative terminals of...

Страница 14: ...r plug from the mains supply before inserting or removing boards containing ESDs Always hold boards with ESDs by their edges Never touch pins or conductors on boards fitted with ESDs Manufacturer s notes Keep this operating manual together with your device If you pass on the device to third parties you should include this manual Copyright protected technology This product incorporates copyright pr...

Страница 15: ...cy s EPA Energy Star Computers award The EPA estimates that computer equipment uses 5 percent of all business electricity and that this is growing rapidly If all desktop PCs and peripherals enter a low power mode when not in use the overall savings in electricity could amount to 2 milliard annually These savings could also prevent the emission of 20 million tons of carbon dioxide into the atmosphe...

Страница 16: ... To be able to use the optimum battery charging capacity you should work in the battery mode until the battery is completely discharged and then recharge the battery Transporting the notebook Please observe the points listed below when transporting your notebook Before you travel Back up important files stored on your hard disk If you are travelling abroad ensure that the power adapter can be oper...

Страница 17: ...t at http www e shop2 de Protect the notebook from severe shocks and extreme temperatures e g direct sunlight in a car Cleaning the notebook Ê Switch the notebook off Ê Pull the power plug of the network adapter out of the mains outlet Ê Remove the battery How to remove the battery is described in the section Inserting and removing the battery Do not clean any interior parts yourself leave this jo...

Страница 18: ......

Страница 19: ...eed to charge the battery if you want to operate your notebook with a rechargeable battery If you use the notebook in a normal office situation run it from the mains using the power adapter Unpacking and checking the delivery Ê Unpack all the individual parts Ê Check the delivery for damage incurred during transportation i Should you discover damages incurred during transportation notify your loca...

Страница 20: ...other objects 100 mm away from the notebook and its power adapter to ensure adequate ventilation Never cover the fan intake or exhaust openings of the notebook or the power adapter The power cable supplied conforms to the requirements of the country in which you purchased your notebook Make sure that the power cable is approved for use in the country in which you intend to use it The power adapter...

Страница 21: ...power cable to the power adapter 2 Ê Plug the power cable into the mains supply 3 The power indicator of the notebook lights up The battery will charge Ê Press the Suspend Resume button 4 and release it again The Suspend Resume button functions like an ON OFF switch The power on indicator on the notebook lights up After switch on a self test POST Power On Self Test is automatically carried out Nev...

Страница 22: ...stallation has been started the notebook must not be switched off During installation the notebook may only be rebooted when you are requested to do so Ê During installation follow the instructions on screen Consult the operating system manual if there is anything unclear about the requested input data i You will find further information about the system drivers utilities updates manuals etc on th...

Страница 23: ...rmation in the Important notes chapter Switching the notebook on 2 1 Ê Press the release button 1 and open the LED display panel 2 Ê Press the Suspend Resume button to switch on the notebook 3 The power on indicator on the notebook lights up i You can configure the Suspend Resume button under Start Settings Control Panel Power Options Power Options Properties If you have assigned a password you mu...

Страница 24: ...ched off Ê Close the LCD screen of the notebook 2 so that it locks into place Switching off the notebook via the operating system How you can switch off your notebook via the operating system is dependent on the settings of the power management feature Additional information is contained in the section Using the power management features in this chapter i Save all open files before switching the n...

Страница 25: ... indicator flashes 1 second on 1 second off The notebook is in energy saving mode The indicator is dark The notebook is switched off Battery indicator The battery charge state is indicated in the status indicator panel Power indicator The power adapter is supplying power to the notebook Speed Step indicator The indicator shows the processor performance see key combination Fn F5 The complete symbol...

Страница 26: ...e character printed on the upper left of the key appears when that key is pressed ScrLK Scroll indicator Scroll Lock The Scr key has been pressed The effect this key has varies from programme to programme PadLK PadLK Pad Lock indicator The Num LK key on the radio keyboard has been pressed The numeric keypad on the radio keyboard is enabled NumLK NumLK indicator Num Lock The Num LK key on the exter...

Страница 27: ... function causes all the characters you type to appear in uppercase In the case of overlay keys the character printed on the upper left of the key appears when that key is pressed To cancel the Caps Lock function simply press the Caps Lock key again Shift key The Shift key causes uppercase characters to appear In the case of overlay keys the character on the upper left of the keycap appears when t...

Страница 28: ...ators If the numeric keypad is enabled NumLK indicator is lit and you hold down the Fn key you can output the characters printed in blue on the bottom right of the keys Key combinations The following description of key combinations refers to functions when using Microsoft Windows Some of the following key combinations may not function in other operating systems and with some device drivers Other k...

Страница 29: ...Increasing the volume This key combination raises the volume of the integrated loudspeakers F8 Fn Reducing the volume This key combination reduces the volume of the integrated loudspeakers Fn F10 Switching between internal and external screen If an external monitor is connected the monitor on which the output is to be displayed can be selected with this key combination You can opt to use just the ...

Страница 30: ... a conventional mouse 1 2 1 Touchpad 2 Touchpad buttons Moving the pointer Ê Move your finger on the touchpad Selecting Ê Tap the touchpad once or press the left button once Executing a command Ê Tap the touchpad twice or press the left button twice Dragging an object Ê Move the pointer to the item you wish to select Ê Select the desired object and leave your finger on the touchpad Ê Drag the obje...

Страница 31: ...screen and an external monitor If the picture does not appear correctly on the LCD monitor press the key combination Fn F10 several times or switch the external monitor off and then on again This achieves good picture synchronisation Battery The battery is one of the most important components of your notebook When not plugged into a mains outlet the notebook runs on its built in battery You can in...

Страница 32: ...wing display briefly appears on the screen during start up ESC Diagnostic screen F12 Boot Menu F2 BIOS Setup F6 Battery learning Ê Press function key F6 The learning cycle is started When the learning cycle is ended a corresponding message is displayed Charging the battery The battery indicator displays the remaining battery charge see the Indicators chapter When you switch on the notebook it take...

Страница 33: ...60 40 20 You can also see the battery s charging state on the battery itself There are five indicators next to the finger icon on the battery telling you what percentage of the battery is charged Ê Press the finger icon The corresponding indicator lights up i If no power adapter is connected to the notebook the keyboard battery will be charged by the notebook battery Even if the notebook is switch...

Страница 34: ...tebook Battery 24 A26391 K113 Z120 5 7619 Removing the battery 2 1 Ê Push the slide in the direction of the arrow 1 up to the stop and hold it in place Ê Pull the battery out of the casing in the direction of the arrow 2 ...

Страница 35: ...book A26391 K113 Z120 5 7619 25 Installing the battery 2 1 Ê Push the slide in the direction of the arrow 1 up to the stop and hold it in place Ê Position the battery at the edge of the casing 2 and then press it into the notebook ...

Страница 36: ...move RAM Do not add or remove a PC card Do not replace or remove the battery Energy saving modes of notebook You can set two energy saving modes with your notebook In the Suspend mode Suspend to DRAM Standby all current data active programmes files are buffered in the main memory and in the Save to Disk mode Save to Disk HibernateMode all current data are saved on the hard disk Then the notebook i...

Страница 37: ...spend to DRAM In this mode the current data in the main memory DRAM is stored The data is stored for as long as the notebook is supplied with energy If the battery is full the data is stored for a matter of days Without a battery and without a power supply the current data is lost Save to Disk So that the current data can be saved sufficient memory must be available on the hard disk If the operati...

Страница 38: ...ctivity takes place for a time period defined in the BIOS Setup This parameter is set in the Power menu in the BIOS Setup When the hard disk is accessed the motor of the hard disk drive is automatically switched on again Hard disk The hard disk is the most important storage medium of your notebook You can work considerably faster and more efficiently if you copy applications and files from floppy ...

Страница 39: ...19 29 Removing modules 2 1 Ê Push the slide in the direction of the arrow 1 up to the stop and hold it in place i To remove the left hand module push the slide to the right To remove the right hand module push the slide to the left Ê Remove the module the direction of the arrow 2 ...

Страница 40: ...ush the slide in the direction of the arrow 1 up to the stop and hold it in place i To install the left hand module push the slide to the right To install the right hand module push the slide to the left Ê Position the module at the edge of the casing 2 and then press it into the notebook Ê Release the slide 2 ...

Страница 41: ... areas subject to high temperatures or humidity You may use both 8 cm and 12 cm CDs DVDs in the optical drive When using CDs DVDs of poor quality vibrations and reading errors may occur Optical drive indicator The indicator flashes when a CD DVD is inserted The indicator goes out when the drive is ready to operate The indicator lights up when the drive is accessed i If the indicator does not go ou...

Страница 42: ...floppy disk drive Never clean the floppy disk drive with cleaning disks Any attempt would destroy the read write head in the disk drive within 20 seconds Make sure that no floppy disk is inserted in the floppy disk drive during transport Otherwise the eject button may break off and the floppy disk drive will be damaged Working with floppy disks i Follow the instructions supplied by the vendor of t...

Страница 43: ... notebook The 56k modem supports all data communication applications such as Modem operation High speed downloads at up to 56 000 bit s V 90 Downward compatible to V 34 modems Fax mode Transmitting and receiving at up to 14 400 bit s Simple country adaptation with programme The modem complies with the EU Directive 91 263 EEC Telecommunications terminal equipment directive and has been checked in a...

Страница 44: ...cable is busy The cable cannot be used for other communication devices at the same time Pull the modem plug out of the TAE N power socket after the data transfer because also with connected cable no other communication devices can be used Connecting IEEE1394 FireWire Peripheral devices such as digital audio video devices or other high speed devices can be connected via IEEE1394 FireWire Your noteb...

Страница 45: ...alling a PC card Ê Insert the PC card contacts first into the lower slot guide The labelled side of the PC card should be facing upward Ê Gently push the PC card into the slot until you feel it click into place i Consult the documentation supplied with the PC card for information on how to install the necessary device drivers For further information refer to the information files e g TXT DOC WRI o...

Страница 46: ...card 1 2 Ê Press the eject button 1 The PC card will project further out of the notebook s case If the eject buttons are pushed in flush with the notebook casing they must first be snapped out Press the eject buttons until they snap out Ê Slide the PC card out of the notebook 2 ...

Страница 47: ...akers 1 2 1 built in microphone 2 built in loudspeakers Your notebook contains a built in microphone 1 and two loudspeakers 2 If you attach an external microphone the built in microphone is disabled The internal loudspeakers switch off when you attach headphones or external loudspeakers to the audio jack ...

Страница 48: ......

Страница 49: ...quipment Kensington Lock With the Kensington MicroSaver a sturdy steel cable you can protect your notebook from theft For this reason your notebook is equipped with a device for the Kensington MicroSaver The Kensington MicroSaver is available as an accessory Password protection You can protect you personal data from unauthorised access with various passwords By combining these different options yo...

Страница 50: ... use the fingerprint sensor under any operating system Brief overview of the security functions Security function Type of protection Preparation Kensington Lock Mechanical Mount and lock Kensington MicroSaver accessory BIOS password protection Password protection for BIOS Setup operating system and hard disk with Supervisor and User password The passwords consist of a maximum of eight alphanumeric...

Страница 51: ...uppercase and lowercase characters Before you exploit the various options of the password protection for your data security in the BIOS Setup please note the following points Please keep in mind your passwords in any case as you will not be able to access your BIOS setup and or your system any longer if you forget both the user password and the supervisor password Deletion of passwords at the fact...

Страница 52: ...tice Changes have been saved you receive a confirmation that the new password has been saved Ê To assign the user password mark the field Set User Password and proceed exactly as when configuring the supervisor password If you do not want to make any other settings you can exit BIOS Setup Ê Select the Exit Saving Changes option in the Exit menu The notebook is rebooted and the new password is effe...

Страница 53: ...on Ê Call BIOS Setup and select the Security menu Ê Mark the Password on Boot field and press the Enter key Ê Select Disabled and press the Enter key If you do not want to make any other settings you can exit BIOS Setup Ê Select the Exit Saving Changes option in the Exit menu The notebook reboots and there is no longer any password protection for the operating system Password protection for hard d...

Страница 54: ...omponents from the Security Drivers Tools CD SmartCards SmartCards are not supplied as standard equipment You can use all SmartCards that comply with the ISO standard 7816 1 2 or 3 These SmartCards are available from various manufacturers Under Windows 2000 or Windows XP we recommend the SICRYPT card as the drivers for this SmartCard are already preinstalled under Windows 2000 and Windows XP With ...

Страница 55: ...must have already booted your system with the SmartCard and the current PIN Ê Pull the SmartCard out of the SmartCard holder and reinsert the SmartCard when requested to do so The window with the request for the PIN entry opens You will also find a button marked Options here Ê Click on Options and select the Change PIN on request option In the next window you can change your User or Admin PIN Ê Fi...

Страница 56: ...to interrupt your work Thanks to the SmartCard you can leave your notebook unattended without unauthorised persons being able to access your opened documents and data Ê Pull the SmartCard out of the notebook during your work session A window appears stating that the system is locked Ê When you want to continue your work insert the SmartCard and enter your PIN You return to your opened documents Sm...

Страница 57: ...e already defined a supervisor and a user password you have to delete these passwords now Follow the instructions in Protecting BIOS Setup supervisor and user password chapter Ê Select the Supervisor Fingerprint Menu field and mark the Enable entry Ê Then select the User Fingerprint Menu field and mark the Enable entry Ê Select the Exit Saving Changes option in the Exit menu The notebook reboots a...

Страница 58: ...o your system in case a finger is injured It is best to use fingers of both hands for registration Ê Press Esc after registration is completed If you have not yet enough fingers read a warning is issued Otherwise you enter the menu to register the user fingerprint USER Fingerprint Security Menu Registering user fingerprint Register several fingers here as well Ê Press the N key Ê Press the fingerp...

Страница 59: ...e sensor Place one of your registered fingertips supervisor or user fingerprint on the sensor Your notebook boots i If the fingerprint sensor does not recognise your fingerprint immediately a note is issued Sorry not accepted Next time when placing the fingertip on the sensor slightly change the contact position After several failed attempts the system is shut down and you have to reboot ...

Страница 60: ...Menu field and mark the Enable entry Ê Select the User Fingerprint Menu field and mark the Enable entry Ê Select the Exit Saving Changes option in the Exit menu When rebooting you enter the SUPERVISOR Fingerprint Security Menu Ê Press the Esc key The USER Fingerprint Security Menu is called Ê Press the N key Ê Press the required fingertip on the fingerprint sensor several times in a row Follow the...

Страница 61: ...tact our help desk The help desk will refer you to our service partner who will unlock your notebook for a charge You must provide proof of ownership for the notebook beforehand SmartCard reader Your SmartCard is not recognised Make sure you have inserted your SmartCard into the SmartCard holder with the chip facing upward Also make sure you are using a supported SmartCard Your SmartCard must comp...

Страница 62: ......

Страница 63: ...f all power and equipment switches 2 Remove all power plugs from the mains outlets 3 Connect all the cables to the notebook and the external devices 4 Plug all data communication cables into the utility sockets 5 Plug all power cables into the mains supply Disconnecting devices from notebook 1 Turn off all power and equipment switches 2 Remove all power plugs from the mains outlets 3 Unplug all da...

Страница 64: ...Connecting external devices Ports 54 A26391 K113 Z120 5 7619 Line In Connections on the left side 1394 Connections on the right side ...

Страница 65: ...mentation Connecting an external monitor An external monitor can be connected to the digital monitor port of the notebook Using the Fn F10 key combination you can switch back and forth between the external monitor and the LCD screen If your notebook is equipped with a TFT monitor you can display the same picture on the external monitor and the LCD screen simultaneously Ê Switch off the notebook an...

Страница 66: ...ting an external keyboard You do not need to switch your notebook off Ê Simply connect the external keyboard to the PS 2 port on your notebook Connecting an external PS 2 mouse You do not need to switch the notebook off Ê Simply connect the mouse to the PS 2 port on your notebook Connecting a serial mouse Ê Switch the notebook off Ê Connect the mouse to the parallel port on your notebook Ê Switch ...

Страница 67: ...hat also have a USB port e g a printer a scanner or a modem i USB devices are hot pluggable This allows cables from USB devices to be connected and disconnected with the system switched on Additional information can be found in the documentation for the USB devices Ê Connect the data cable to the external device Ê Connect the data cable to a USB port i Device drivers The devices you connect to the...

Страница 68: ...docking device before you can dock the notebook For this notebook you require the device platform W 1 1 2 Ê Hold the Tray at an angle over the docking device and push the Tray straight into the notches in the docking device 1 Ê Press down the front corners of the Tray 2 until they engage Removing the Tray 2 1 2 Ê Push the release 1 in the direction of the arrow until the Tray is released on both s...

Страница 69: ...e into operation see documentation for the docking devices Ê Mount the suitable Tray on the docking device Ê Switch the notebook off Ê Disconnect all cables connected to notebook Ê Make sure that the PC card eject buttons of the notebook are pressed in Ê Place your notebook on the docking device and push it evenly in the direction of the arrows until you feel it engage Switching on docked notebook...

Страница 70: ...he notebook when you dock the notebook The notebook must be in the battery mode Ê Put your docking device into operation see documentation for the docking devices Ê Mount the suitable Tray on the docking device Ê Disconnect all cables connected to notebook Ê Make sure that the PC card eject buttons of the notebook are pressed in Ê Place your notebook on the docking device and push it evenly in the...

Страница 71: ...d on your notebook that supports Plug Play and hot docking e g Windows 98 you need not switch off the notebook for undocking The notebook may also be in an energy saving mode You must prepare the notebook for undocking Ê To do this select Eject PC in the Start menu or Ê Press the key combination Fn F2 The notebook then ends all connections to the docking device ...

Страница 72: ......

Страница 73: ...y configuration Exit to exit the BIOS Setup Start BIOS Setup Ê Restart the notebook switching ON OFF or warm boot The following display briefly appears on the screen during start up ESC Diagnostic screen F12 Boot Menu F2 BIOS Setup F6 Battery learning Ê When this message appears press the key F2 i If BIOS Setup is protected by a password or fingerprint Ê Enter the password and press the Enter key ...

Страница 74: ...g Changes Select Exit Saving Changes and Yes to save the current settings and exit the BIOS Setup The device is rebooted and the new settings come into effect Exit Discard Changes Select Exit Discard Changes and Yes to discard the changes you have made The settings which were in force when BIOS Setup was called remain effective BIOS Setup is terminated and the device is rebooted Load Setup Default...

Страница 75: ...ess the original data in the case of any problems following installation you should backup your hard disk prior to installation Restoring the contents of the hard disk under Windows Using the Windows Recovery CD and the CELSIUS Mobile Driver CD you can restore the operating system of your notebook During restoring the operating manual the contents of your hard disk will be overwritten After this o...

Страница 76: ...sk Battery indicator does not illuminate Battery is not installed or is defective If the battery status indicator does not light up either no battery is installed or there is no contact between the notebook and the battery Ê Check whether the battery is installed correctly in its compartment It may be necessary to replace the battery with a new one When you dispose of used batteries please observe...

Страница 77: ...ck whether the power adapter is plugged properly into the external monitor and into the power socket Ê Check whether the data cable is properly connected to the notebook and the external monitor if it is plugged in with a connector Ê Switch on the external monitor and the notebook The external monitor is blank or the image is unstable Two causes are possible An incorrect type has been selected for...

Страница 78: ...h the notebook off Ê Check whether the power adapter is connected correctly to the notebook Ê Check whether the power cable is plugged properly into the power adapter and into the mains outlet Ê Switch the notebook on The notebook stops working If the notebook stops working this may have the following reasons The notebook is in Standby or Suspend mode Ê Reactivate the notebook by pressing a key St...

Страница 79: ...n adapter or extension lead with the mouse cable check the connections Ê Switch the notebook on The floppy disk cannot be written Ê Check whether the disk is OK and is not write protected The printer does not print Ê Make sure that the printer is switched on and is on line see the manuals supplied with the printer Ê Check that the cable connecting the notebook and the printer is connected properly...

Страница 80: ...chase or our hotline help desk System CMOS checksum bad Default configuration used The system configuration information is incorrect Ê Restart the notebook Ê Enter the BIOS Setup programme by pressing F2 Ê Select the Exit menu in the BIOS Setup Ê Select the Default Setup entry and click on OK If the error message appears repeatedly please contact the place of purchase or our hotline help desk Inse...

Страница 81: ...e parameter for floppy disk drive A has been set to the format 1 44 Mbyte 3 1 2 inch Keyboard controller error Ê Switch off the notebook with the Suspend Resume button Ê Wait 3 5 seconds and switch on the notebook again If this error message appears again please contact your point of sale or our hotline help desk Keyboard error If you use an external keyboard Ê Check the connection and reboot the ...

Страница 82: ...o do so Real Time clock error Ê Contact your sales outlet or our hotline help desk nnnnK Shadow RAM failed at offset xxxx Failing Bits zzzz Ê Contact your sales outlet or our hotline help desk System battery is dead Replace and run SETUP Ê Contact your sales outlet or our hotline help desk System cache error Cache disabled Ê Contact your sales outlet or our hotline help desk nnnnK System RAM faile...

Страница 83: ...s SD RAM JEDEC 144 pin SO DIMM 3 3 V Never use force when installing or removing memory modules Make sure that foreign objects do not fall into the memory module compartment The main memory of your notebook can be expanded to a maximum of 10242 Mbyte with another memory module The notebook will not start without memory modules as no fixed main memory is installed Removing and installing memory ext...

Страница 84: ... in the direction of the arrow 2 Ê Pull off the cover from the notebook in the direction of the arrow 3 Installing memory modules 1 3 1 2 a b a Front b Right side panel Ê Carefully push the two mounting clips outwards 1 Ê Insert the memory module contacts first into the slot 2 Ê Carefully push the memory module downwards until you feel it latch into place 3 ...

Страница 85: ...odule will flap upward 2 Ê Pull the memory module out of its slot 3 Mounting the cover 3 2 1 a b a Front b Right side panel Ê Place the cover on its mounting location 1 Ê Close the cover on the bottom of the notebook 2 Ê Fasten the cover with the screws 3 Ê Refit the battery Ê Place the notebook right side up on a flat stabile nonslippery surface Ê Reconnect the cables ...

Страница 86: ......

Страница 87: ... drive Combo drive CD RW DVD second hard disk drive third hard disk drive Electrical data Regulations complied with EN60950 IEC60950 UL1950 CSA22 2 No 950 ISO9241 FCC Part 15 Class B Protection class III Maximum power draw notebook on with battery charging 80 W LCD display panel Display diagonal 15 inch UXGA TFT LVDS port Supported screen resolution max UXGA 1400x1050 Graphics Chip ATI Mobility Ra...

Страница 88: ... PS 2 port 6 pin mini DIN female connector Parallel port 25 pin female connector bi directional ECP capable Monitor port Female connector DVI I 24 and 5 pin digital and analogue Serial port 9 pin male connector RS232C Microphone jack connector mono Digital Line In headphone port SP DIF connector stereo S Video Out port 7 pin mini DIN female connector Modem port Female connector RJ 11 once USB port...

Страница 89: ...n battery and DVD included Battery Rated voltage 11 1 V Rated capacity 66 Wh Charging time when not in operation 3 hours Operating time with a battery approx 3 hours without power management Power adapter Primary Rated voltage 100 V to 240 V automatic Frequency 50 Hz to 60 Hz automatic Max rated current 1 5 A Secondary Rated voltage 19 V Max rated current 4 2 A You can readily order an additional ...

Страница 90: ......

Страница 91: ...enance 22 Beep error message 70 BIOS passwords handling problems 51 BIOS Setup 63 cancel supervisor password 42 cancel user password 42 change supervisor password 42 change user password 42 exiting 64 operating 63 password protection 41 protect with password 42 set supervisor password 42 set user password 42 settings 63 starting 63 Board 4 Buffer battery load 66 C CapsLK indicator 16 CardBus see P...

Страница 92: ...al CD DVD 32 Energy consumption 26 Energy saving 5 Energy saving functions 5 26 additional 27 closed cover switch 27 hard disk timeout 28 power button 28 standby timeout 28 Energy saving modes 26 setting 27 Enter key 17 Error message acoustic 70 on the screen 70 Error correction 65 ESD 4 External devices connecting 57 External monitor is blank 67 synchronising the display 21 F Fingerprint adding 5...

Страница 93: ... cleaning 7 external 56 Keyboard port 56 L LAN port 55 LAN integrated 34 LCD screen cleaning 7 increasing the brightness 19 21 is blank 66 opening 13 reducing the brightness 19 21 reflected glare 66 remains blank 66 setting the Desktop Area 21 setting the font size 21 settings 21 synchronising the display 21 technical data 77 LCD display 15 Lifetime battery 21 Loudspeaker 37 switching off on 19 M ...

Страница 94: ...5 energy saving 5 manufacturer 4 safety 3 transporting 6 Numeric keypad 18 NumLK indicator 16 O Operating from the battery 26 Operating system Activating system protection 43 Cancel system protection 43 restoring 65 Optical drive 31 indicator 16 31 P Packing material 9 Parallel port 55 56 Password protection 39 BIOS password 39 BIOS Setup 41 Hard disk 39 43 Operating system 39 Passwords forgotten ...

Страница 95: ...dby mode terminating 68 Standby Timeout 28 Start disk for Windows ME 65 Start key 18 Storage battery 6 Summer time 66 Supervisor password 39 Survey security functions 40 Suspend mode terminating 68 Suspend to DRAM 27 Suspend Resume button 13 Symbols display field 15 Synchronisation screen display 21 System configuration 63 System settings BIOS Setup 63 T Technical data 77 Time daylight savings 66 ...

Отзывы: