background image

90

91

Viewing

Images

6

5

1

Press “

a

” or “

b

” to select “

u

PRINT DPOF”.

2

Press “

c

”.

!

When [

u

NOT SET DPOF] appears, the DPOF settings are

not specified.

!

To use DPOF printing, the DPOF settings must be specified
on FinePix Z2 beforehand (

P.55, 57).

!

Even when “WITH DATE” is specified in the DPOF settings,
the date is not inserted on printers that do not support date
printing.

PRINT WITH DATE

PRINT WITH DATE
PRINT WITHOUT DATE

PRINT WITHOUT DATE

P R I N T   D P O F

P R I N T   D P O F

O K

O K

P I C T B R I D G E

P I C T B R I D G E

0

1

0

2

6

u

PRINT DPOF OK?” appears on the LCD

monitor.
Press the “MENU/OK” button to download the data
to the printer and print the frames specified in the
DPOF settings.

!

Press the “DISP/BACK” button to cancel the printing.
Depending on the printer, the printing may not be canceled
immediately or printing may stop midway through. When
printing stops midway, briefly turn the camera off and then on
again.

4

“CHECKING USB” appears and then the menu is
displayed on the LCD monitor.

!

If the menu does not appear, check whether the “

ò

” USB

MODE setting is “

®

” PICTBRIDGE.

!

Depending on the printer, some functions are disabled. 

CHECKING USB

CHECKING USB

PICTBRIDGE

PICTBRIDGE

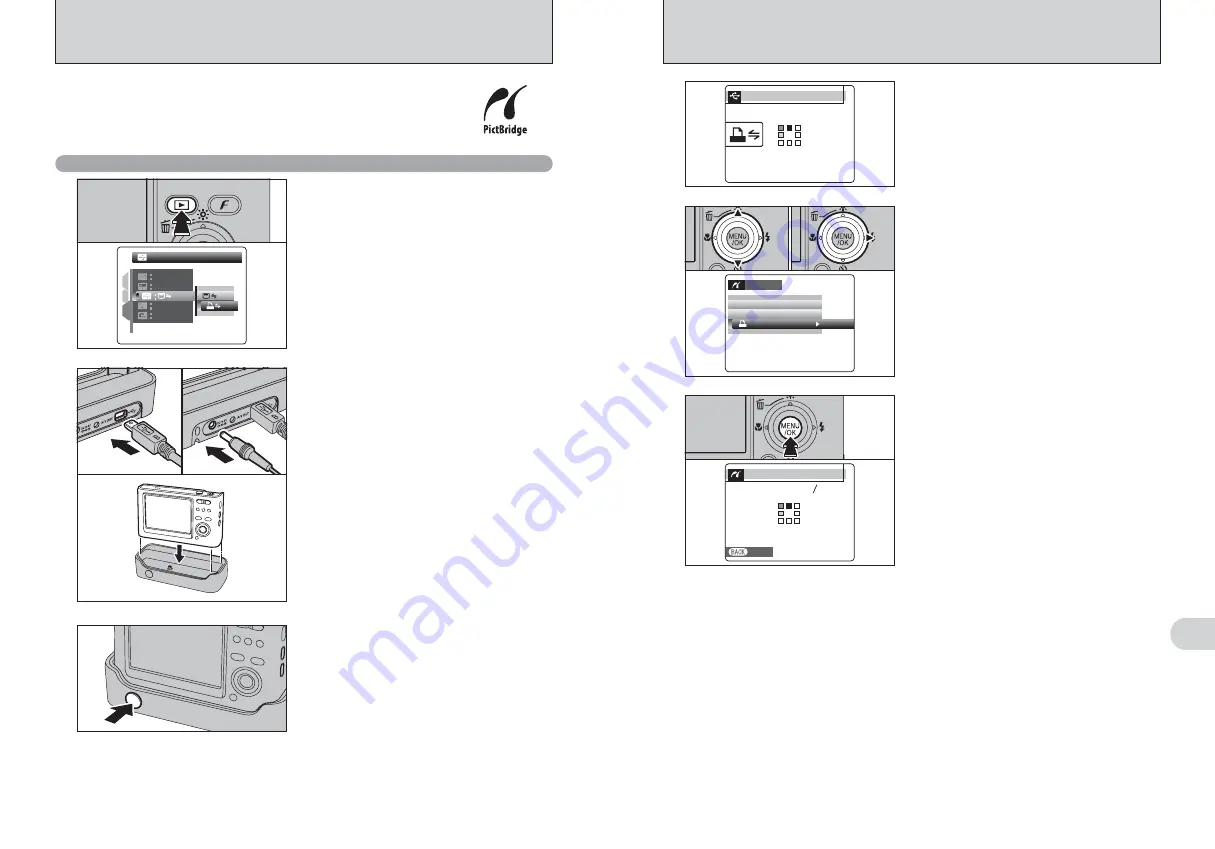
When a printer that supports PictBridge is available, images can be printed
by connecting the camera directly to the PictBridge-compatible printer
without a PC.

!

In PictBridge function, images photographed on other than a camera may not be printed.

6.2.1 Specifying images for printing on the camera

1

Press the “

w

” button for about 1 second to turn

the camera on in Playback mode.

2

Select “

®

” PICTBRIDGE in “

ò

” USB MODE

in the “

˜

” SET-UP menu (

P.78).

3

Turn the camera off.

!

Do not connect to a PC when the “

ò

” USB MODE setting is

set to “

®

” PICTBRIDGE. See P.108 if you connect to a PC

by mistake.

1

P I C T B R I D G E

P I C T B R I D G E

ENGLISH

ENGLISH
SET

SET

NTSC

NTSC

1

3

2

OK

OK

0

1

0

2

6.2 CONNECTING THE CAMERA DIRECTLY TO THE PRINTER

— PictBridge FUNCTION

2

1

Connect the cradle to the printer using the USB
cable (mini-B).

2

Plug the AC power adapter connector into the
“DC IN 5V” socket on the cradle and then plug
the AC power adapter into the power outlet.

3

Set the camera in the cradle.

4

Turn the printer on.

!

Plug the camera securely and vertically into the cradle
connecting plug.

!

The camera cannot be used to specify printer settings such
as the paper size and print quality.

!

Use an 

xD-Picture Card

that was formatted on FinePix Z2.

Press the “POWER” button on the cradle.

3

S H E E T S

S H E E T S

P R I N

I N T I N G

I N G

C A N C E L

C A N C E L

111 19

19

19

19

0

1

0

2

3

Содержание FinePix Z 2

Страница 1: ...show you how to use your FUJIFILM DIGITAL CAMERA FinePix Z2 correctly Please follow the instructions carefully OWNER S MANUAL 1 2 3 4 5 6 Getting Ready Settings Using the Camera Advanced Features Software Installation Viewing Images ...

Страница 2: ...Ownership All copyrights and other proprietary rights to Software and Documentation are owned and retained by FUJIFILM or the third party suppliers as indicated on or in Software or Documentation Nothing contained herein shall be construed expressly or implicitly as transferring or granting any right license or title to you other than those explicitly granted under this Agreement 5 Limited Warrant...

Страница 3: ...uous shooting 48 h Long period continuous shooting 49 Í AF MODE 50 Ï CENTER 50 PHOTOGRAPHY MENU p PHOTO MODE PHOTOGRAPHY PHOTOGRAPHY FUNCTIONS 3 Advanced Features MULTI 50 B PLAYBACK Ò ERASING SINGLE ALL FRAMES 51 Ú IMAGE ROTATE 53 HOW TO SPECIFY PRINT OPTIONS DPOF 54 SPECIFYING DPOF SETTINGS EASILY 55 DPOF SET FRAME 57 DPOF ALL RESET 59 Ü PRINTING BY FUJIFILM MOBILE PRINTER 60 Ç PROTECTING IMAGES...

Страница 4: ...red in the U S and other countries h Microsoft Windows and the Windows logo are trademarks or registered trademarks of Microsoft Corporation in the United States and or other countries Windows is an abbreviated term referring to the Microsoft Windows Operating System The Designed for Microsoft Windows XP logo refers to the camera and the driver only h Other company or product names are trademarks ...

Страница 5: ...power input socket Place the camera vertically in the cradle when setting or removing it Camera parts and features Refer to the pages in parentheses for information on using the camera parts or features The Cradle Use the cradle as a convenience tool for your camera h Setting the camera in the cradle to charge the battery P 14 h Displaying your images on a TV P 89 h Transferring image files quickl...

Страница 6: ...t the battery is firmly held in place LOADING THE BATTERY AND THE MEDIA 1 Getting Ready 1 Check that the camera is turned off before opening the battery cover If opening the battery cover while the camera is still on the camera will turn off Do not apply force to the battery cover Compatible battery Always use the Rechargeable Battery NP 40 included The use of other brands of rechargeable battery ...

Страница 7: ... The display will shortly go blank and the camera will stop working Replace or recharge the battery Blinking red Lit white Lit white 1 2 4 Lit red 3 Turn the camera on and check the battery level indicator on the LCD monitor Á Ä or à appears as a small icon on the left hand side of the LCD monitor Depending on the camera mode the transition from à to V may occur more quickly Due to the nature of t...

Страница 8: ...ket outlet shall be installed near the equipment and shall be easily accessible The shape of the plug and socket outlet depends on the country of use Check that the camera is turned off Set the camera in the cradle Only connect and disconnect the AC power adapter when the camera is off Connecting or disconnecting the AC power adapter while the camera is on temporarily interrupts the power supply t...

Страница 9: ... MM D DD 1 1 1 1 1 1 2 2 2 2 1 1 1 0 0 0 00 0 0 0 AM 2 1Press d or c to select Year Month Day Hour or Minute 2Press a or b to correct the setting 0 1 0 2 3 Once you have set the date and time press the MENU OK button Pressing the MENU OK button changes the camera to Photography or Playback mode At the time of purchase and after leaving the camera for a long period with the battery removed settings...

Страница 10: ...uously When the time displayed passes 12 the AM PM setting changes SELECTING THE LANGUAGE 1 1Press the MENU OK button to display the menu on the LCD monitor 2Press a or b to select SET UP 0 1 0 2 The screens in this manual are shown in English See P 78 for more information on the SET UP menu 3 1Press a or b to select ô 2Press c LANG LANG LANG LANG OK OK NTSC NTSC 1 3 2 SET SET ENGLISH ENGLISH DEUT...

Страница 11: ...tton indicated In the right side LCD monitor press the MENU OK button to erase the displayed frame To cancel erasing press the DISP BACK button Up down left and right are indicated by black triangles in the Owner s Manual Up or down is shown as a or b and left or right is shown as d or c Displaying the on screen Help DISP BACK button DISP Press this button to select the LCD monitor display BACK Pr...

Страница 12: ...icture camera shake Place the camera on a stable surface to prevent camera shake particularly for shots in the dark when the selected flash mode is Suppressed flash There may be some uneven brightness at the lower edge of the LCD monitor This is normal and does not affect the photographed image 4 Press T telephoto button to zoom in Press W wide angle button to zoom out A zoom bar appears on the LC...

Страница 13: ...s Blinking red i xD Picture Card Warnings No card inserted card not formatted incorrect format card full and xD Picture Card error i Lens operation error Detailed warning messages appear on the LCD monitor P 105 106 INDICATOR LAMP DISPLAY TAKING PICTURES AUTO MODE PHOTOGRAPHY MODE Standard number of frames per xD Picture Card The table below shows the standard number of frames for a new xD Picture...

Страница 14: ...n the main subject at the intersection of two lines in this frame or align one of the horizontal lines with the horizon Use this frame as a guide to the subject s size and the balance of the shot while composing a shot The framing guideline is not recorded on the image The lines in the scene frame divide the image into 3 roughly equal parts horizontally and vertically The resulting printed image m...

Страница 15: ... may take longer to appear Changing to Sorting by date mode displays the images taken on the same day as the image selected in Multi frame playback mode 2 3 2005 2005 2005 1 9 10 22 10 22 10 22 10 23 10 23 10 23 10 24 Press a b d or c to move the cursor colored frame to the selecting frame 2005 2005 2005 1 9 10 22 10 22 10 22 10 23 10 23 10 23 10 24 VIEWING THE IMAGES w PLAYBACK PLAYBACK MODE Pres...

Страница 16: ... CANCEL ERAS ERASE E OK OK 3 0 1 0 2 Playback zoom Press the T or W button during single frame playback to zoom the image A zoom bar appears on the LCD monitor Press a b d or c to display another part of the image The current displayed image appears on the navigation screen Playback zoom cannot be used with multi frame playback Press the DISP BACK button to cancel playback zoom Zoom bar Navigation...

Страница 17: ... the subject from being overexposed or underexposed and to show the substance and textures of the subject clearly Use exposure compensation Select if the background is pale and if the background is dark Specify the camera settings for taking pictures to get the best result A general guide is given below 1 Select the Photography mode P 45 46 AUTO Auto Specifies all settings other than Quality Sensi...

Страница 18: ...re the picture is taken and then fires again to take the actual picture The flash fires as required by the shooting conditions If pressing the shutter button while the flash is charging the picture will be taken without the flash Red eye effect When using the flash to take a picture of people in low light conditions their eyes sometimes appear red in the picture This is caused by the light of the ...

Страница 19: ...camera shake 1 N N N 12 12 12 12 OFF 0 1 0 2 36 d FLASH PHOTOGRAPHY PHOTOGRAPHY FUNCTIONS d Forced flash Use this mode in backlit scenes such as a subject against a window or in the shade of a tree or to get the correct colors when taking a picture under bright lighting In this mode the flash fires in bright as well as dark conditions v Suppressed flash Use this mode for taking pictures using indo...

Страница 20: ...p PHOTO MODE PHOTOGRAPHY 38 This is useful when checking the shot composition for dimly lit scenes Slow synchro shots etc 1 Set the Mode switch to q Press the fi a button appears on the LCD monitor and the subject is displayed brightly To cancel increased brightness Press the fi a button again This function is automatically cancelled after each shot When this function is active it will increase the ...

Страница 21: ...ensitivity setting the camera selects the best sensitivity setting for the subject s brightness 1 2 0 1 0 2 PHOTO MODE PHOTO MODE PHOTO MODE PHOTO MODE 800 1600 200 100 64 AUTO AUTO 400 ISO ISO AUTO AUTO STD STD N 0 1 0 2 û SENSITIVITY p PHOTO MODE PHOTOGRAPHY 40 Area shot and quality setting Normal shooting provides an aspect ratio of 4 3 and shooting provides an aspect ratio of 3 2 same aspect r...

Страница 22: ...OLOR setting is retained even when the camera is off or the mode setting is changed In r Movie mode do not set the ü FinePix COLOR setting 4 p CHROME may have little visible effect with some subjects such as close up shots of people portraits Because the effects on the image differ depending on the scene being shot in p CHROME mode take pictures in p STANDARD mode as well as this mode Note that yo...

Страница 23: ...SETTING PHOTOGRAPHY MENU PHOTOGRAPHY MENU ˇ Shooting mode P 45 Specify s MANUAL AUTO À NATURAL LIGHT m PORTRAIT LANDSCAPE SPORT or NIGHT Exposure compensation P 46 Use this setting when the correct exposure cannot be obtained H AF mode P 50 Set the focusing method White balance P 47 Change this setting to suit for the surroundings and lighting â High speed shooting P 47 Use this setting to reduce ...

Страница 24: ...on on EV Any of the following disables exposure compensation i Using the flash in Auto or Red eye reduction mode i Shooting dark scenes in Forced flash mode Shooting mode Explanation Available flash modes m PORTRAIT Used for photography getting beautiful skin tones and soft overall tone AUTO b d v c n s MANUAL Sets the Exposure compensation P 46 White balance P 47 and AF mode P 50 to manual to eas...

Страница 25: ...e xD Picture Card the camera records as many of the shots taken just before the shutter button was released as will fit on the xD Picture Card k Final 3 frame continuous shooting Available Photography modes AUTO À m s Shooting continues as long as holding the shutter button down This mode shoots up to 3 frames max 2 2 frames sec When taking the pictures the images appear and are recorded The maxim...

Страница 26: ... displays the AF frame over subject in focus When taking pictures in Macro mode the camera focuses on the center of the LCD monitor Ï CENTER The camera focuses on the center of the LCD monitor Use this setting when taking pictures using AF AE lock P 25 N N N 12 12 12 12 ISO ISO 100 ISO 100 ISO 100 1 250 1 250 1 250 1 250 F5 6 F5 6 F5 6 F5 6 N N N 12 12 12 12 ISO ISO 100 ISO 100 ISO 100 0 AUTO AUTO...

Страница 27: ...frames files ALL FRAMES Protected frames files cannot be erased Unprotect the frames files before erasing them P 63 To stop the procedure midway Press the DISP BACK button to cancel erasing of all the frames files Some unprotected frames files will be left unerased Even if you stop the procedure immediately some frames files will be erased CANCEL CANCEL CANCEL CANCEL Ò ERASING SINGLE ALL FRAMES PL...

Страница 28: ...tings only the modifications are canceled 0 1 0 2 When DPOF settings were specified on another camera When the data includes a frame file with DPOF settings that were specified on another camera RESET DPOF OK appears Pressing the MENU OK button erases all of the DPOF settings already specified for each frame file Specify the DPOF setting for each frame file again Press the DISP BACK button to leav...

Страница 29: ...00 AM 10 24 2005 10 00 AM 100 0009 100 0009 100 0009 0 1 0 2 DPOF SET FRAME PLAYBACK MENU Continued 56 DPO DPOF F SE SET T I N G N G HA HAS BEEN BEEN COMPLETED COMPLETED DPOF SET T I N G HAS BEEN COMPLETED DPOF SET T I N G HAS BEEN COMPLETED DPOF SET T I N G HAS BEEN COMPLETED COMPLETED COMPLETED TOTAL TOTAL SHEETS SHEETS PR I NT ORDE ORDER R DPO DPOF 9 9 9 5 Total number of prints appears on the ...

Страница 30: ...ile for specifying DPOF settings 2Press a or b to set a value up to 99 as the number of copies of the frame file to be printed For frames files that you do not want printed set the number of prints to 0 zero To specify more DPOF settings repeat steps 1 and 2 Prints of up to 999 frames files can be ordered on the same xD Picture Card Ñ appears on the LCD monitor when selecting WITH DATE DPOF settin...

Страница 31: ...e printed 4 Press the MENU OK button to begin transmission Transmitting time is about 20 seconds Image data is converted to 0 3 M when transmitting it CANCEL CANCEL TRANSMITTING IMAGE DATA TRANSMITTING IMAGE DATA TRANSMISSION COMPLETED TRANSMISSION COMPLETED 1 1Press the MENU OK button to display the menu on the LCD monitor 2Press a or b to select Ü PRINT WITH MP Turn the printer on 1 2 SET SET PR...

Страница 32: ...CT OK OK SET RESET FRAME SET RESET FRAME 1 2 FRAME FRAME SET ALL SET ALL RESET ALL RESET ALL 1 2 1Press a or b to select Ç PROTECT 2Press c 3 1Press a or b to select FRAME SET ALL or RESET ALL 2Press the MENU OK button to confirm your selection FRAME Protects or unprotects only the selected frame file SET ALL Protects all the frames files RESET ALL Removes the protection from all the frames files ...

Страница 33: ...0 1 0 2 Â RECORDING VOICE MEMOS PLAYBACK MENU Continued 64 1 2 FADE IN FADE IN FADE IN FADE IN FADE IN FADE IN MULTIPLE MULTIPLE CLOCK CLOCK NORMAL NORMAL NORMAL NORMAL 3 1Press a or b to select the playback interval and the type of image transition 2Press the MENU OK button The image frames are advanced and played back Press d or c to advance or go back through the images when selecting NORMAL an...

Страница 34: ...r Speaker  PLAYING BACK VOICE MEMOS PLAYBACK MENU t appears on the LCD monitor when an image file with a voice memo is selected Voice memos cannot be played back using multi frame playback Press the DISP BACK button to select single frame playback 66 REC REC RE REC REC F I F I N I N I SH SH After 30 seconds of recording FINISH appears on the LCD monitor To finish Press the MENU OK button To re re...

Страница 35: ...ING Zoom bar A saved image size varies depending on the zoom scale For 0 3M the fl YES option appears in yellow 2 0 1 0 2 3 TRIMMING TRIMMING SET SET 1 2 Continued TRIMMING PLAYBACK MENU 68 SET SET CANCEL CANCEL 1 0 2 3 4 5 6 7 8 9 10 10 1 Press the MENU OK button while playing back voice memo The voice memo is paused during playback 1 1 0 2 3 4 5 6 7 8 9 10 10 SET SET CANCEL CANCEL 2 Press d or c ...

Страница 36: ...ecorded onto the xD Picture Card as it is saved it cannot be recorded correctly if the camera suddenly loses power if you open the battery cover or disconnect the AC power adapter It may not be possible to playback your movies on other cameras Continued 70 YES YES YES YES CANCEL CANCEL CANCEL CANCEL TR I MM ING ING TR I MM ING TR I MM ING Press the DISP BACK button to return to single frame playba...

Страница 37: ...in shots taken outdoors When the remaining time runs out recording ends and the movie is saved onto the xD Picture Card If recording is stopped immediately after it begins 1 second of the movie is recorded onto the xD Picture Card 6 Press the shutter button down halfway during recording the recording ends 4 Press the shutter button down fully to start recording The brightness and color of the LCD ...

Страница 38: ... movie Skip playback Press d or c when the movie is paused the movie advances or goes back one frame Hold down d or c to move through the frames quickly 6s 6s STOP STOP STOP STOP PAUSE PAUSE Bar PLAY PLAY PLAYING BACK MOVIES PLAYBACK MODE 1 Movies cannot be played back using multi frame playback Press the DISP BACK button to select single frame playback 2 1Press b to play the movie 2The playback t...

Страница 39: ...on to confirm the changes 0 1 0 2 76 1 Press the MENU OK button to display the menu on the LCD monitor AUTO AUTO AUTO AUTO OFF OFF OFF OFF OFF OFF OFF OFF 0 1 2 M M AUTO AUTO SHOOTING MODE SHOOTING MODE USING THE SET UP SCREEN CONT CONT 1 3 2 SET SET SET SET 1 5 SEC SEC OFF OFF 3 SEC SEC 1 5 SEC SEC IMAGE DISP IMAGE DISP IMAGE DISP IMAGE DISP 3 Press c to move to SET UP menu ENGLISH ENGLISH SET SE...

Страница 40: ...y default Explanation Page àBEEP VOLUME OFF 1 2 3 2 Sets the volume of the tone emitted when the camera controls are used áIMAGE DISP 3 SEC 1 5 SEC OFF 1 5 SEC Specifies whether an image checking screen photography result appears after taking a picture The image appears for a few moments and is then recorded The color tones in images recorded may differ from actual color Play back the recorded ima...

Страница 41: ...cal zoom focal length Approx 36 mm to 108 mm max zoom scale 3 h Digital zoom focal length Approx 108 mm to 616 mm max zoom scale approx 5 7 h Optical zoom focal length Approx 38 mm to 114 mm max zoom scale 3 h Digital zoom focal length Approx 114 mm to 650 mm max zoom scale approx 5 7 35 mm camera equivalents The position of the indicator on the zoom bar shows the zooming status The area to the ri...

Страница 42: ... frames files including protected frames files Back up important frames files onto your PC or another media 1Press d or c to select OK 2Pressing the MENU OK button erases all the frames files and initializes the xD Picture Card When CARD ERROR WRITE ERROR READ ERROR or CARD NOT INITIALIZED appears see P 105 for information before formatting the xD Picture Card 0 1 0 2 SET UP TIME DIFFERENCE TIME D...

Страница 43: ...ilt PCs or on PCs running updated operating system software i When you reinstall or remove FinePixViewer the Internet menu and your user ID and password for the FinePix Internet Service are deleted from your PC Click the Register now button enter your registered user ID and password and download the menu again 1 Install FinePixViewer as instructed in the Quick start guide 2 Install DirectX as dire...

Страница 44: ...stalled even if you do not have an Internet connection Notes i Connect the camera directly to the Macintosh using the USB cable mini B The software may not operate correctly if you use an extension cable or connect the camera via a USB hub i Push the USB connector fully into the socket to ensure that it is securely connected The software may not operate correctly if the connection is faulty i Addi...

Страница 45: ...top it 5 6 1 CAMERA CONNECTION USING THE CRADLE 6 Viewing Images 88 5 2 INSTALLATION ON A Mac OS X 10 The FinePixViewer installation completed message dialog appears Then click exit button and close it When Safari is used as the Web browser a message may be displayed and the CD ROM may not be removed If this happens click the Safari icon in the Dock to make Safari the active application and then s...

Страница 46: ...CTBRIDGE When a printer that supports PictBridge is available images can be printed by connecting the camera directly to the PictBridge compatible printer without a PC In PictBridge function images photographed on other than a camera may not be printed 6 2 1 Specifying images for printing on the camera 1Press the w button for about 1 second to turn the camera on in Playback mode 2Select PICTBRIDGE...

Страница 47: ...t printing the specified number of prints PR I R I NT I NG NG CANCEL CANCEL 1 1 1 1 9 9 9 9 9 SHEETS SHEETS Disconnecting the printer 1Check that PRINTING is not displayed on the camera s screen 2Press the POWER button on the cradle to turn the power off 4 CHECKING USB appears and then the menu is displayed on the LCD monitor If the menu does not appear check whether the ò USB MODE setting is PICT...

Страница 48: ... CX DSC Mass storage device mode 6 3 1 Connecting to a PC 1 Insert an xD Picture Card into the camera Gold marking Gold contact area 1Press the w button for about 1 second to turn the camera on in Playback mode 2Select DSC in ò USB MODE in the SET UP menu P 78 3Turn the camera off 2 DSC DSC NTSC NTSC 1 3 2 ENGLISH ENGLISH SET SET OK OK 0 1 0 2 0 1 0 2 1Plug the USB cable mini B into the cradle USB...

Страница 49: ...screen to save the images To proceed without saving the images click the Cancel button Screen for Windows 2000 Professional Windows 98 98 SE Me 2000 Professional Macintosh h A removable disk icon appears and you can use your PC to transfer files to and from the camera Windows Macintosh If the above operations do not occur you do not have the required software programs or drivers installed on your ...

Страница 50: ...w to Use FinePixViewer covers a range of topics including batch processing and ordering prints 1Check that the camera is not connected to the PC 2Quit all currently running applications 3Open the My Computer window Then open the Control Panel and double click on Add Remove Programs Windows 4The Add Remove Programs Properties window appears Select the software to be uninstalled FinePixViewer or the...

Страница 51: ...Professional Windows XP or iMac Mac OS 8 6 to 9 2 2 Mac OS X 10 1 2 to 10 2 2 and models that support USB as standard h Compatible with xD Picture Card of 16 MB to 512 MB and SmartMedia of 3 3 V 4 MB to 128 MB h PC Card Adapter DPC AD The PC Card Adapter allows the xD Picture Card and SmartMedia to be used as a PC Card Standard ATA compliant PCMCIA 2 1 PC card Type II h Compatible with xD Picture ...

Страница 52: ...Camera Correctly e Read this information and the Safety Notes P 116 to make sure you use your camera correctly Places to Avoid Do not store or use the camera in the following types of locations h In the rain or in very humid dirty or dusty places h In direct sunlight or in places subject to extreme temperature rises such as in a closed car in summer h Extremely cold places h Places with strong vib...

Страница 53: ...cannot be played back 104 Notes on the xD Picture Card Image Memory Card h This Image Memory Card is a new image recording media xD Picture Card developed for digital cameras The Image Memory Card consists of a semiconductor memory NAND type flash memory to record digital image data The recording process is electrically performed and enables erasure of existing image data as well as re recording o...

Страница 54: ...it into the camera just before you take a picture i Wipe the battery terminals with a clean dry cloth i Load a new or fully charged battery i Insert an xD Picture Card i Insert a new xD Picture Card or erase some unnecessary frames i Format the xD Picture Card on the camera i Wipe the xD Picture Card contact area with a clean dry cloth i Insert a new xD Picture Card i Turn the camera on i Load a n...

Страница 55: ...causes Solutions The camera does not emit any sound Frame erase does not erase the frame The ERASE ALL function does not erase all the frames Screens are not displayed in English There is no image or sound on the TV The TV image is black and white When connecting the camera to a PC the photographed image or playback image appears on the camera s LCD monitor Nothing happens when using the Mode swit...

Страница 56: ...ght for photography Approx 150 g 5 3 oz including battery and xD Picture Card Operating conditions Temperature 0 C to 40 C 32 F to 104 F 80 humidity or less no condensation According to the CIPA Camera Imaging Products Association standard procedure for measuring digital still camera battery consumption extract When using a battery use the battery supplied with the camera The storage media should ...

Страница 57: ... Belgium Belgian Fuji Agency Technical support 20 Avenue Lavoisier Wavre 1300 Belgium Repair service TEL 3210242090 FAX 3210238562 info fuji be Croatia I I d o o Technical support Hondlova 2 Zagreb Croatia TEL 38512319060 FAX 2310240 dsaravanja fujifilm hr Repair service Hondlova 2 Zagreb Croatia TEL 38512316228 FAX 2310240 info fujifilm hr Cyprus PMS IMAGING LTD Technical support 11 Dighenis Akri...

Страница 58: ... 1 503983 Repair service P O Box 2942 Haddah St HTC Sana a Yemen TEL 00967 1 503977 FAX 00967 1 503983 AFRICA Egypt Foto Express Egypt Technical support 426 Pyramids St Giza Egypt Repair service TEL 202 7762062 FAX 202 7760169 fotoegypt access com eg Kenya Fuji Kenya Ltd Repair service P O Box 41669 00100 Fuji Plaza Chiromo Road Nairobi Kenya TEL 254 20 4446265 8 FAX 254 20 4448515 7 info fujifilm...

Страница 59: ...tery could cause the battery to ignite or burst Keep xD Picture Cards out of the reach of small children Because xD Picture Cards are small they can be swallowed by children Be sure to store xD Picture Cards out of the reach of small children If a child swallows an xD Picture Card seek medical attention or call an emergency number WARNING CAUTION Do not use this camera in locations affected by oil...

Страница 60: ...119 118 ...

Страница 61: ...26 30 Nishiazabu 2 chome Minato ku Tokyo 106 8620 Japan http home fujifilm com products digital Printed in Japan FPT 507108 FP Printed on recycled paper ...

Отзывы: