93
5
92
INSTALLATION ON A Mac OS 8.6 TO 9.2
■
Enable File Exchange
Check whether File Exchange is active.
To use an xD-Picture Card that is supported by
the camera, the File Exchange utility supplied
with Mac OS must be running.
1. Switch on your Macintosh and start up
Mac OS 8.6 to 9.2.
●
!
Do not connect the camera to your Macintosh until
the software installation is completed.
2. Select the Extension Manager in the Control
Panel and check that the File Exchange
check box is ticked. If not, click in the box
so that an
appears and then restart your
Macintosh.
1. When you load the enclosed CD-ROM into
the CD-ROM drive, the “FinePix” window
automatically opens.
●
!
If the “FinePix” window does not open automatically,
double-click the CD-ROM icon.
Check the system software settings
From FinePixViewer installation to restart
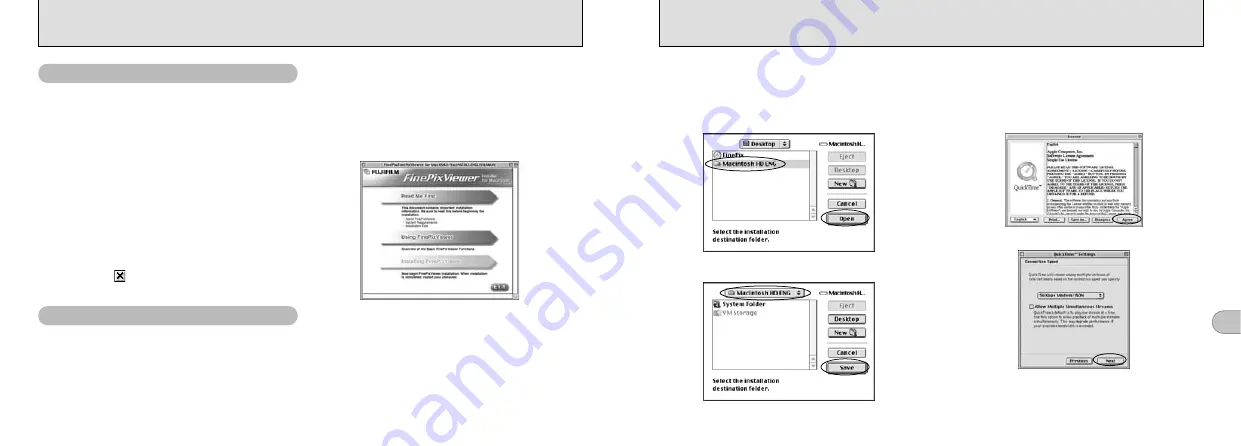
2. Double-click “Installer for MacOS8.6-9.x”
to launch the Installer.
3. The Installer setup screen appears. Click
the [Installing FinePixViewer] button.
✽
For more information on what is installed, click the
[Read Me First] button and [Using FinePixViewer]
button.
4. A confirmation message appears asking
whether you want to continue with the
installation. Click the [OK] button.
5. The User License Agreement for this
software is displayed. Read the agreement
carefully and then, if you agree to the
terms of the Agreement, click the [Yes]
button. If you click the [No] button, the
software is not installed.
7. Install QuickTime as directed by the on-
screen instructions and then restart your
Macintosh.
✽
If you have already installed QuickTime version
5.0.2 or later, this installation is not performed.
If the “Connection Speed” window appears after you restart your
Macintosh, set the correct speed for your environment of
connection and then click the [Next] button.
✽
If you do not know your connection speed, simply click the
[Next] button.
Click the [Agree] button in the “License” window.
6. Select the installation destination for
FinePixViewer and ImageMixer VCD for
FinePix.
1
Click the [Open] button to open the installation
destination folder.
2
Click the [Save] button.


