background image

79

3

78

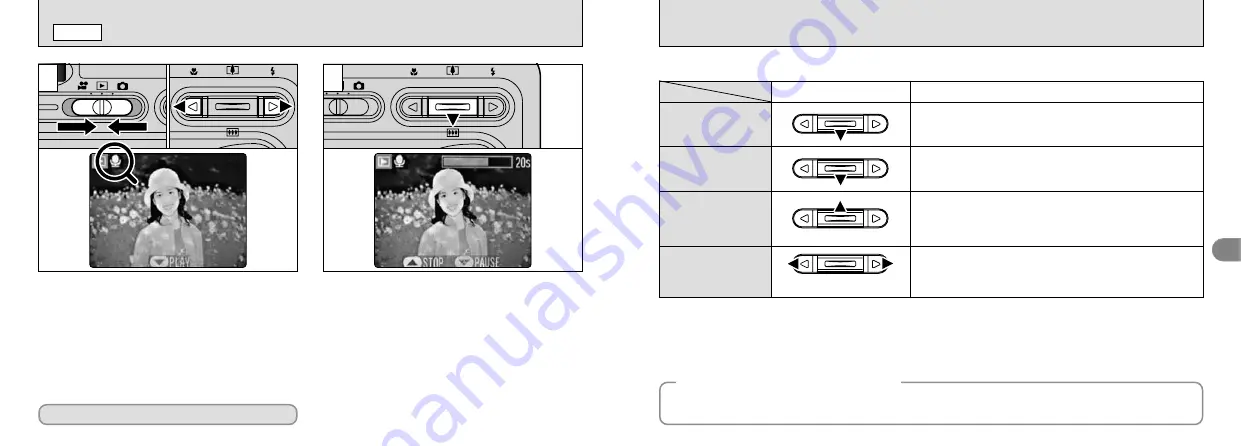
The voice memo automatically stops when playback ends.

Playback

Control

Description

Pauses the voice memo during playback.
Press this button again to resume playback.

Pause/Resume

Stops playback.

Press “

d

” or “

c

” while voice memo playback is stopped to

go back to the previous file or advance to the next file
respectively.

Stop

Press these during playback to skip forwards or backwards
through the voice memo.

These buttons do not function while playback is paused.

Fast forward/Rewind

Playing back voice memos

Playing back voice memo files 

Rewind

Fast forward

The FinePix F410 can play voice memo files recorded on a FinePix F410 and voice memo files up to 
30 seconds long that were recorded on a FUJIFILM digital camera and stored on xD-Picture Card.

PLAYING BACK VOICE MEMOS

w

MODE

2

1

0

1

0

2

0

1

0

2

!

You cannot play back voice memos using multi-
frame playback. Use the “DISP” button to revert to
normal playback.

1

Set the Mode switch to “

w

”.

2

Press “

d

” or “

c

” to select an image file that

has a voice memo.

The “

r

” icon is displayed.

1

Press “

b

” to play the voice memo.

2

The LCD monitor shows the playback time
and a playback progress bar.

!

Take care not to block the speaker.

!

If the sound is difficult to hear, adjust the volume
(

P.80).

Содержание FinePix F410Z

Страница 1: ...BL00258 200 1 Getting Ready Using the Camera Advanced Features Settings Software Installation Camera Connection...

Страница 2: ...ons However there is no guarantee that interference will not occur in a particular installation If this equipment does cause harmful interference to radio or television reception which can be determin...

Страница 3: ...Installation Final 4 frame Continuous Shooting 60 dEV EXPOSURE COMPENSATION 61 aWHITE BALANCE SELECTING THE LIGHT SOURCE 62 TSHOOTING MOVIES 63 PLAYING BACK MOVIES 66 Playing back movies 67 pERASING...

Страница 4: ...If the camera is to be used in hospitals or aircrafts please note that this camera may cause interference to other equipment in the hospital or aircraft For details please check with the applicable r...

Страница 5: ...efer to the pages in parentheses for information on using the camera features Viewfinder lamp P 27 LCD monitor Tripod mount Viewfinder P 25 MENU OK button P 22 Flash button P 34 BACK button P 22 DISP...

Страница 6: ...brands of rechargeable battery could cause faults or damage to the camera NP 60 Rechargeable Battery 1 The battery is not fully charged at shipment and must be charged up before being used Do not stic...

Страница 7: ...n the slot 2Close the battery cover If you open the battery cover while the camera is still switched on the camera is automatically switched off to protect the xD Picture Card The xD Picture Card will...

Страница 8: ...arging times increase at low temperatures If the self timer lamp blinks during charging a charging error has occurred and the battery cannot be charged If this occurs see P 122 Switching the camera on...

Страница 9: ...passes 12 00 the AM PM setting automatically switches Settings such as the date and time are not set at the time of purchase and are cleared if the camera is left for a long period with the battery re...

Страница 10: ...to set the format Refer to the table below for details of the settings Setting Explanation YYYY MM DD Displays the date in the year month day format MM DD YYYY Displays the date in the month day year...

Страница 11: ...ic Photography BASIC OPERATION GUIDE You ve read the chapter on getting ready and the camera is now set up and ready to take pictures The Basic Photography section explains the three basic steps of ta...

Страница 12: ...when the flash is set to Suppressed Flash mode DISP button You can use this button to select the LCD monitor display When shooting Switches the LCD monitor on and off or displays the framing guides Du...

Страница 13: ...re to hold the camera so that your fingers or the strap do not cover the lens flash or flash control sensor If the lens flash or flash control sensor is obscured by your fingers or the camera strap yo...

Страница 14: ...he camera makes a clicking noise and takes the picture The camera then records the photographed image You can adjust the volume of the camera operation noises bebeep and click or switch them off altog...

Страница 15: ...ots per xD Picture Card This is the standard number of shots displayed for a new xD Picture Card that was formatted on the camera Because the amount of data recorded varies depending on the subject th...

Страница 16: ...being out of focus Important Scene Use this frame when you want to position your main subject in the center of the frame or when you want to align your shot with the horizon This feature provides a cl...

Страница 17: ...viewfinder and lens are in different positions Accordingly you should use the LCD monitor to take pictures in Macro mode 0 1 0 2 USING THE ZOOM q T MODE Optical zoom Digital zoom Zoom bar display You...

Страница 18: ...at the camera h Get as close as possible to the subjects I FLASH q MODE You can choose from 5 flash modes according to the type of shot 1Set the Mode switch to q 2The flash setting changes each time...

Страница 19: ...layed to show the approximate playback position on the xD Picture Card 0 1 0 2 I FLASH q MODE This is a flash mode that uses a slow shutter speed This allows you to take pictures of people at night th...

Страница 20: ...ng the d or c during zooming cancels zooming and moves to the next image Press the BACK button to return to normal unscaled display MULTI FRAME PLAYBACK w MODE Text displayed No text displayed Multi f...

Страница 21: ...zoom press the MENU OK button to crop the image Check the size of the image being saved and then press the MENU OK button The cropped image is added as a separate file in the last frame Image Sizes B...

Страница 22: ...mage attached to E mail or used on a website 0 3MB 680 480 Image quality Sample Uses 42 ERASING SINGLE FRAME w MODE 3 4 Press d or c to view the frame selected image you want to erase Press the BACK b...

Страница 23: ...locations it will also increase the amount of speckling in your images Choose the sensitivity setting that best suits the conditions 1Press a or b to change y QUALITY setting 2Press MENU OK button to...

Страница 24: ...sensitivity remains set to high 800 even if the Mode switch is set to Playback or the camera is switched off f SENSITIVITY _PHOTO MODE STILL IMAGE MOVIE Quality setting in high sensitivity mode If yo...

Страница 25: ...support date and time imprinting or specification of the number of prints Note that the warnings shown below may be displayed while you are specifying the prints P 68 When you erase the image the DPO...

Страница 26: ...TH DATE the date is imprinted on your prints 2Press the MENU OK button i HOW TO SPECIFY PRINT OPTIONS DPOF _PHOTO MODE PLAYBACK 3 3 0 1 0 2 When the data includes a frame with DPOF settings that were...

Страница 27: ...to the side turn the camera on 2Set the Mode switch to w 3Press the Photo mode _ button 1Press d or c to select DPOF ALL RESET 2Press the MENU OK button 3 2 0 1 0 2 3 A confirmation screen appears To...

Страница 28: ...NG MODE and then use a or b to select qAUTO or qMANUAL 3Press the MENU OK button to confirm the selection Set the Mode switch to q See P 63 for information on shooting movies This is the easiest mode...

Страница 29: ...off You can also use the AF AE lock P 29 Be careful not to stand in front of the camera when you press the shutter button as this can cause focusing or exposure metering errors Displaying the menus P...

Страница 30: ...Top 4 frame continuous shooting is set to ON the t appears on the LCD monitor When Final 4 frame continuous shooting is set to ON appears on the LCD monitor Continuous shooting continues while the sh...

Страница 31: ...age 0 6 EV Guide to using positive compensation Guide to using negative compensation Subjects for Which Exposure Adjustment is Particularly Effective d EV EXPOSURE COMPENSATION PHOTOGRAPHY MENU Press...

Страница 32: ...ect set the flash mode to Suppressed Flash P 36 Change the white balance setting when you want to take a picture with the white balance fixed for the surroundings and lighting when the picture is take...

Страница 33: ...used Press the a P or b to zoom in and out A zoom bar appears on the LCD monitor hDigital zoom focal length 35mm camera equivalent Approx 38 mm to 111 mm Max zoom scale 2 93 Approx 38 mm to 277 mm Ma...

Страница 34: ...i It may not be possible to playback a movie file that was recorded on a camera other than the FinePix F410 i To playback movie files on a computer save the movie file on the xD Picture Card to the co...

Страница 35: ...ected files You should copy important files that you do not want to be erased to your computer or other media 3 1 0 1 0 2 2 1Set the Mode switch to w 2Press the MENU OK button to display the menu scre...

Страница 36: ...to select the file to be erased Pressing the MENU OK button repeatedly erases consecutive frames Take care not to mistakenly erase frames 2Press the MENU OK button to erase the currently displayed fi...

Страница 37: ...ecting files press the BACK button To remove the protection press the MENU OK button again 1 2 1Press a or b to select RESET ALL SET ALL or FRAME 2Press MENU OK button to confirm your selection 0 1 0...

Страница 38: ...creen 2Press d or c to select r VOICE MEMO 3Press the MENU OK button Continued on next page SET ALL Press the MENU OK button to protect all the files Press the MENU OK button to unprotect all the file...

Страница 39: ...already has a voice memo r RECORDING VOICE MEMOS PLAYBACK MENU The message appears on the LCD monitor Recording begins when you press the MENU OK button 3 4 Face the microphone as you record the voic...

Страница 40: ...s Playing back voice memo files Rewind Fast forward The FinePix F410 can play voice memo files recorded on a FinePix F410 and voice memo files up to 30 seconds long that were recorded on a FUJIFILM di...

Страница 41: ...en 0 1 0 2 2 1Press d or c to select g OPTION and then press a or b to select 6LCD or VOLUME 2Press the MENU OK button 4 Settings 6 ADJUSTING THE MONITOR BRIGHTNESS ADJUSTING THE VOLUME 0 1 0 2 1 h q...

Страница 42: ...ally when it is not being used See P 84 for details FORMAT OK Erases all files See P 85 for details BEEP OFF 1 2 3 2 Sets the volume of the tone emitted when the camera controls are used SHUTTER OFF 1...

Страница 43: ...icture by pressing the shutter button all the way down Operation can also be restored by pressing buttons other than the shutter button To restore power to the camera The Sleep function does not opera...

Страница 44: ...ng this function to CONT makes file management easier as it ensures that file names are not duplicated when images are downloaded to a PC CONT Pictures are stored beginning from the highest file numbe...

Страница 45: ...r recommended Display 800 600 pixels or better 16 bit color or better Hard disk space Amount required for installation 140MB minimum Amount required for operation 300MB minimum When ImageMixer VCD for...

Страница 46: ...TALLATION ON A Mac OS 8 6 TO 9 2 Pre installation Checklist To run this software you must have the hardware and software described below Check your system before you begin the installation Compatible...

Страница 47: ...he Installing FinePixViewer button For more information on what is installed click the Read Me First button and Using FinePixViewer button 4 A confirmation message appears asking whether you want to c...

Страница 48: ...red to use the FinePix Internet Service The software can still be installed even if you do not have an Internet connection Pre installation Checklist Compatible Mac Power Macintosh G3 1 PowerBook G3 1...

Страница 49: ...w does not open automatically double click the CD ROM icon 3 Double click Installer for MacOS X INSTALLATION ON A Mac OS X From FinePixViewer installation to restart Functions not supported in FinePix...

Страница 50: ...ng PictureHello is not supported on Macintosh computers Connection is only possible with a FUJIFILM camera equipped with a PC Camera function CD ROM Software for FinePix SX For more information on usi...

Страница 51: ...pment and shall be easily accessible The shape of the plug and socket outlet depends on the country of use USING THE AC POWER ADAPTER USB socket DC IN 5V socket Camera OFF ON USB socket PC 1 Load an x...

Страница 52: ...s installed on your PC Complete the required PC setup procedures Then reconnect the camera to your PC Camera Operation USE AT DSC MODE 1 The Found New Hardware help message appears in the bottom right...

Страница 53: ...r displayed on the PC the PC may still be exchanging data with the camera Always check that the camera s viewfinder lamp is lit green 2 For a DSC connection proceed to step For a PC CAMERA connection...

Страница 54: ...installing Acrobat Reader h What is explained in How to Use FinePixViewer How to Use FinePixViewer covers a range of topics including batch processing and ordering prints Only perform this operation...

Страница 55: ...e Trash Then select Empty Trash in the Special menu Mac OS 8 6 9 2 Macintosh 2 After you have exited FinePixViewer and DP Editor and then drag the installed FinePixViewer folder to the Trash Then clic...

Страница 56: ...le battery h BC 65 Battery Charger Quickly charges the rechargeable battery The BC 65 reduces charging time to approximately 2 hours for the NP 60 h SC FX401 This is designed to protect the camera aga...

Страница 57: ...mera correctly Notes on the Power Supply This camera uses the Rechargeable Lithium ion Battery Pack NP 60 Note the points below when using the rechargeable battery Take particular care to read the Saf...

Страница 58: ...it into a fire h Do not attempt to disassemble or modify the battery Notes on storage AC Power Adapter Use only the AC 5VW AC Power Adapter with your FinePix F410 Digital Camera The use of other AC p...

Страница 59: ...the camera etc h The memory card is a precision electronic instrument Do not apply pressure or shock and avoid bending h Do not use the memory card in a hot humid or corrosive environment h If the con...

Страница 60: ...aken but the exposure will not be correct e The table below lists the warnings that are displayed on the LCD monitor h The use of xD Picture Cards is recommended with the FinePix F410 The camera quali...

Страница 61: ...n the DPOF frame settings The maximum number of frames for which prints can be specified on the same xD Picture Card is 999 Copy the images for which you want to order prints onto another xD Picture C...

Страница 62: ...ting Possible causes Solutions The self timer lamp does not light when charging the battery i There is no battery in the camera i The camera and AC power adapter are not connected correctly i Load the...

Страница 63: ...are recorded in JPEG format Motion JPEG can be played back by QuickTime 3 0 or later Troubleshooting Possible causes Solutions Frame erase does not erase the frame Some frames may be protected Remove...

Страница 64: ...0 800 h White Balance Auto In Manual modes 7 positions can be selected h Focal range Normal Approx 60 cm 2 0 ft to infinity Macro Approx 10 cm 0 3 ft to 80 cm 2 6 ft Standard number of available shots...

Страница 65: ...4 m to 3 5 m 1 3 ft to 11 5 ft Telephoto Approx 0 4 m to 2 m 1 3 ft to 6 6 ft Flash modes Auto Red Eye Reduction Forced Flash Suppressed Flash Slow Synchro h Erase modes ERASE FRAME ERASE ALL FRAMES F...

Страница 66: ...ese Safety Notes and your Owner s Manual carefully beforehand h After reading these Safety Notes store them in a safe place About the Icons The icons shown below are used in this document to indicate...

Страница 67: ...laces subject to extremely high temperatures Do not leave the camera in locations such as a sealed vehicle or in direct sunlight This can cause a fire Keep out of the reach of small children This prod...

Страница 68: ...her than those explicitly granted under this Agreement 5 Limited Warranty FUJIFILM warrants to you that Media is free from any defect in material and workmanship under normal use for ninety 90 days fr...

Страница 69: ...Printed in Japan FGS 305102 FG Printed on recycled paper 26 30 Nishiazabu 2 chome Minato ku Tokyo 106 8620 Japan http home fujifilm com products digital index html...

Отзывы: