background image

105

Viewing

Images

6

104

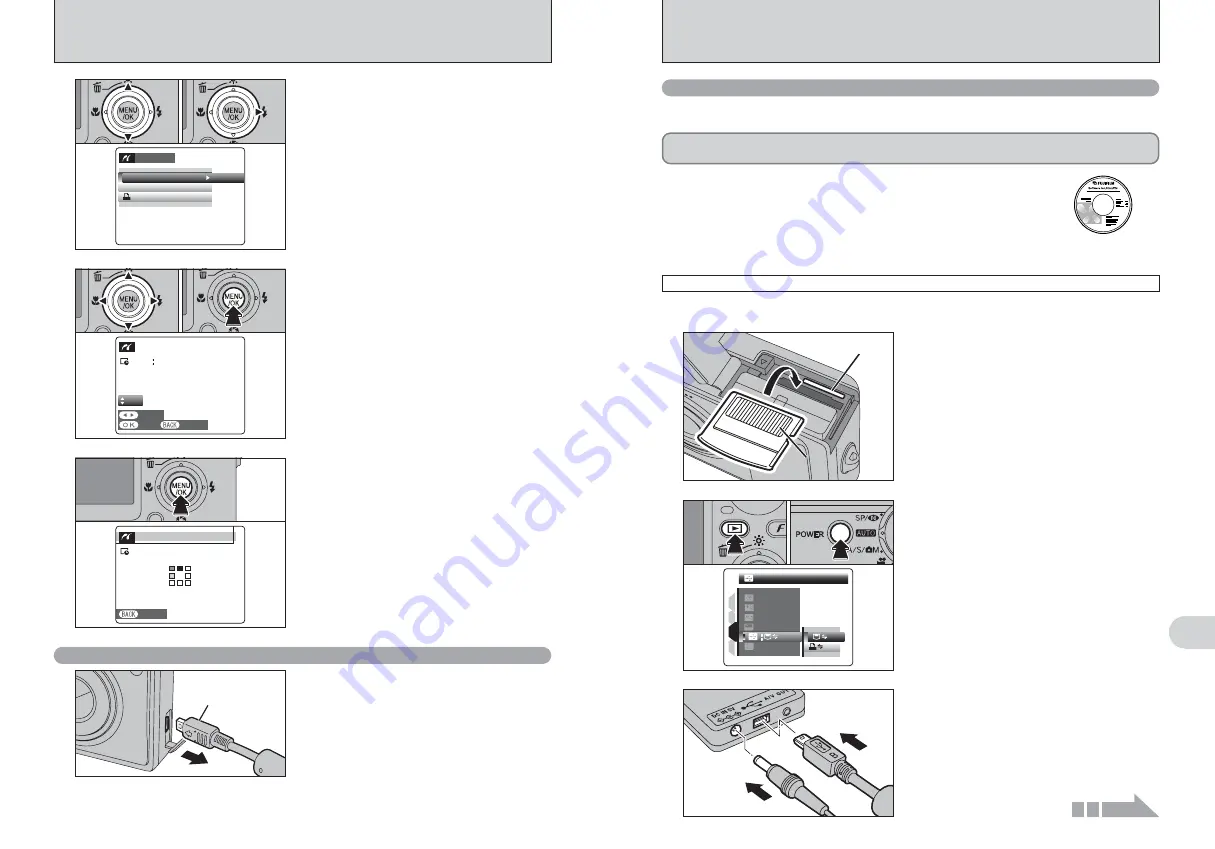
6.3 CONNECTING TO A PC

The “Connecting to a PC” section explains how to connect the camera to your PC using the USB
cable (mini-B) and describes the functions you can use once the camera and PC are connected.

If the power cuts out during data transmission, the data will not be transmitted correctly. Always use the
AC power adapter when connecting the camera to a PC.

Refer to Section 5 the first time you connect the camera to your PC.

Install the software first. Do not connect the camera to the PC before installing
all the software.

This mode provides a simple way to read images from an 

xD-Picture Card

and store images onto

an 

xD-Picture Card

.

CD-ROM

(Software for FinePix 

CX

)

DSC (Mass storage device) mode

6.3.1 Connecting to a PC

1

Insert an 

xD-Picture Card

into the camera.

Gold marking

Gold contact area

Gold contact area

Gold contact area

Gold contact area

Gold contact area

Continued

1

Press the “

w

” button for about 1 second to turn

the camera on in Playback mode.

2

Select “

” DSC in “

ò

” USB MODE in the

˜

” SET-UP menu (

P.86).

3

Press the “POWER” button to turn the camera
off.

2

DSC

DSC

NTSC

NTSC

NTSC

NTSC

SET

SET

SET

SET

SET

SET

ENG

ENGLI

LISH

SH

1

2

3

4

0

1

0

2

0

3

1

Plug the USB cable (mini-B) into the USB socket
of the terminal adapter.

2

Plug the AC power adapter connector into the
“DC IN 5V” socket of the terminal adapter and
then plug the AC power adapter into the power
outlet.

3

0

1

0

2

!

Press the “DISP/BACK” button to cancel the printing.
Depending on the printer, the printing may not be canceled
immediately or printing may stop midway through. When
printing stops midway, briefly turn the camera off and then on
again.

“PRINT OK?” appears on the LCD monitor.
Press the “MENU/OK” button to download the data
to the printer and start printing the specified
number of prints.

1

Check that “PRINTING” is not displayed on the
camera’s screen.

2

Turn the camera off. Unplug the terminal
adapter.

Terminal 
adapter

6.2 CONNECTING THE CAMERA DIRECTLY TO THE PRINTER 

— PictBridge FUNCTION

!

“PRINT WITH DATE” is not available when the camera is
connected to a printer that does not support date printing.

6

1

Press “

a

” or “

b

” to select “PRINT WITH DATE”

or “PRINT WITHOUT DATE”. If “PRINT WITH
DATE” is selected, the date is imprinted on your
prints.

2

Press “

c

”.

PPICT

CTBRI

RIDGE

GE

PR

PRINT

NT WITH

TH DATE

DATE

PR

PRINT

NT WITHOUT

OUT DATE

DATE

PR

PRINT

NT DPOF

DPOF

OK

OK

0

1

0

2

!

Movie images cannot be printed.

!

Images photographed with a camera other than FinePix F11
may not be printed.

7

1

Press “

d

” or “

c

” to display the frame (file) for

which you want to specify PRINT settings.

2

Press “

a

” or “

b

” to set a value up to 99 as the

number of copies of the frame (file) to be printed.
For frames (files) that you do not want printed,
set the number of prints to 0 (zero).

To specify more PRINT settings, repeat steps 

1

and 

2

.

3

Always press the “MENU/OK” button after the
settings are completed.

YES

YES

CANCEL

CANCEL

FRAME

FRAME

TOTAL

TOTAL

00019

SHEETS

SHEETS

01

0

1

0

3

0

2

8

PRI

RINTING

NG

CANCEL

CANCEL

1/19 

SHEETS

SHEETS

Disconnecting the printer

Содержание FinePix F11

Страница 1: ...how you how to use your FUJIFILM DIGITAL CAMERA FinePix F11 correctly Please follow the instructions carefully OWNER S MANUAL 1 2 3 4 5 6 Getting Ready Settings Using the Camera Advanced Features Soft...

Страница 2: ...oftware 4 Ownership All copyrights and other proprietary rights to Software and Documentation are owned and retained by FUJIFILM or the third party suppliers as indicated on or in Software or Document...

Страница 3: ...UTTER PRIORITY AE APERTURE PRIORITY AE 38 e MACRO CLOSE UP 44 d FLASH PHOTOGRAPHY 45 AUTO Auto flash no icon 45 bRed eye reduction 45 d Forced flash 46 v Suppressed flash 46 c Slow synchro 46 n Red ey...

Страница 4: ...registered trademarks of the respective companies Explanation of Color Television System NTSC National Television System Committee color television telecasting specifications adopted mainly in the U S...

Страница 5: ...Playback button W Wide zoom button P 21 DISP Display BACK button P 21 Battery cover P 11 MENU OK button P 21 T Tele zoom button P 21 Strap mount LCD monitor xD Picture Card slot P 11 Battery compartm...

Страница 6: ...t go all the way into the slot Do not apply force when inserting an xD Picture Card Gold marking Gold contact area Gold contact area Gold contact area Gold contact area Gold contact area Align the gol...

Страница 7: ...tery Blinking red Lit white Lit white 1 2 4 Lit red 3 Turn the camera on and check the battery level indicator on the LCD monitor Battery with no remaining charge V blinking red may cause camera fault...

Страница 8: ...nd the battery cannot be charged P 118 Turning the camera on during charging interrupts the charging Use the BC 65 Battery Charger sold separately to charge battery more quickly P 112 Lit red CHARGING...

Страница 9: ...t the date and time this message will appear each time you turn the camera on The menu screen varies depending on the selected mode SETTING THE DATE AND TIME DATE TIME DATE TIME SET SET CANCEL CANCEL...

Страница 10: ...0 24 0 1 00 AM DD MM YY DD MM YY YY MM DD YY MM DD DATE TIME DATE TIME SET SET CANCEL CANCEL DATE TIME DATE TIME SET SET CANCEL CANCEL 2007 2006 2004 2003 2005 YY MM DD YY MM DD 24 10 0 1 00 AM Correc...

Страница 11: ...Specify the print order DPOF settings Playback button Press the button for about 1 second to turn the camera on in Playback mode Pressing the button toggles between Photography mode and Playback mode...

Страница 12: ...graphed through glass h Subjects that do not reflect well such as hair or fur h Subjects with no substance such as smoke or flames h Dark subjects h Fast moving subjects h Subjects with little or no c...

Страница 13: ...rror i Lens operation error Detailed warning messages appear on the LCD monitor P 116 117 INDICATOR LAMP DISPLAY AF ASSIST ILLUMINATOR Press the shutter button down halfway in dimly lit conditions The...

Страница 14: ...h a camera other than FinePix F11 SHOOTING ASSISTANT FUNCTION Select the framing guideline and post shot assist window in Photography mode Pressing the DISP BACK button changes the LCD monitor display...

Страница 15: ...ISP BACK button until the multi frame playback screen 9 frames appears 1Press a b d or c to move the cursor colored frame to the selecting frame Press a or b repeatedly to jump to the next page 2Press...

Страница 16: ...your PC or another media 1Press the a button 2Press d or c to select OK SET SET OK OK CANCEL CANCEL ERAS ERASE OK OK 0 1 0 2 3 Playback zoom Press the T or W button during single frame playback to zo...

Страница 17: ...utter speed setting so that the action is frozen the flow of the motion is conveyed or the background is out of focus 2 Specify the photography settings P 44 46 e Macro Used for close up shots d Flash...

Страница 18: ...eddings etc and school concerts Restaurants aquariums museums and churches Flash not available NIGHT Used for shooting evening and night scenes This mode allows you to take shots where priority is giv...

Страница 19: ...ING PHOTOGRAPHY MODE PHOTOGRAPHY MENU M Long exposure Use this setting to take a picture of a main subject in low light condition Long exposure can be used in only the NIGHT mode P 35 OFF OFF OFF OFF...

Страница 20: ...ow shutter speed 1Select M SHUTTER PRIORITY AE P 38 2Press the MENU OK button to confirm your selection 0 0 2 Press the b button to select SETTING SHUTTER SPEED SETTING SETTING SHUTTER SPEED SHUTTER S...

Страница 21: ...ess d or c to select the shutter speed h Shutter speed setting 3 sec to 1 1000 sec in 1 3 EV increments When the correct exposure cannot be obtained with selected shutter speed the aperture setting ap...

Страница 22: ...elephoto F5 to F8 in 1 3 EV increments When the correct exposure cannot be obtained with selected aperture setting the shutter speed appears in red When this occurs adjust the aperture setting again 3...

Страница 23: ...just before the picture is taken and then fires again to take the actual picture The flash fires as required by the shooting conditions If pressing the shutter button while the flash is charging the...

Страница 24: ...lighting In this mode the flash fires in bright as well as dark conditions v Suppressed flash Use this mode for taking pictures using indoor lighting for shots taken through glass and for photography...

Страница 25: ...a guide select the setting that best suits your aims N N F N QUALITY QUALITY AUTO AUTO STD STD PHOTO MODE PHOTO MODE PHOTO MODE PHOTO MODE 1 1Set the Mode switch to Photography mode 2Press the p butto...

Страница 26: ...COLOR COLOR STD STD AUTO AUTO STD STD N 2 1Press a or b to select FinePix COLOR 2Press c 0 1 0 2 1 0 1 0 2 FinePix COLOR p PHOTO MODE PHOTOGRAPHY N N AUTO AUTO 800 1600 200 100 80 AUTO AUTO 400 AUTO A...

Страница 27: ...s The menu screen varies depending on selected Photography mode h B h h M s N N N 10 10 10 0 SPOT SPOT 1 2 M OFF OFF OFF OFF AUTO AUTO 4 When the setting is enabled an icon appears in the top left cor...

Страница 28: ...he picture is taken after 2 seconds Any of the following cancels the self timer setting i Completing the shooting i Changing the Mode switch setting i Setting the camera to Playback mode i Turning the...

Страница 29: ...h mode should be set to v Suppressed flash P 46 The color tones may vary depending on the shooting conditions light source etc Change the white balance setting to suit for the surroundings and lightin...

Страница 30: ...results are always displayed after you shoot Note that pictures taken using Long period continuous shooting are recorded without displaying the results h Continuous shooting cannot be selected in M l...

Страница 31: ...ou take your finger off the shutter button before 40 shots have been taken the camera records the final 3 frames shot before you released the shutter button If there is insufficient space on the xD Pi...

Страница 32: ...ess the shutter button down halfway The AF frame appears positioned on the high contrast subject near the center of the image When the camera has difficulty focusing on the subject in MULTI mode set t...

Страница 33: ...OK OK IT IT MA MAY Y TAKE TAKE A A WHILE WHILE YES YES CANCEL CANCEL ERASE ERASE OK OK 1Press d or c to select the erasing frame file 2Press the MENU OK button to erase the currently displayed frame...

Страница 34: ...ations are canceled 0 1 0 2 When DPOF settings were specified on another camera When the data includes a frame file with DPOF settings that were specified on another camera RESET DPOF OK appears Press...

Страница 35: ...2 10 24 2005 10 00 AM 10 24 2005 10 00 AM 10 24 2005 10 00 AM 100 0009 0 1 0 2 DPOF SET FRAME PLAYBACK MENU Continued DPOF SET DPOF SETTING HAS BEEN ING HAS BEEN COMPLETED COMPLETED DPOF SETTING HAS B...

Страница 36: ...s 2Press a or b to set a value up to 99 as the number of copies of the frame file to be printed For frames files that you do not want printed set the number of prints to 0 zero To specify more DPOF se...

Страница 37: ...ECT OK OK SET RESET FRAME SET RESET FRAME 1 2 SET ALL SET ALL FRAME FRAME RESET ALL RESET ALL 1 2 1Press a or b to select PROTECT 2Press c 3 1Press a or b to select FRAME SET ALL or RESET ALL 2Press t...

Страница 38: ...emo 0 1 0 2 RECORDING VOICE MEMOS PLAYBACK MENU 3 Press c Continued FADE IN FADE IN FADE IN FADE IN NORMAL NORMAL FADE IN FADE IN MULTIPLE MULTIPLE CLOCK CLOCK NORMAL NORMAL 1 2 3 1Press a or b to sel...

Страница 39: ...p forwards or backwards through the voice memo These buttons do not function while playback is paused 0 1 0 2 0 1 0 2 Take care not to block the speaker Speaker Playing voice memo files You may not be...

Страница 40: ...om bar Zoom bar Zoom bar A saved image size varies depending on the zoom scale For 0 3M the YES option appears in yellow 2 0 1 0 2 3 TRIMMING TRIMMING SET SET 1 2 TRIMMING PLAYBACK MENU Continued SET...

Страница 41: ...re Card as it is saved it cannot be recorded correctly if the camera suddenly loses power if you open the battery cover or disconnect the AC power adapter You may not be possible to playback your movi...

Страница 42: ...taken outdoors When the remaining time runs out recording ends and the movie is saved onto the xD Picture Card If recording is stopped immediately after it begins about 1 second of the movie is recor...

Страница 43: ...ie Skip playback Press d or c when the movie is paused the movie advances or goes back one frame Hold down d or c to move through the frames quickly 6s STOP STOP STOP STOP PAUSE PAUSE Bar PLAY PLAY PL...

Страница 44: ...gs press the MENU OK button to confirm the changes ENGLISH ENGLISH SET SET USB MODE USB MODE NTSC NTSC 1 3 2 4 SET SET SET SET 4 Press a or b to select the menu item Press c to move to SET UP menu SET...

Страница 45: ...OFF BEEP VOLUME OFF 1 2 3 2 Sets the volume of the tone emitted when the camera controls are used IMAGE DISP 3 SEC 1 5 SEC OFF 1 5 SEC Specifies whether an image checking screen photography result ap...

Страница 46: ...D BRIGHTNESS To adjust LCD monitor brightness 1Press d or c to adjust the LCD monitor brightness 2Press the MENU OK button to confirm the new setting SET SET CANC CANCEL EL 4 5 3 2 1 0 1 2 3 4 5 0 1 0...

Страница 47: ...This function sets a time difference relative to the date and time currently set When this setting is enabled the specified time difference is applied when pictures are taken Use this function when tr...

Страница 48: ...e FinePix Internet Service The software can still be installed even if you do not have an Internet connection Operating System 1 CPU Windows 98 including the Second Edition Windows Millennium Edition...

Страница 49: ...tware requirements Compatible Mac Power Macintosh G3 1 PowerBook G3 1 Power Macintosh G4 iMac iBook Power Macintosh G4 Cube or PowerBook G4 Power Macintosh G5 Operating System Mac OS X compatible with...

Страница 50: ...rminal adapter 1 1Check that the camera is turned off 2Plug the terminal adapter into the terminal adapter connection socket on the camera 2 3 Plug the AC power adapter connector into the DC IN 5V soc...

Страница 51: ...cable mini B into the USB socket of the terminal adapter 2Connect the terminal adapter to your printer using the USB cable mini B 3 0 1 0 2 1Plug the AC power adapter connector into the DC IN 5V sock...

Страница 52: ...pter 2Plug the AC power adapter into the power outlet SET SET SET SET ENGLISH ENGLISH SET SET NTSC NTSC PICTBRIDGE PICTBRIDGE 1 4 3 2 0 1 0 2 0 3 Continued 6 1Press a or b to select u PRINT DPOF 2Pres...

Страница 53: ...2 Press the DISP BACK button to cancel the printing Depending on the printer the printing may not be canceled immediately or printing may stop midway through When printing stops midway briefly turn th...

Страница 54: ...ur PC to transfer files to and from the camera Windows Macintosh If the above operations do not occur you do not have the required software programs or drivers installed on your PC Complete the requir...

Страница 55: ...h processing and ordering prints 1Check that the camera is not connected to the PC 2Quit all currently running applications 3Open the My Computer window Then open the Control Panel and double click on...

Страница 56: ...FinePix F11 Digital Camera Audio Visual output TV monitor commercially available Audio Visual output FinePix F11 Digital Camera eBy using FinePix F11 together with other optional FUJIFILM products yo...

Страница 57: ...NP 120 at an ambient temperature between 10 C and 35 C 50 F and 95 F If you charge the NP 120 at a temperature outside this range charging takes longer because the performance of the NP 120 is impair...

Страница 58: ...to a fire h Do not attempt to take apart or change the battery h Do not recharge the battery with chargers other those specified h Dispose of used battery promptly To avoid damaging the battery or sho...

Страница 59: ...LCD monitor Lit red Blinking red The battery is low or completely out of charge Charge the battery or load a fully charged battery There is a strong likelihood of camera shake because the shutter spe...

Страница 60: ...aph is taken when pressing the shutter button Cannot use the flash The flash settings are restricted and cannot be selected The playback image is dark even though the flash was used The image is blurr...

Страница 61: ...hots varies depending on the level of charge in battery the figures shown here for the number of available shots using battery is not guaranteed The number of available shots will also decline at low...

Страница 62: ...adjusting the color balance to suit the color of the ambient light around the subject This adjustment is called matching the white balance Exif Print Format is a newly revised digital camera file form...

Страница 63: ...4662 cameras fujifilm pt If you have technical questions or if you need repair service ask the following local distributor Please present the warranty card and your purchase receipt when you ask for r...

Страница 64: ...EL 662 2730029 ext 761 762 FAX 662 2730239 warin fujifilm co th Romania CTS Cardinal Top Systems Ltd Technical support 112 Calea Dorobanti street 4 flat 1sector Bucharest Romania Repair service TEL 40...

Страница 65: ...d When discarding cover the battery terminals with insulation tape h Contact with other metallic objects or battery could cause the battery to ignite or burst Keep xD Picture Cards out of the reach of...

Страница 66: ...130 Memo...

Страница 67: ...26 30 Nishiazabu 2 chome Minato ku Tokyo 106 8620 Japan http home fujifilm com products digital Printed in Japan FPT 507109 YP Printed on recycled paper...

Отзывы: