background image

10

2

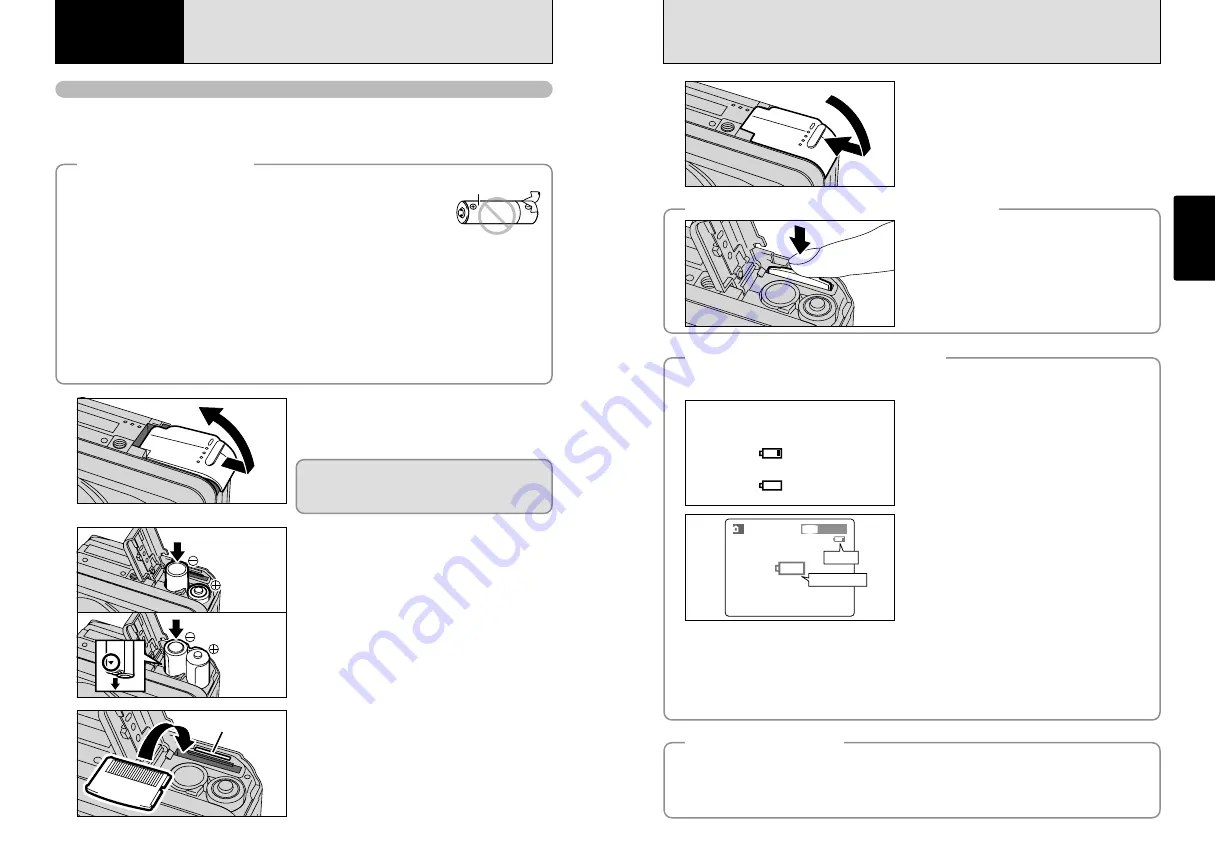
Load the batteries correctly as shown.

1

Check that the camera is switched off (viewfinder
lamp switches off) before opening the battery cover.

!

Opening the battery cover while the camera is switched on,
the camera is switched off.

!

Do not apply excessive force to the battery cover.

Do not open the battery cover while the camera is
still switched on. This could damage the 

xD-

Picture Card

or corrupt the image files on the 

xD-

Picture Card

.

11

Getting Ready

Power Save Function 

If the camera is not used for 2 minutes, this function automatically switches the camera off. When this
function is active, it also switches off the LCD monitor to reduce power consumption if the camera is not
used for 30 seconds (see P.47 for details). If the camera is then left unused for a further period (for 90
seconds), the Power Save function automatically switches the camera off. To switch the camera back
on, slide the “POWER” switch to the side to turn the camera off briefly and then turn it back on.

Checking the remaining battery charge 

!

The information above is an approximate guide for photography mode. Depending on the camera mode and the type
of batteries used, the transition from “

C

” to “

V

” may occur more quickly.

!

When the batteries run out, “

V

” is displayed and camera operation automatically stops. When this occurs, the

camera may work if you switch it on again even without loading new or fully charged batteries. However, this may
cause camera faults such as the camera switching itself off without retracting the lens. Always load new or fully
charged batteries.

!

Due to the nature of the battery, the battery low warning may appear early when the camera is used in cold locations.
This is normal and does not indicate a fault. Try warming the batteries in your pocket or a similar location before use.

C

” is displayed as a small icon on the right-hand

side of the LCD monitor. “

V

” appears as a large

icon on the LCD monitor.

   33

   33

1M

1M

A

Switch the camera on and check that no battery level warning (

C

or 

V

) is displayed on the LCD

monitor. If no icon is displayed, there is ample charge left in the batteries.

1

There is ample remaining battery charge. 

2

The battery charge is low. Have a new set of
batteries ready.

3

The batteries run out. The display will shortly go
blank and the camera will stop working. Replace
or recharge the batteries.

Blinking red

Lit red

1

2

3

No icon

LOADING THE BATTERIES AND THE MEDIA

1

Getting Ready

Compatible batteries

h

AA-size alkaline batteries (2), Rechargeable Battery NH-10 (sold separately), or AA-size Ni-MH
batteries (sold separately) (2).

!

Please use the same brand AA-size alkaline batteries as those supplied with the camera.

How to use the batteries 

h

Never use the following types of batteries, as this could cause serious
problems such as batteries fluid leakage or overheating:
1. Batteries with split or peeling outer casings
2. Combinations of different types of batteries or new and used batteries together

h

Do not use manganese or Ni-Cd batteries.

h

Soil, such as fingermarks, on the poles of the batteries can significantly
reduce the amount of time for which the batteries can be used.

h

The time for which AA-size alkaline batteries (referred to hereafter simply as alkaline batteries) can
be used varies depending on the brand, and some alkaline batteries may stop providing power more
quickly than those supplied with the camera. Note also that due to their nature, the time for which
alkaline batteries can be used decreases in cold conditions (0°C to +10°C). The use of AA-size Ni-
MH batteries is recommended for this reason.

h

Cradle can be used in combination with camera and to charge rechargeable Battery NH-10 (sold
separately). Use Fujifilm Battery charger (sold separately) to charge AA-size Ni-MH batteries.

h

See P.68, 69 for other notes on using batteries.

h

When first purchased or if left unused for a log period, the time for which AA-size Ni-MH
batteries or rechargeable Battery NH-10 can be used may be shorter. See P. 69 for details.

Outer casing

3

Gold marking

Align the gold mark on the xD-Picture Card slot
with the gold contact area on the 

xD-Picture Card

and then push the card firmly all the way into the
slot.

!

The 

xD-Picture Card

will not slide fully into the slot if it is

inserted facing the wrong way. Be careful not to apply undue
force to the 

xD-Picture Card

.

4

Close the battery cover.

When you want to replace the 

xD-Picture Card

When you push the 

xD-Picture Card

into the slot

and then slowly remove your finger, the lock is
released and the 

xD-Picture Card

is pushed out.

Rechargeable
battery NH-10

LR6 AA-size
alkaline batteries

Lit red

Blinking red

Содержание A205S. A210

Страница 1: ...how to use your FUJIFILM DIGITAL CAMERA FinePix A205 FinePix A210 correctly Please follow the instructions carefully BL00278 200 2 Getting Ready Using the Camera Advanced Features Software Installatio...

Страница 2: ...M titled Software for FinePix SX which is provided to you together with this Agreement b Software means the software which is recorded on Media c Documentation means the operation manuals of Software...

Страница 3: ...MENU STILL PHOTOGRAPHY MODE o ERASING SINGLE ALL FRAMES 37 ALL FRAMES FRAME BACK 37 u DPOF SET FRAME 39 HOW TO SPECIFY PRINT OPTIONS DPOF 39 HOW TO SPECIFY PRINT OPTIONS FRAME SET RESET 39 RESET ALL 4...

Страница 4: ...his camera contains precision electronic components To ensure that images are recorded correctly do not subject the camera to impact or shock while an image is being recorded Trademark Information h a...

Страница 5: ...to use the zoom or the MENU OK button to crop the image Nomenclature Refer to the pages in parentheses for information on using the camera features POWER switch P 12 VIDEO OUT Video output socket P 59...

Страница 6: ...e batteries run out The display will shortly go blank and the camera will stop working Replace or recharge the batteries Blinking red Lit red 1 2 3 No icon LOADING THE BATTERIES AND THE MEDIA 1 Gettin...

Страница 7: ...st switch the camera on the date is cleared Press the MENU OK button to set the date and time To set the date and time later press the BACK button If you do not set the date and time this confirmation...

Страница 8: ...the date order 1Press d or c to select the date order 2Press a or b to set the date order Refer to the table below for details of the settings 4 0 1 0 2 5 1 1Press the MENU OK button to display the me...

Страница 9: ...splay on and off or selects multi frame playback Photography ab button Press to zoom in telephoto Press to zoom out wide angle Playback ab button Panning frames files Press to enlarge the image Press...

Страница 10: ...or shots in dark locations when the flash is set to Suppressed Flash mode There may be some unevenness in the brightness at the lower edge of the LCD monitor This is normal and does not indicate a fau...

Страница 11: ...or as the background h Subjects moving at high speed h When something other than your subject is close to the AF frame has contrasting areas of light and dark and is either closer or further away than...

Страница 12: ...focus during zooming hold the Shutter button down halfway to refocus the shot The digital zoom can only be used for shots taken using the LCD monitor This camera features 5 levels of zoom magnificatio...

Страница 13: ...r text display disappears after approximately 3 seconds Playback zoom cannot be used with multi frame playback Text displayed No text displayed Multi frame playback 0 1 0 2 0 1 0 2 Still images that c...

Страница 14: ...ppropriate flash mode for the conditions To take pictures in a dark location when the camera shake warning icon is displayed use a tripod to prevent camera shake The lens is fixed at the wide angle zo...

Страница 15: ...is too great for the flash to be effective In this situation you can use the specified white balance P 32 to take shots that retain the atmosphere given by the ambient lighting To take pictures in Su...

Страница 16: ...n situations such as group shots where the photographer is included in the shot Setting the self timer to ON appears on the LCD monitor In this mode a timer runs for roughly 10 seconds before the shut...

Страница 17: ...the ambience of the light source 6 Shooting outdoors in fine weather 7 Shooting in shade 9 Shooting under Daylight fluorescent lamps 0 Shooting under Warm White fluorescent lamps Shooting under Cool W...

Страница 18: ...hooting shooting ends and the movie is stored on the xD Picture Card If you end shooting immediately after you start shooting only 1 second of movie is shot 5 6 Pressing the Shutter button down fully...

Страница 19: ...goes back one frame Hold down the button to move through the frames quickly Playing back movie files i It may not be possible to play back a movie file that was recorded on a camera other than the Fi...

Страница 20: ...erased 1Turn the Mode switch to w 2Press the MENU OK button 2 Press d or c to select u DPOF 1 0 1 0 2 DPOF stands for Digital Print Order Format and refers to a format that is used for recording print...

Страница 21: ...celled If there were previous DPOF settings only the modifications are cancelled When DPOF settings were specified on another camera When the data includes a frame with DPOF setting that were specifie...

Страница 22: ...iles P 48 0 1 0 2 0 1 0 2 0 1 0 2 RESET ALL Removes the protection from all the frames files SET ALL Protects all the frames files FRAME Protects or unprotects only the selected frame file i PROTECTIN...

Страница 23: ...nced and played back Pressing the DISP button once during playback the playback frame number is displayed on the LCD monitor To interrput g PLAYBACK press the BACK button 3 1Turn the Mode switch to q...

Страница 24: ...output is set to NTSC or PAL qRESET OK Resets all the camera settings other than the date and time language and video output settings to the factory default values set at shipment Pressing c displays...

Страница 25: ...onto your computer or another media 1Press d or c to select OK 2Press the MENU OK button to erase all the files and format the xD Picture Card Formatting erases protected files also FRAME NO CONT Pic...

Страница 26: ...if the connection is faulty i Additional USB interface board is not guaranteed i Windows 95 cannot be used i Operation is not guaranteed on home built computers or on computers running updated operat...

Страница 27: ...are i Connection speed 56k or better recommended Sound functions Speakers and microphone 1 Models with a USB port as a standard feature 2 This software does not run correctly in the Mac OS X Classic e...

Страница 28: ...minimum 256 MB or more recommended Hard disk space Amount required for installation 110 MB minimum Amount required for operation 300 MB minimum Display 800 600 pixels or better at least 32 000 colors...

Страница 29: ...ller for MacOS X 4Click the icon This operation is not required on version 10 2 or later 5 Enter the administrator name and password Then click the OK button 6 Click the Continue button 7 Quit any oth...

Страница 30: ...result in damage to the xD Picture Card or malfunctions during PC connection 6 1 CAMERA CONNECTION 6 Viewing Images The Camera Connection section explains how to connect the camera to your computer u...

Страница 31: ...lways disconnect the camera from the PC using the procedure on P 62 Do not disconnect the USB cable when the camera is communicating with the PC See P 62 for information on the disconnection procedure...

Страница 32: ...on in the taskbar and eject USB Disk 3The menu option shown below appears Click on this option 4The Eject hardware dialog box appears Click the OK button or the close button Screen for Windows Me Scre...

Страница 33: ...gins When uninstallation ends click the OK button Only perform this operation when you no longer require the installed software or when the software was not installed correctly Mac OS 8 6 9 2 2 Uninst...

Страница 34: ...being carried h Rechargeable Battery NH 10 This is a battery pack that uses nickel metal hydride Ni MH batteries The NH 10 can be charged using the Digital Camera FinePix A205 FinePix A210 and Cradle...

Страница 35: ...ren h When loading the batteries into the camera ensure that the battery polarity and is as indicated on the camera h Do not use a new battery together with a used battery In the case of rechargeable...

Страница 36: ...ctured by FUJIFILM are used h The xD Picture Card may feel warm when it is removed from the camera after extended periods of picture taking or image viewing This is normal and does not indicate a faul...

Страница 37: ...act area is soiled i Camera fault i You attempted to play a movie that was not recorded on this camera i Images cannot be played back i Wipe the contact area on the xD Picture Card with a soft dry clo...

Страница 38: ...the camera in extremely cold conditions i The terminals are soiled i The batteries get un rechargeable i No xD Picture Card is inserted i The xD Picture Card is fully recorded i The xD Picture Card i...

Страница 39: ...FinePix A205 System Model Digital camera FinePix A205 Number of effective pixels 2 0 million pixels CCD sensor 1 2 7 inch square pixel CCD Number of total pixels 2 11 million pixels Number of recorde...

Страница 40: ...mera FinePix A210 Number of effective pixels 3 2 million pixels CCD sensor 1 2 7 inch square pixel CCD Number of total pixels 3 34 million pixels Number of recorded pixels Still image 2048 1536 pixels...

Страница 41: ...d as indicated by the and marks WARNING Unplug from power socket Do not use in the bathroom or shower Do not disassemble Explanation of Terms Deactivated batteries Leaving an Ni MH battery unused in s...

Страница 42: ...D Picture Card is allowed to fly out it could hit someone and cause injury Request regular internal testing and cleaning for your camera Build up of dust in your camera can cause a fire or electric sh...

Страница 43: ...Printed in Japan FGS 305106 FG Printed on recycled paper 26 30 Nishiazabu 2 chome Minato ku Tokyo 106 8620 Japan http home fujifilm com products digital...

Отзывы: