


60
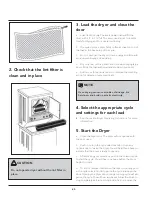
2. Check that the lint filter is
clean and in place
3. Load the dryer and close the
door
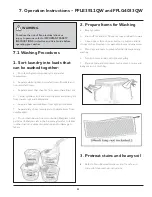
a. Load items loosely. The average wet load will fill the
drum with 1/3 to 1/2 full. The items need room to tumble
freely for drying and to cause less wrinkling.
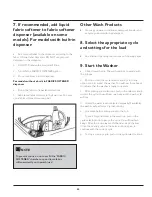
b. If required, place a dryer fabric softener sheet on top of
the load at the beginning of the cycle.
c. Do not overload the dryer to save energy and time and
avoid uneven drying and wrinkling.
d. Dry only two or three items at a time when drying large
items. Fill up the load with small and medium sized items.
e. Add two or three similar items to improve the tumbling
action for delicate or very small loads.
4. Select the appropriate cycle
and settings for each load
• See the section Dryer Operating Instructions, for more
information.
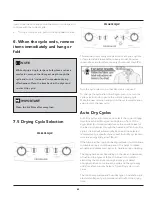
5. Start the Dryer
a. Close the dryer door. The dryer will not operate with
the door open.
b. Push in or turn the cycle selector knob or turn any
option knob to “wake” the dryer. You will hear three beeps to
indicate that the dryer is ready to operate.
c. After making your selections, push in the selector knob
to start the cycle. You will hear one beep before the drum
begins to rotate.
d. To add or remove items when the dryer is running, push
in the cycle selector knob to pause the cycle and open the
door. Opening the dryer door during a running cycle will also
pause the cycle. You will hear two beeps. Allow the drum to
stop completely before reaching inside. Add or remove the
CAUTION
Do not operate dryer without the lint filter in
place.
NOTE
Over-drying can cause wrinkles, shrinkage, lint,
harshness and build up a static electricity.
Содержание FFLE3911QW
Страница 1: ...Publication 5995666392 October 2015 Technical Service Manual Laundry Center ...
Страница 2: ...I ...
Страница 9: ...8 3 Product Features ...
Страница 14: ...13 5 1 FFLE3911QW 5 1 1 Upper Cabinet Drum Heater 5 Exploded View and List of Parts ...
Страница 17: ...16 5 1 2 Motor Blower Belt ...
Страница 19: ...18 5 1 3 Control Panel ...
Страница 21: ...20 5 2 FFLG4033QW 5 2 1 Upper Cabinet Drum Heater ...
Страница 24: ...23 5 2 2 Motor Blower Belt ...
Страница 27: ...26 5 2 3 Control Panel ...
Страница 32: ...31 5 3 3 Wash Assembly POS NO DESCRIPTION 14 Screw 2 PLCS 15 Lock Hub Functional parts ...
Страница 33: ...32 5 3 4 Cabinet Assembly ...
Страница 69: ...68 User Interface of Laundry Center FFLG4033QW ...
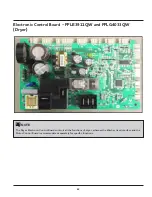
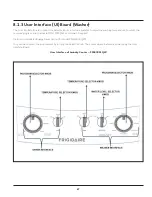
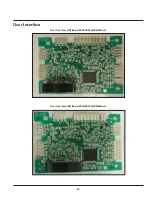
Страница 70: ...69 User Interface User Interface UI Board FFLE3911QW Washer User Interface UI Board FFLG4033QW Washer ...
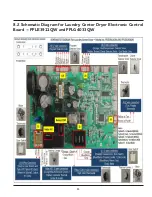
Страница 72: ...71 8 2 Schematic Diagram for Laundry Center Dryer Electronic Control Board FFLE3911QW and FFLG4033QW ...
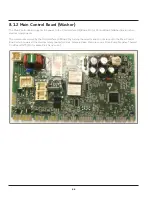
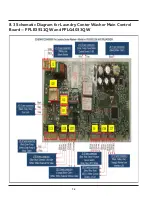
Страница 73: ...72 8 3 Schematic Diagram for Laundry Center Washer Main Control Board FFLE3911QW and FFLG4033QW ...
Страница 74: ...73 8 4 Schematic Diagram for Laundry Center Washer User Interface UI FFLE3911QW and FFLG4033QW ...
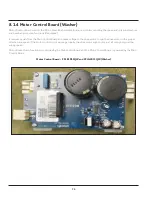
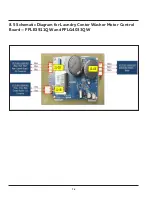
Страница 75: ...74 8 5 Schematic Diagram for Laundry Center Washer Motor Control Board FFLE3911QW and FFLG4033QW ...
Страница 76: ...75 8 6 Wiring Diagram FFLE3911QW Electric Dryer Model ...
Страница 77: ...76 8 7 Wiring Diagram FFLG4033QW Gas Dryer Model ...
Страница 78: ...77 8 8 Wiring Diagram FFLE3911QW and FFLG4033QW Washer Model ...
Страница 91: ...90 Wiring Diagram FFLE3911QW Wiring Diagram FFLG4033QW ...
Страница 125: ...124 ...
Страница 161: ...160 ...
Страница 165: ...164 ...
Страница 168: ...167 ...
Страница 170: ...169 ...
Страница 179: ...178 ...
Страница 181: ...180 ...
Страница 183: ...182 ...


