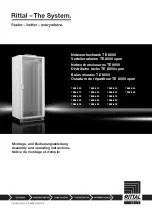
background image

2

TE 8000 Montageanleitung/TE 8000 assembly instructions/TE 8000 – Notice de montage

Lieferumfang 4
Technische Daten 

5

Hinweise zur Dokumentation 

– Verwendete Symbole 

5

Sicherheitshinweise 

6 – 7

Bestimmungsgemäße Verwendung und
Einschränkung 7
Montage 

– Niveauregulierung 

8

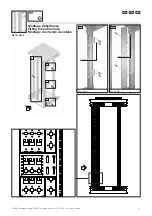
– Tiefenverstellung der Ebenen 

8

– Aktivierung der Kabeleinführung 

8

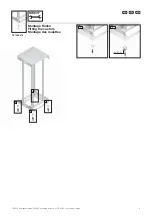
– Montage Rollen 

9

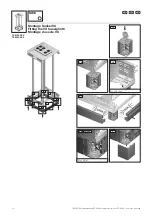
– Montage Sockel VX 

10

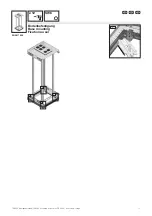
– Bodenbefestigung 

11

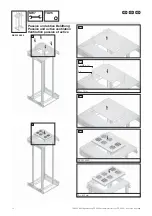
– Passive und aktive Belüftung 

12

– Montage Kabeltrasse 

13

– Montage Seitenwand 

14

–  Türanschlag wechseln

für Tür mit Griff schale 

15

– Demontage Griff schale 

16

–  Montage Ergoform-S-Schwenkhebel 

für Profi lhalbzylinder 

16

– Einsatz Verschlussstange 

16

– Austausch Logo 

16

–  Türanschlagwechsel mit 

Ergoform-S-Schwenkhebelgriff  

17 – 18

– Erdung und Potenzialausgleich 

19

– Innenausbau-Möglichkeiten 

20 – 21

Garantie 22
Kundendienstadressen 22

Scope of supply 

4

Technical data 

5

Notes on documentation 

– Symbols used 

5

Safety notes 

6 – 7

Intended use and limitation 

7

Assembly 

– Level control 

8

– Depth adjustment of the levels 

8

– Activation of cable entry 

8

– Fitting the castors 

9

– Fitting the VX base/plinth 

10

– Base mounting 

11

– Passive and active ventilation 

12

– Fitting the cable route 

13

– Fitting the side panels 

14

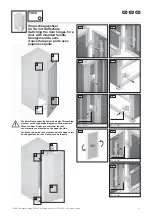
–  Switching the door hinges 

for a door with moulded handle 

15

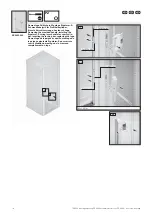
– Removing the moulded handle 

16

–  Installing the Ergoform-S 

swing lever handle for semi-cylinder 

16

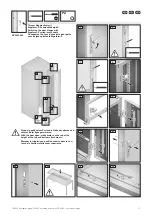
– Inserting the locking bar 

16

– Replacing the logo 

16

–  Switching the door hinges with

Ergoform-S swing lever handle 

17 – 18

– Earthing and potential equalisation 

19

– Interior installation options 

20 – 21

Warranty 22
Customer service addresses 

22

Composition de la livraison 

4

Caractéristiques techniques 

5

Remarques relatives à la documentation 

– Symboles utilisés 

5

Consignes de sécurité 

6 – 7

Utilisation correcte de l’appareil et 
restrictions 7
Montage 

– Réglage à niveau 

8

–  Réglage en profondeur des

plans de montage 

8

– Ouverture des passages de câbles 

8

– Montage des roulettes 

9

– Montage du socle VX 

10

– Fixation au sol 

11

– Ventilation passive et active 

12

– Montage du chemin de câbles 

13

– Montage des panneaux latéraux 

14

–  Changement du sens d’ouverture 

pour porte avec poignée coquille 

15

– Démontage de la poignée coquille 

16

–  Montage de la poignée 

pivotante Ergoform-S pour 
serrure semi-cylindrique 

16

– Montage de la crémone 

16

– Remplacement du logo 

16

–  Changement du sens d’ouverture 

pour porte avec poignée pivotante 
Ergoform-S 

17 – 18

– Mise à la terre et équipotentialité 

19

–  Possibilités d’équipement 

intérieur 

20 – 21

Garantie 22
Adresses des services après-vente 

22

Inhaltsverzeichnis/Contents/Sommaire

Содержание RITTAL 7888.390

Страница 1: ...ank TE 8000 Verteilerrahmen TE 8000 open Network enclosures TE 8000 Distributor racks TE 8000 open Baies r seaux TE 8000 Ossature de r partiteur TE 8000 open 7888 390 7888 410 7888 430 7888 440 7888 5...

Страница 2: ...he side panels 14 Switching the door hinges for a door with moulded handle 15 Removing the moulded handle 16 Installing the Ergoform S swing lever handle for semi cylinder 16 Inserting the locking bar...

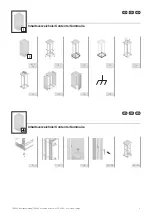
Страница 3: ...E 8000 Montageanleitung TE 8000 assembly instructions TE 8000 Notice de montage Inhaltsverzeichnis Contents Sommaire 4 7 22 8 10 11 12 12 14 15 19 9 13 16 17 18 20 21 Inhaltsverzeichnis Contents Somma...

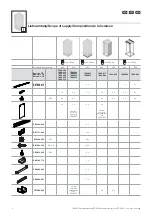
Страница 4: ...840 7888 850 7888 875 7888 882 7888 892 7888 940 7888 944 DK 7888 610 DK 7888 612 2 x 1 x 2 x 4 x 4 x 4 x 4 x 4 x 4 x 4 x M10 4 x 4 x 4 x 4 x 4 x 4 x 2 x 2 x 2 x 2 x nicht bei not with sauf pour 7888...

Страница 5: ...x sp cialistes form s pour la maintenance lectrotechnique Technische Daten Temperatureinsatzbereich 15 C bis 45 C Lagerungstemperatur 20 C bis 80 C Technical data Operating temperature range 15 C to 4...

Страница 6: ...en Ger teboden aus dem Rack herausziehen Ziehen Sie immer nur eine Komponente einen Ger teboden heraus Das Rack kann instabil werden wenn mehrere Komponen ten gleichzeitig herausgezogen werden Danger...

Страница 7: ...blettes d appareillage extensibles Pour viter les blessures ou les dommages mat riels il faut stabiliser convenablement la baie TE 8000 avant de sortir un composant ou une tablette d appareillage de l...

Страница 8: ...depth adjustment of the levels and activation of cable entry R glage niveau r glage en profondeur des plans de montage et ouverture des passages de c bles TX30 mm SW10 Zur Tiefenverstellung jeweils n...

Страница 9: ...9 TE 8000 Montageanleitung TE 8000 assembly instructions TE 8000 Notice de montage 1 1 1 1 Montage Rollen Fitting the castors Montage des roulettes SW8 17 1 1 TE 7000 672 4x M10...

Страница 10: ...ung TE 8000 assembly instructions TE 8000 Notice de montage 1 1 1 2 2 1 3 Montage Sockel VX Fitting the VX base plinth Montage du socle VX 1 1 1 1 2 2 2 2 SW8 TS 8100 XXX TS 8200 XXX 2 2 MA 6 Nm optio...

Страница 11: ...11 TE 8000 Montageanleitung TE 8000 assembly instructions TE 8000 Notice de montage 1 Bodenbefestigung Base mounting Fixation au sol SW8 12 1 1 1 1 SO 2817 000...

Страница 12: ...E 8000 assembly instructions TE 8000 Notice de montage Passive und aktive Bel ftung Passive and active ventilation Ventilation passive et active 1 2 1 1 2 1 1 2 MA 1 Nm TX25 SW7 DK 5502 020 4x M6 x 12...

Страница 13: ...ntageanleitung TE 8000 assembly instructions TE 8000 Notice de montage Montage Kabeltrasse Fitting the cable route Montage du chemin de c bles 1 MA 5 Nm 1 MA 5 Nm PZ 1 1 1 2 DK 7000 685 6x 5 5 x 13 6x...

Страница 14: ...14 TE 8000 Montageanleitung TE 8000 assembly instructions TE 8000 Notice de montage 1 1 2 2 3 3 3 3 1 2 3 1 3 2 Montage Seitenwand Fitting the side panels Montage des panneaux lat raux...

Страница 15: ...es for a door with moulded handle Changement du sens d ouverture pour porte avec poign e coquille 8 1x M5 x 12 MA 5 Nm 9 1x M5 x 12 MA 5 Nm Die Verschlussgegenst cke werden beim T ranschlag wechsel au...

Страница 16: ...Montage Ergoform S Schwenkhebelgriff f r Pro lhalbzylinder Einsatz Verschlussstange Austausch Logo Removing the moulded handle installing the Ergoform S swing lever handle for semi cylin der inserting...

Страница 17: ...handle Changement du sens d ouverture pour porte avec poign e pivotante Ergoform S 1 8 2 9 3 10 4 6 5 7 6 4 5 7 8 2 1 8 1 8 3 3 9 2 10 Stange in ge ffnetem Zustand in H he der oberen und unteren Befe...

Страница 18: ...Schwenkhebelgriff Switching the door hinges with Ergoform S swing lever handle Changement du sens d ouverture pour porte avec poign e pivotante Ergoform S 18 20 1215 1316 21 1117 19 12 14 13 15 16 11...

Страница 19: ...0 Montageanleitung TE 8000 assembly instructions TE 8000 Notice de montage 5 6 1 2 1 3 4 2 2 3 5 4 6 1 Erdung und Potenzialausgleich Earthing and potential equalisation Mise la terre et quipotentialit...

Страница 20: ...nce A 495 455 375 600 800 6 SZ 4943 000 B 395 324 275 600 2 DK 7963 310 495 424 375 600 800 2 DK 7963 410 595 524 475 800 1000 2 DK 7963 510 695 624 575 1000 2 DK 7963 610 C 495 375 600 800 4 DK 7828...

Страница 21: ...enenabstand mm Distance between levels mm cartement entre les plans 19 mm L nge Befestigungsma mm Length mounting dimension mm Longueur cote de xation mm F r Breite Tiefe mm For width depth mm Pour la...

Страница 22: ...Inde constituent les bases pour garantir un service apr s vente mondial rapide et efficace en s appuyant sur le r seau de toutes les liales et agents Rittal travers le monde Headquarter Deutschland H...

Страница 23: ...Power Distribution Climate Control IT Infrastructure Software Services www rittal com contact You can nd the contact details of all Rittal companies throughout the world here 09 2018 340261 D 0000 00...

Отзывы: