


General recommendations
Read these instructions carefully before using the
appliance for the first time. Keep these instructions
in a safe place for future reference.
First time of use
While the manufacturing of the heaters, oil
residues adhere to the elements. The first time of
use, these residues will be burnt off, thereby
occasionally triggering fire alarms. Precautions
should be taken in order to prevent this from
happening.
Area of use
The Panther 6 – 15 kW fan heaters are not
intended for use other than indoors. These heaters
are appropriate for the heating of warehouses,
workshops, storage rooms, show rooms, etc.
Function
The air is carried through the heater by a fan and
heated by non-corrosive elements which are
regulated by the built-in thermostat with a range of
+5 - +35°C. The air speed is adjustable in three
steps.
Switching on or off, selecting half or full output
and regulating the RPM is performed through the
control panel PP15 (ordered separately) which is
wall mounted for easy access.
The appliance is protected from overheating via
a built-in temperature limiter. To reset, see
Overheating.The heater is mounted on a wall with
a bracket, which allows direction of the air stream
in several directions, straight ahead, to the left, to
the right and down.
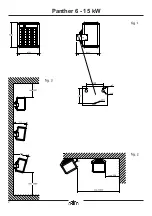
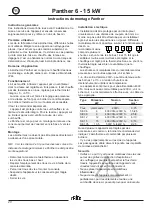
Installation
The fan heaters are intended for wall mounting.
The appliance must not be placed directly under a
wall-outlet.
N.B.! The minimum distances given in fig. 2 and 3
must be kept. The fan heaters must not be mounted
on the ceiling.
• Loose the bracket from the appliance by
unscrewing the bolts.
• Mark holes by means of the loose bracket.
• Drill holes for the fixing plugs.
• Mount the bracket.
• Mount the fan heater on the bracket and adjust
the heater to desired vertical and horizontal
angles.
• Screw the bottom bolt in and tighten all bolts.
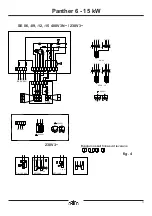
Electrical installation
The electrical installation should be carried out by
a qualified electrician in conformity with prevailing
regulations. The appliance should be preceded by
an all-pole switch with at least 3 mm breaking gap.
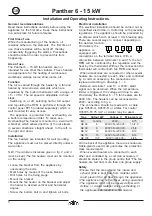
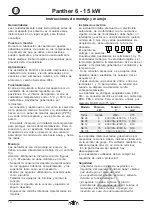
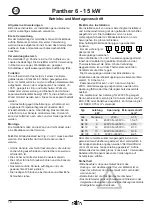
There are several ways to connect depending on
the desired function.
On delivery the
appliance is
equipped with
connections on the terminal block. With a
connection between terminals 14 and 15, the fan
RPM will be controlled by the regulation and the
heat by the thermostat. Without the connection the
thermostat will control both fan RPM and heat.
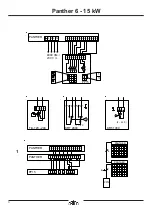
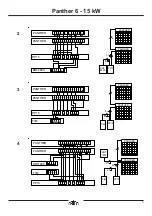
When accessories are connected or when several
heaters are connected to each other and controlled
by a common accessory, the connections are
replaced according to drawings 1 – 4.
Between terminals 1 and 13, a 230V~ alarm
signal can be obtained. When the temperature
limiter is triggered, the voltage will drop to zero.
On delivery the Panther 6 – 15 fan heaters are for
400V 3N~. The heaters can be reconnected to
230V~ according to fig. 4.
The connection should be made with a cable
type S05VV-U, A05VV-R or similar. For control
H05VV5-F0,75 mm² or similar may be used.
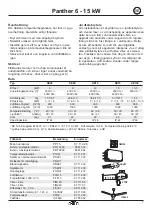
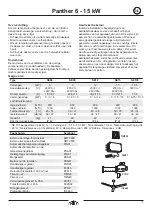
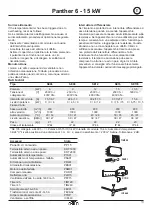
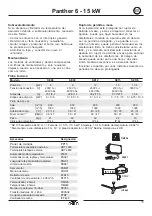
Type
Output kW
Voltage V
Min.area mm²
All
control
230V~
0,75
SE 06
6
400V 3N~/230 V3~
1,5/2,5
SE 09
9
400V 3N~/230 V3~
2,5/6
SE 12
12
400V 3N~/230 V3~
4/10
SE 15
15
400V 3N~/230 V3~
6/16
SE 135
13,5
500V 3~/440 V3~
4/2,5
On the back of the appliance there are knock-outs.
Cable-glands used must guarantee the protection
class requirements!
When several heaters are connected to each
other and controlled by a common accessory it
should be stated in the group centre that “The fan
heaters are fed from more than one group supply”.
Safety
• Ensure that the area around the intake and
exhaust grille is kept free from material which
could prevent the air flow through the appliance.
• The appliance has hot surfaces during operation!
• The appliance must not be covered either with
clothes or similar material since overheating of
the appliance can result in a fire hazard.
Installation and Operating Instructions
Panther 6 - 15 kW
12
11
2
1
14 15
3
9
GB
8
Содержание Panther SE 06
Страница 2: ...Panther 6 15 kW 2 ...


