4.1
With the air system fully charged, make
one full brake application and note the air
pressure reading on the primary air
gauge.
4.2
Further reduce air pressure using moder-
ate brake applications, then run the en-
gine at governed rpm.
4.3
Note the time that the pressure reaches
the previously noted reading on the pri-
mary air gauge, then note the time that
the air pressure reaches cut-out pressure.
4.4
If it takes longer than 30 seconds to reach
cut-out pressure after the primary air
gauge passes the previously noted pres-
sure (noted after one full brake applica-
tion), eliminate any leaks or replace the air
compressor before operating the vehicle.
5.
Check air leakage in the system.
5.1
With the parking brake applied, the trans-
mission out of gear, and the air system
fully charged, release the service brakes
and shut down the engine.
5.2
Wait one minute and note the air pressure
drop in psi (kPa) per minute from the pri-
mary air reservoir.
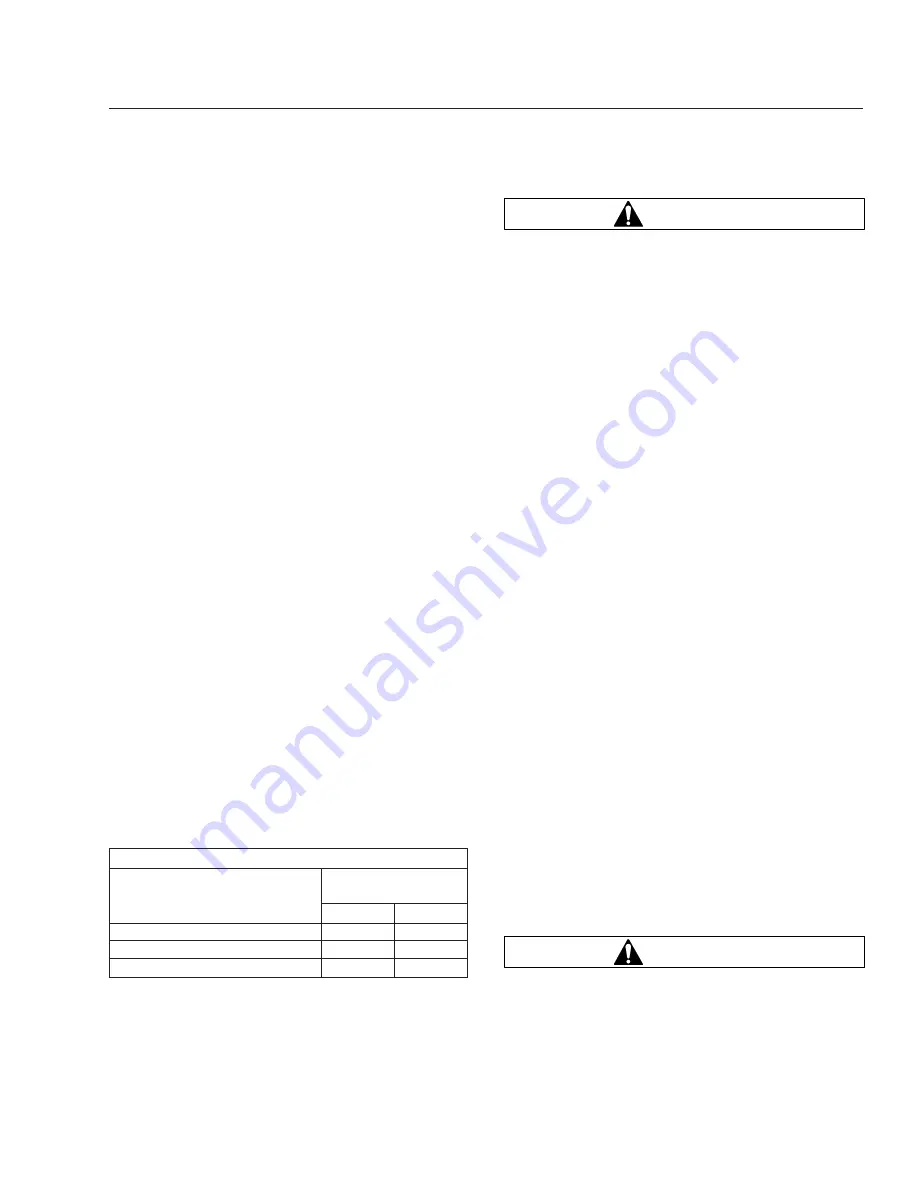
If the pressure drop exceeds the limits
shown in
Table 11.1
, eliminate any leaks
before operating the vehicle.
6.
Check the air pressure reserve.
With the engine still off, make one full brake ap-
plication and observe the pressure drop on the
primary air gauge. If pressure drops more than
25 psi (172 kPa), eliminate any leaks before op-
erating the vehicle.
Maximum Allowable Air Leakage
Description
Pressure Drop:
psi (kPa) Per Minute
Released
Applied
Truck or Tractor Only
2 (14)
3 (21)
Truck or Tractor w/Single Trailer
3 (21)
4 (28)
Truck or Tractor w/Two Trailers
5 (34)
6 (41)
Table 11.1, Maximum Allowable Air Leakage
WARNING
When cleaning windshields and windows, always
stand on the ground or on a secure ladder or
platform. Use a long-handled window cleaner. Do
not use the cab steps, tires, fenders, fuel tanks,
engine, or under-hood components to access the
windshield or windows. Doing so could cause a
fall and result in an injury.
7.
Inspect the mirrors, window glass, and wind-
shield for cracks or other damage.
8.
Ensure that the horn, windshield wipers, and
windshield washers are operating properly.
These devices must be in good working order for
safe vehicle operation.
9.
Ensure the heater and defroster are operating
properly.
10. Check the operation of all interior lights.
10.1
Turn on the headlights and leave them on.
Ensure all equipped gauge bulbs illumi-
nate in the dash message center.
10.2
Ensure all equipped driver control
switches illuminate.
10.3
Ensure both turn signal indicator bulbs
illuminate in the dash message center
when the turn signal switch is activated.
11. Check the operation of all exterior lights. See
Fig. 11.8
.
11.1
Activate the high-beam headlights and
hazard warning lights.
11.2
Exit the cab and check that all exterior
lights and reflectors are clean and intact.
11.3
Check that the brake lights, taillights,
headlights, turn signals, marker lights,
identification lights, and clearance lights
are working properly.
12. Inspect the seat belts and tether belts.
WARNING
Inspect and maintain seat belts. When any part of
a seat belt system needs replacement, the entire
seat belt must be replaced, both retractor and
buckle side. Any time a vehicle is involved in an
accident, and the seat belt system was in use,
Pretrip and Post-Trip Inspections and Maintenance
11.8


