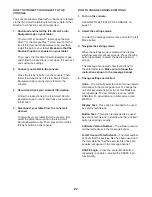
background image

10

8

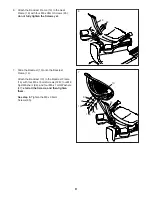
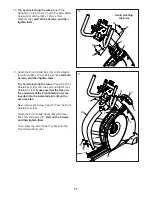
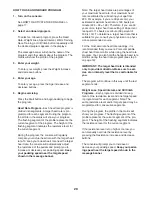
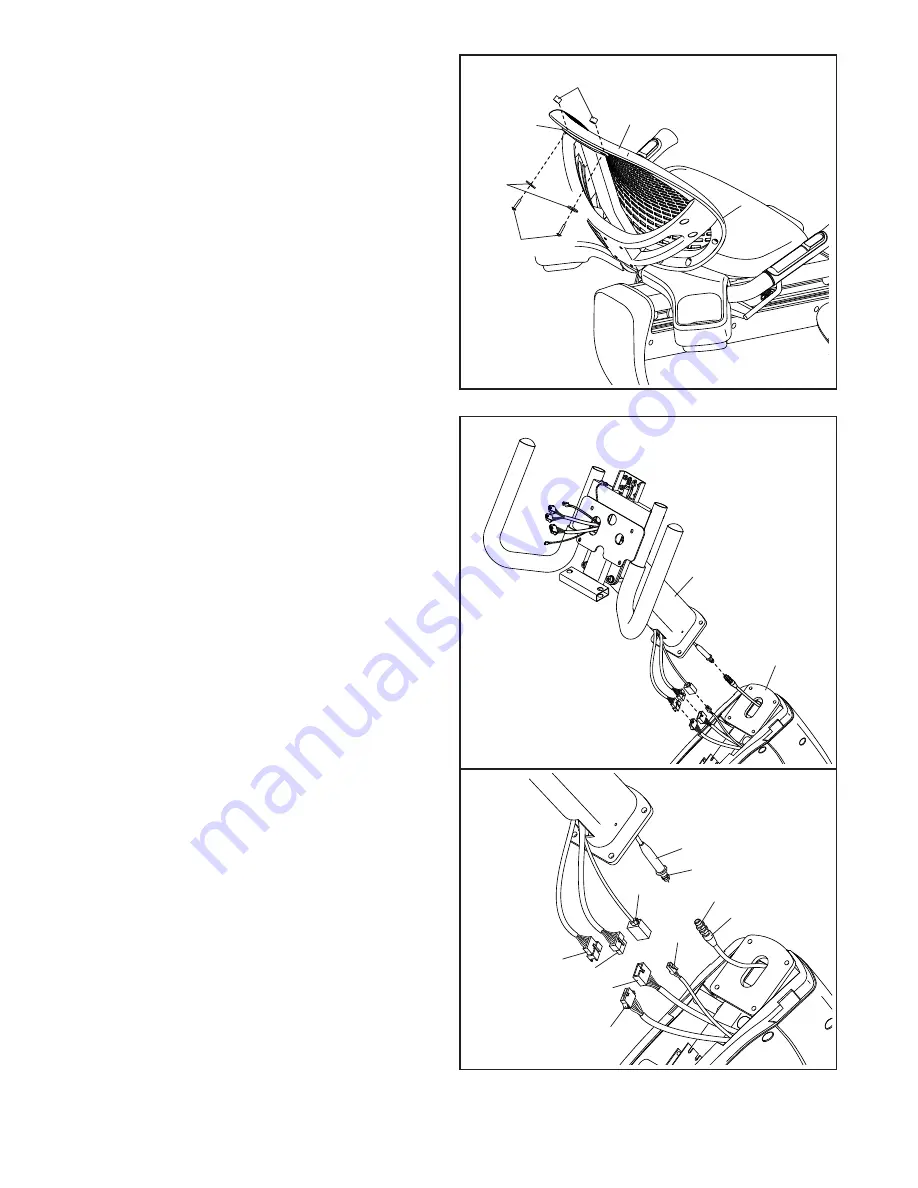
8.  Attach the top of the Backrest (13) to the 

Backrest Frame (14) with two M4 x 25mm 

Screws (94), two M4 Washers (114), and two 

Backrest Spacers (39).

9

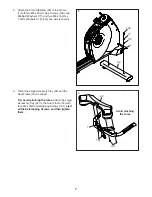
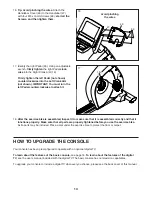
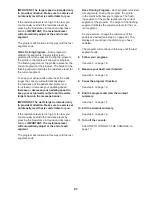
9.  Have a second person hold the Upright (4) near 

the Frame (1).

  See the lower drawing. Connect the Upper 

Main Wire (79) to the Lower Main Wire (123), 

connect the Upper Power Wire (115) to the 

Lower Power Wire (122), connect the Upper 

Pulse Wire (99) to the Lower Pulse Wire (124), 

and connect the Upper TV Coaxial Cable (100) 

to the Lower TV Coaxial Cable (121).

  See the lower drawing. Locate the covers 

(C, D) on the Lower TV Coaxial Cable (121) and 

on the Upper TV Coaxial Cable (100). Slide the 

covers together and push the small cover (C) 

into the large cover (D).

  Then, insert the excess wire into the Upright (4).

13

14

39

114

94

4

1

D

C

79

123

100

121

115

99

124

122

Содержание r8.9b

Страница 1: ...ng this equipment Keep this manual for future reference Model No VMEX82018 0 Serial No Write the serial number in the space above for reference freemotionfitness com QUESTIONS If you have questions or...

Страница 2: ...5 COMPLIANCE INFORMATION 24 MAINTENANCE AND TROUBLESHOOTING 25 EXERCISE GUIDELINES 26 PART LIST 27 EXPLODED DRAWING 29 HOW TO CONTACT CUSTOMER CARE Back Cover LIMITED WARRANTY Back Cover FREEMOTION an...

Страница 3: ...learance around the exercise bike To protect the floor or carpet from damage place a mat under the exercise bike 6 Inspect and properly tighten all parts each time the exercise bike is used Replace an...

Страница 4: ...e For your benefit read this manual carefully before you use the exercise bike If you have questions after reading this manual please see the back cover of this manual To help us assist you note the p...

Страница 5: ...M8 x 40mm Screw 105 1 M8 x 25mm Screw 138 4 M8 x 40mm Cap Screw 145 2 M8 x 20mm Screw 93 4 M6 x 35mm Screw 95 4 M8 x 12mm Seat Screw 125 4 M6 x 15mm Screw 128 4 M5 x 10mm Screw 89 6 PART IDENTIFICATIO...

Страница 6: ...identify small parts see page 5 The following tools not included are required for assembly one adjustable wrench one Phillips screwdriver a set of metric hex keys Assembly may be easier if you have a...

Страница 7: ...Seat Frame 18 with four M4 x 16mm Self tapping Screws 101 start all the Self tapping Screws and then tighten them 3 2 2 2 Attach the Front Stabilizer 50 to the Frame 1 with two M8 x 25mm Cap Screws 13...

Страница 8: ...1 5mm Washer 142 do not fully tighten the Screw yet Finish attaching the Seat Frame 18 with two M8 x 40mm Cap Screws 145 two M8 Split Washers 77 and two M8 x 16mm x 2mm Washers 143 fully tighten the M...

Страница 9: ...s yet 6 7 7 Slide the Backrest 13 onto the Backrest Frame 14 Attach the Backrest 13 to the Backrest Frame 14 with four M6 x 15mm Screws 128 four M6 Split Washers 96 and four M6 x 1mm Washers 97 start...

Страница 10: ...ect the Upper Power Wire 115 to the Lower Power Wire 122 connect the Upper Pulse Wire 99 to the Lower Pulse Wire 124 and connect the Upper TV Coaxial Cable 100 to the Lower TV Coaxial Cable 121 See th...

Страница 11: ...12mm Screws 78 start both Screws and then tighten them Tip Avoid pinching the wires Press the Front Shield Cover 20 onto the Left and Right Front Shields 21 22 make sure that the forks on the undersi...

Страница 12: ...and then tighten them 13 While a second person holds the Console 5 near the Handlebar 47 connect the wires f on the Console to the matching wires g in the Handlebar Insert the excess wire downward thr...

Страница 13: ...from the coupler I and discard the coupler Then plug the wire labeled In J into the In port on the receiver L and plug the wire labeled Out K into the Out port on the receiver Next peel the backing M...

Страница 14: ...eft Crank Arm not shown IMPORTANT You must turn the left Pedal counterclockwise to attach it 16 Tip Avoid pinching the wires Attach the Handlebar Cover 46 to the Handlebar 47 with four M5 x 10mm Screw...

Страница 15: ...bike for cable or over the air TV stations to be viewed Locate the coaxial cable terminal C on the frame of the exercise bike Connect the coaxial cable to the coaxial cable terminal Route the coaxial...

Страница 16: ...or You can even connect your tablet to the console and use the iFit Smart Cardio Equipment app to record and track your workout information You can also use the charging port on the console to charge...

Страница 17: ...RKOUT OR PRESS START TO BEGIN will scroll across the message banner HOW TO TURN OFF THE CONSOLE If the pedals are not moved and no buttons are pressed for a short while the console will turn off autom...

Страница 18: ...until a flashing light appears next to the displays in a repeating cycle When the quick start mode is selected the time display will show the elapsed time When a pro gram is selected the time display...

Страница 19: ...t rate reading hold the contacts for at least 15 seconds If the display does not show your heart rate make sure that your hands are positioned as described Be careful not to move your hands excessivel...

Страница 20: ...ate Your maximum heart rate is estimated by subtracting your age from 220 For example if you are 30 years old your estimated maximum heart rate is 190 beats per minute 220 30 190 Therefore if you are...

Страница 21: ...IMPORTANT The watts target is intended only to provide motivation Make sure to exercise at an intensity level that is comfortable for you If the resistance level is too high or too low you can manual...

Страница 22: ...the console HOW TO CHANGE CONSOLE SETTINGS 1 Turn on the console See HOW TO ACTIVATE THE CONSOLE on page 17 2 Select the settings mode To select the settings mode press and hold the left Mode button...

Страница 23: ...vigate right and left in the digital TV menus Enter button right Mode button Press these buttons to make a selection Left Mode button Press this button to select a TV source Start button Press this bu...

Страница 24: ...d on try to correct the interference by one or more of the following measures Reorient or relocate the receiving antenna Increase the separation between the equipment and the receiver Connect the equi...

Страница 25: ...the handgrip heart rate monitor or if the dis played heart rate appears to be too high or too low see step 5 on page 19 If a replacement power adapter is needed call the telephone number on the cover...

Страница 26: ...ic Exercise If your goal is to strengthen your cardiovascular system you must perform aerobic exercise which is activity that requires large amounts of oxygen for prolonged periods of time For aerobic...

Страница 27: ...g 52 1 Large Accessory Tray 53 2 Short Grip 54 1 Seat Handle Spring 55 1 Handle Bushing 56 1 Ground Wire 57 2 Wheel 58 2 Coupler 59 1 Drive Belt 60 2 Rail Plate 61 6 Clip Nut 62 2 Rear Rail Bumper 63...

Страница 28: ...Adapter Wire 131 1 Handlebar Cover Cap 132 2 Crank Bearing 133 1 Crank Spacer 134 1 Bearing Spacer 135 1 M4 x 10mm Screw 136 1 M5 x 12mm x 1mm Washer 137 1 M4 x 8mm Screw 138 4 M8 x 25mm Cap Screw 139...

Страница 29: ...28 32 31 34 38 40 41 43 43 46 131 135 56 81 48 45 42 44 51 47 49 59 57 26 81 89 86 86 130 88 85 138 110 138 85 68 17 142 98 68 82 82 37 82 82 50 76 77 77 80 80 84 87 89 78 92 92 93 93 154 156 132 134...

Страница 30: ...15 54 53 60 63 91 74 157 157 62 64 90 103 103 77 77 77 80 80 119 119 62 60 148 77 101 101 66 30 30 67 67 67 30 30 66 33 36 106 106 107 108 106 106 85 125 125 35 142 14 95 94 39 114 114 52 65 69 70 72...

Страница 31: ...DRAWING C Model No VMEX82018 0 R0619B 19 20 21 23 22 24 27 78 78 78 78 78 78 78 78 78 78 78 78 73 101 101 102 102 5 129 139 140 141 144 151 152 153 149 146 146 150 147 118 58 101 101 102 102 101 101 1...

Страница 32: ...to the original owner and is non transferable 2 The labor warranty applies only to products sold in the US and Canada Contact your authorized Freemotion Fitness dealer for details on labor coverage i...

Отзывы: