background image

9

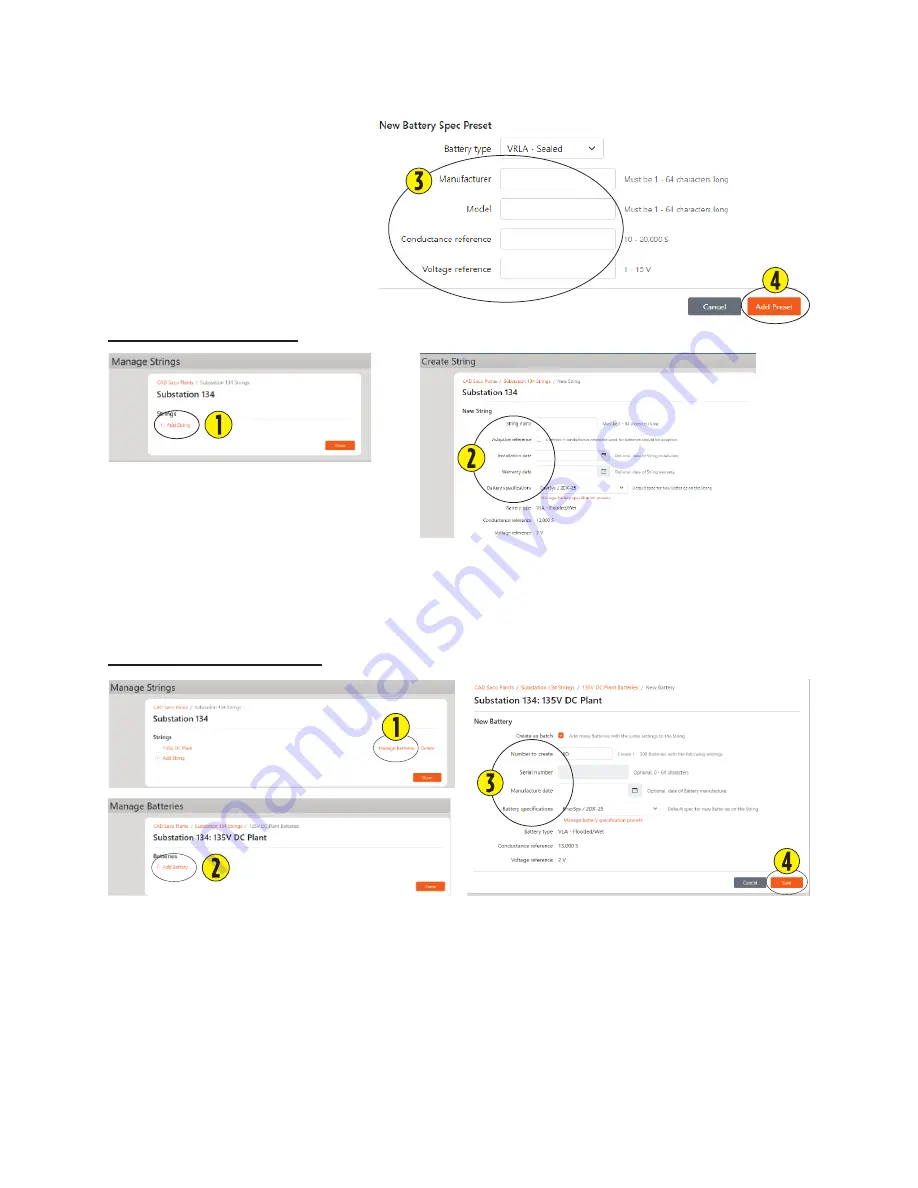
3.  Enter the following information

• 

Manufacturer name.

• 

Battery model name/number.

• 

Conductance baseline reference value.

• 

Nominal battery/cell voltage.

4.  Select "

Add Preset

" when done.

Creating a Battery String

1.  Select "

Add String

".

2.  Enter the following information.

• 

Name the Battery String.

• 

Installation Date and Warranty Date are optional fields.

• 

Select a Battery Specification from the list or create a new battery specification for the string.

Adding Batteries to a String

1.  Select "

Manage Batteries

".

2.  Select "

Add Batteries

".

3.  Enter required information.

4.  Select "

Save

" when done.

Содержание Celltron UNITE

Страница 1: ...Celltron advantagedigitalbatterytester UNITE START UP guide ...

Страница 2: ...y manufacturer and the manufacturer of any equipment you intend to use in the vicinity of a battery Review cautionary marking on these products and on the battery cabinets battery racks battery rooms and on equipment containing the battery WARNING Do not disassemble any equipment contact Franklin Electric Grid Solutions when a repair is required Incorrect reassembly may result in a risk of electri...

Страница 3: ...WiFi Commissioning the CADD to UNITE 6 Verify the CADD is Connected to UNITE 7 Create or Add a Plant in UNITE 7 Creating a Battery Specification 8 Creating a Battery String 9 Adding Batteries to a String 9 Setting Alarm and Warning Thresholds 10 Stage a Download to the CADD 10 Assign the CADD 11 Ready to Download to the CADD 11 Download Data from UNITE to the CADD 11 View the Data Downloaded to th...

Страница 4: ...Intentionally Blank ...

Страница 5: ...a storage proactive maintenance planning and compliance reporting Creating Tester Organizations in UNITE 1 Login to UNITE with your email address and password at unite1 franklingrid com 2 Select Add new organization 3 Name the organization This can be a company name region district office etc 4 Provide a description Battery Testing Data for example 5 Select CAD Testing from the drop down list 6 Se...

Страница 6: ...ot support enterprise WIFI so you will need to use a network where it is just SSID and password or just SSID for unsecured There are no allowances for usernames IMPORTANT Do not include http s when you enter your web address TXT 3 Copy txt file to a USB flash drive 4 Insert the flash drive in the USB A port data storage transfer Required Information WiFi connection name SSID Password UNITE Web Add...

Страница 7: ...edintheCADDport PressF3toconfirm IMPORT WiththeUSBflashdrive insertedintheCADDport PressF3toIMPORTthe WIFIprofileyoucreated After import you can edit the name and match TYPE to your security type None no password for an unsecured network or WPA WPA2 for a secured network WEP is rare To edit these fields highlight the item and press enter on the selected setting Press the Main Menu key when finishe...

Страница 8: ... time connecting to a WIFI profile and if you are connected to the WIFI network in your selected profile you will see an IP address NET will be YES and UNITE will be NO fig A NOTE If the device obtains and displays an IP address it is connected to WIFI but you may have entered something wrong in your profile or have a problem with your network For this case NET is NO and UNITE is NO fig B Adding t...

Страница 9: ...5 2 Choose the desired Testing Organization to associate your CADD with 3 Select Manage 4 Select Add a new CADD 5 Enter your four digit code from the CADD 6 Select Add ...

Страница 10: ...COMMISSIONIcon PressF3toSELECT PressF3toconfirm commissioning CodetoenterinUNITE NOTE The code will be a unique four digit code for each CADD 5241 is just an example WiFi Commissioning the CADD to UNITE NOTE Email will turn gray after you click Save 1 Name the CADD and press Enter 2 Assign a Registered User s email from the dropdown list to the CADD 3 Select Save ...

Страница 11: ...3toSELECT X indicatesno networkconnection indicatesnetworkconnection If the connection times out repeat the process NOTE The NET listingofYESorNOindicatesifthedevicecanaccesstheUNITE server NOTE The UNITE listingofYESorNOindicatesifthedeviceiscommissionedtotheUNITE serveritisattemptingtocommunication Create or Add a Plant in UNITE 1 Select Manage 2 Select Manage Tester Battery Plants 3 Select Add ...

Страница 12: ...TE Latitude and longitude coordinates are optional Enter the coordinates if you want a map view of your plants NOTE If creating a new battery specification see Creating a Battery Specification below Creating a Battery Specification 1 Select Create and apply a new specification 2 Select battery type from menu ...

Страница 13: ...ing a Battery String 1 Select Add String 2 Enter the following information Name the Battery String Installation Date and Warranty Date are optional fields Select a Battery Specification from the list or create a new battery specification for the string Adding Batteries to a String 1 Select Manage Batteries 2 Select Add Batteries 3 Enter required information 4 Select Save when done ...

Страница 14: ...r selected 2 Stage a Download to the CADD 1 Select Manage 2 Select Manage CADD Downloads 3 Select Stage a new download 4 Name the download 5 Select Stage Download when done NOTE You can select a Plant which will include all battery strings in that Plant You can select an individual or multiple battery strings Selecting at a higher level will include everything below that level ...

Страница 15: ...d to the assigned CADD select Assign CADs Download Data from UNITE to the CADD indicatesnetworkconnection MakesureyourCADDis connectedtoWIFIand UNITE FromtheMainMenu navigatetotheWIFIIcon PressF3toSELECT Navigatetothe DOWNLOADIcon PressF3toSELECT PressF3toconfirm youwanttogetdata fromUNITE Youwillseethe DOWNLOADWAS SUCCESSFUL message whenalldataisreceived ...

Страница 16: ...ee theBatteryStringsthat aresetupintheCADD fortesting NOTE When battery testing is finished you can upload the data to UNITE Upload Data from the CADD to UNITE indicatesnetworkconnection MakesureyourCADDis connectedtoWIFIand UNITE FromtheMainMenu navigatetotheWIFIIcon PressF3toSELECT Navigatetothe UPLOADIcon PressF3toSELECT PressF3toconfirm youwanttosenddata toUnite Youwillseethe UPLOADWAS SUCCESS...

Страница 17: ...3 Contact Information Tech Support FGSTechsupport franklingrid com Customer Svc GridCustomerService fele com Grid Pro University https gridpro exceedlms com student catalog Web https www franklingrid com ...

Страница 18: ...10000011488 r1 ...

Отзывы: