


– 10 –
CE-50 / CE-75 / TE-50 / TE-75 / TE-75S / TE-125 / TE-125BF
EN
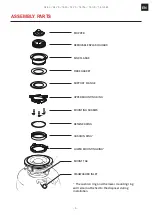
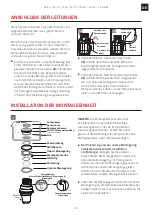
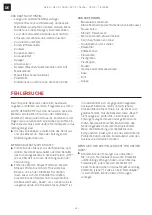
PLUG SOCKET
13 AMP FUSED
DOUBLE POLE
SWITCHED SPUR
WALL MOUNTED
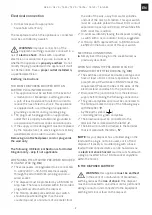
ELECTRICAL CONNECTION
FOR DISPOSER PROVIDED
WITH PREWIRED MOLDED
PLUG AND LEAD.
For continuous feed only
- not batch feed
3A
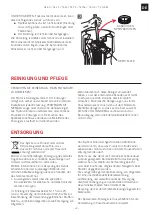
13 AMP FUSED
DOUBLE POLE
SWITCHED SPUR
WALL MOUNTED
FIXED WIRE ELECTRICAL
CONNECTION
13 AMP FUSED
SPUR MOUNTED
UNDER SINK
3B
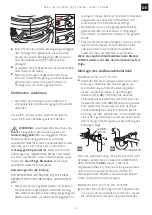
Replacing the fuse in moulded plugs
9
The correct fuse cover must be refitted when
changing the fuse.
9
Remove the fuse cover and slide the fuse out.
9
Replace it with a 13 Amp ASTA fuse (approved
to BS 1363). Should the fuse cover be lost or
damaged, an exact replacement should be used.
These are available from an approved service
agent, listed below. Never use the plug without
the fuse cover fitted.
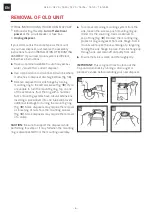
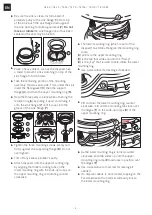
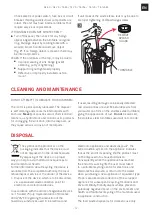
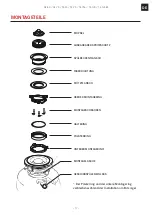
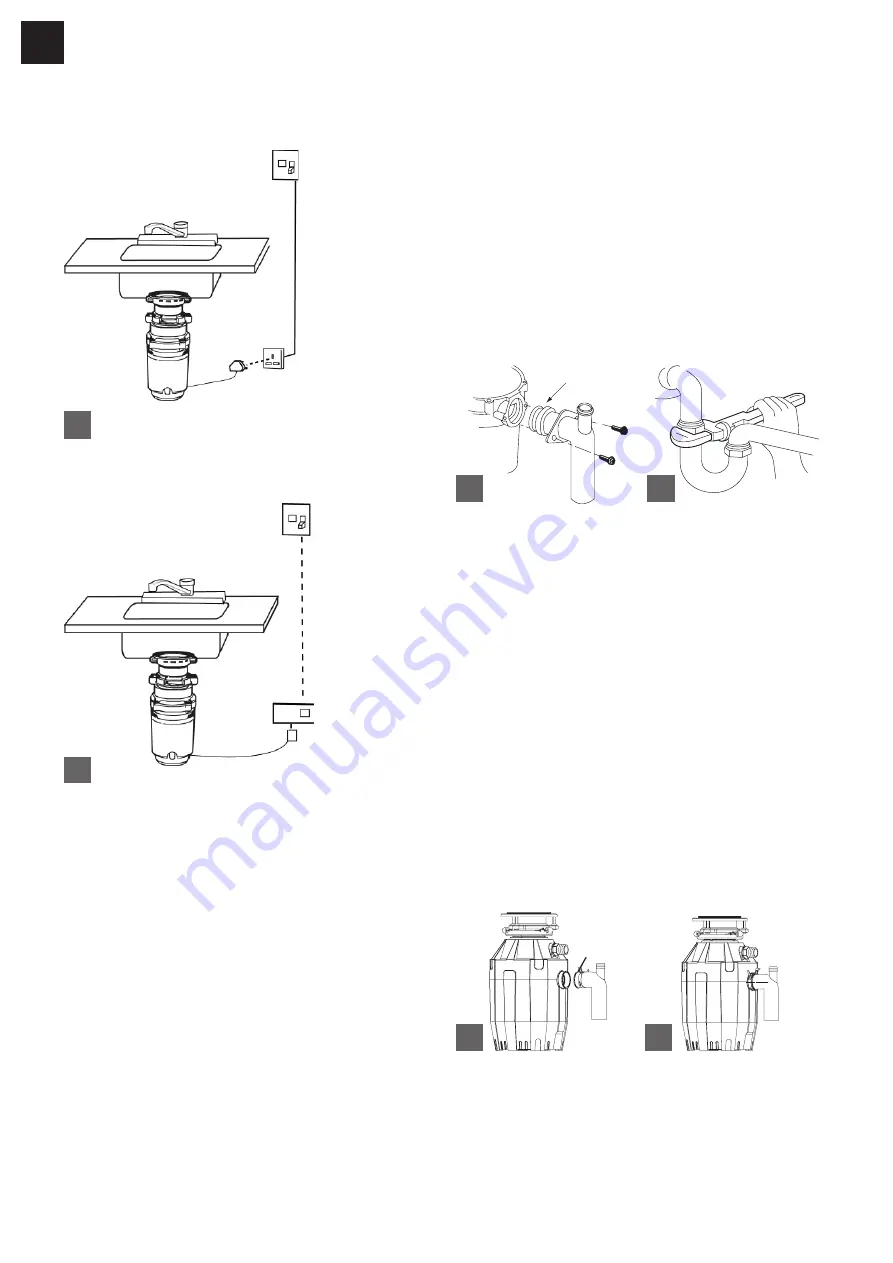
Attaching discharge elbow
MODELS CE-50, CE-75, TE-75S
X
X
Connect the waste elbow to the disposer by
sliding the flange against the rubber gasket on the
elbow and tightening the screws into the disposer
(fig.
4A
). Then connect bottom of the elbow by
tightening the slip nut (fig.
4B
). If using a straight
pipe, it must have a lip similar to the one on the
elbow. Remove the gasket from the elbow and
install it on the straight pipe with the flat end of
the gasket facing toward the disposer discharge
opening.
4A
4B
P-TRAP
RUBBER
GASKET
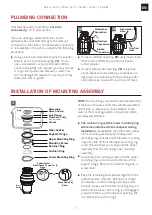
If you are connecting to a dishwasher, return to
PLUMBING CONNECTION section (
2A
-
B
). If not,
make sure all plumbing connections are tight and in
accordance with all plumbing codes and ordinances.
Run water and check for leaks.
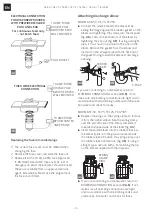
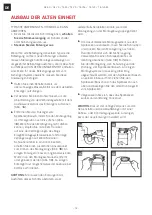
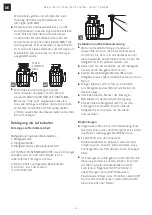
MODELS TE-50, TE-75, TE-125, TE-125BF
X
X
Depress the wings on the spring clamp to remove
it from the rubber sleeve. Slip the spring clamp
over the smooth side of the elbow and slide it
towards the lipped side of the elbow (fig.
4C
).
X
X
Insert the waste elbow into the rubber sleeve so
the elbow lip fits into the groove located inside
the rubber sleeve. Position the spring clamp over
the rubber sleeve and secure (fig.
4D
). If using a
straight pipe, use one with a lip matching the lip
on the elbow supplied with the disposer.
4C
SPRING
CLAMP
RING
4D
X
X
If you are connecting to a dishwasher, return to
PLUMBING CONNECTION section (
2A
-
B
). If not,
make sure all plumbing connections are tight
and in accordance with all plumbing codes and
ordinances. Run water and check for leaks.
Содержание CE-50
Страница 2: ...2 CE 50 CE 75 TE 50 TE 75 TE 75S TE 125 TE 125BF EN...
Страница 63: ...63 CE 50 CE 75 TE 50 TE 75 TE 75S TE 125 TE 125BF ES...
Страница 64: ...64 CE 50 CE 75 TE 50 TE 75 TE 75S TE 125 TE 125BF EL 65 65 66 67 68 69 69 71 71 72 73 73 73 74 75 76...
Страница 65: ...65 CE 50 CE 75 TE 50 TE 75 TE 75S TE 125 TE 125BF EL FRANKE X X X X Z Z X X 9 9 Z Z...
Страница 67: ...67 CE 50 CE 75 TE 50 TE 75 TE 75S TE 125 TE 125BF EL...
Страница 68: ...68 CE 50 CE 75 TE 50 TE 75 TE 75S TE 125 TE 125BF EL Z Z Z Z X X X X 1A X X 1B 1B 1C X X 1D X X 1A 1B 1C 1D...
Страница 69: ...69 CE 50 CE 75 TE 50 TE 75 TE 75S TE 125 TE 125BF EL X X 2A 2B 2A X X 2B X X 2B 2 CE XX TE XX 3 X X X X 3...
Страница 74: ...74 CE 50 CE 75 TE 50 TE 75 TE 75S TE 125 TE 125BF EL X X X X OFF X X 3 X X X X 7...
Страница 75: ...75 CE 50 CE 75 TE 50 TE 75 TE 75S TE 125 TE 125BF EL 7...
Страница 76: ...76 CE 50 CE 75 TE 50 TE 75 TE 75S TE 125 TE 125BF EL Z Z 15 25 2002 96...
Страница 77: ...77 CE 50 CE 75 TE 50 TE 75 TE 75S TE 125 TE 125BF EL...
Страница 102: ...102 CE 50 CE 75 TE 50 TE 75 TE 75S TE 125 TE 125BF RU 103 103 104 105 106 107 107 109 109 110 111 111 111 112 113 114...
Страница 103: ...103 CE 50 CE 75 TE 50 TE 75 TE 75S TE 125 TE 125BF RU FRANKE X X X X Z Z X X 9 9 Z Z...
Страница 104: ...104 CE 50 CE 75 TE 50 TE 75 TE 75S TE 125 TE 125BF RU Z Z Z Z Z Z Z Z Z Z Z Z Z Z Z Z Z Z Z Z Z Z 220 240 50 60...
Страница 105: ...105 CE 50 CE 75 TE 50 TE 75 TE 75S TE 125 TE 125BF RU...
Страница 106: ...106 CE 50 CE 75 TE 50 TE 75 TE 75S TE 125 TE 125BF RU Z Z Z Z X X X X 1A X X 1B 1B 1C X X 1D X X 1A 1B 1C 1D...
Страница 107: ...107 CE 50 CE 75 TE 50 TE 75 TE 75S TE 125 TE 125BF RU X X 2A 2B 2A X X 2B X X 2B 2 CE XX TE XX 3 X X X X...
Страница 112: ...112 CE 50 CE 75 TE 50 TE 75 TE 75S TE 125 TE 125BF RU X X X X X X 3 X X...
Страница 113: ...113 CE 50 CE 75 TE 50 TE 75 TE 75S TE 125 TE 125BF RU X X 7 7...
Страница 114: ...114 CE 50 CE 75 TE 50 TE 75 TE 75S TE 125 TE 125BF RU Z Z 15 25 2002 96 EC...
Страница 115: ...115 CE 50 CE 75 TE 50 TE 75 TE 75S TE 125 TE 125BF RU...
Страница 127: ...127 CE 50 CE 75 TE 50 TE 75 TE 75S TE 125 TE 125BF TR...


