34
Electrical connection scheme
WARNING:
Before starting any work related with gas installation, turn off gas supply. Risk of explosion.
Please operate your oven in dry atmosphere.
1.
Fit the clamp to the hose. Push one of the hose until it goes to the end of the pipe.
2.
For the sealing control; ensure that the buttons in the control panel are closed, but the gas cylinder is
open. Apply some soap bubbles to the connection. If there is gas leakage, there will be foaming in the soaped
area.
3.
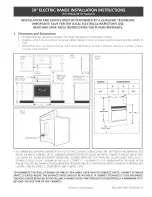
The oven should be using a well ventilation place and should be install on flat ground.
4.
Re-inspect the gas connection.
5.
When placing your oven to its location, ensure that it is at the counter level. Bring it to the counter level
by adjusting the feet if necessary.
6.
Do not make gas hose and electrical cable of your oven go through the heated areas, especially through
the rear side of the oven. Do not move gas connected oven. Since the forcing shall loosen the hose, gas
leakage may occur.
7.
Please use flexible hose for gas connection.
For LPG connection.
For LPG (cylinder) connection, affix metal clamp on the hose coming from LPG cylinder. Affix an edge of the
hose-on-hose inlet connector behind the appliance by pushing to end through heating the hose in boiled
water. Afterward, bring the clamp towards end section of the hose and tighten it with screwdriver. The gasket
and hose inlet connector required for connection is as the picture shown below.
NOTE:
The regulator to be affixed on LPG cylinder should have 300 mms feature.
5.
GAS CONNECTION