


19
Chapter 2 Installation Instructions
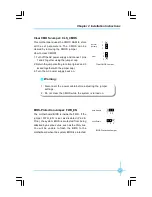
S/PDIF Out Connector: SPDIF_OUT
The S/PDIF out connector is capable of pro-
viding digital audio to external speakers or
compressed AC3 data to an external Dolby
digital decoder.
SPDIF_OUT
5V
GND
Empty
DATA
1
Audio Interface: F_AUDIO
The audio interface provides two kinds of
audio output choices: the Front Audio, the
Rear Audio. Their priority is sequenced from
high to low (Front Audio to Rear Audio). If head-
phones are plugged into the front panel of
the chassis (using the Front Audio), then the
Line-out (Rear Audio) on the rear panel will
not work. If you do not want to use the Front
Audio, pin 5 and 6, pin 9 and 10 must be
short, and then the signal will be sent to the
rear audio port.
F_AU DIO
MIC_GND
MIC
+5VAC
MIC_PW R
AUT_RET_R
AUD_OUT_R
EMPTY
AUD_OUT_L
AUT_RET_L
1
2
9
10
NC
Speaker Connector: SPK
The speaker connector is used to connect
speaker of the chassis.
SPEAKER
SPK
SPKJ
Emypty
NC
1
Additional COM Connector:COM2
This board provides an additional serial
COM connector for your computer. You
need connect the switching-cable to this
connector first, and then connect the serial
COM device with the port of the switching-
cable.
COM2
DSR#
DCD#
RI#
GND
RTS#
TX D
EMP TY
DTR#
CTS#
1
2
9
10
RX D
PDF created with pdfFactory Pro trial version
www.pdffactory.com