20
• To prevent the cooktop from discoloring or staining, clean cooktop after each use, and wipe up acidic or sugary
spills as soon as the cooktop is cooled.
• The sealed burners of your range are not secured to the cooktop and are designed to be removed easily. Boil
overs or spills will not seep underneath the cooktop. The burners should be cleaned after each use.
Oven Light
The oven light is controlled by a push switch on the control panel.
The light can be used while cooking or cleaning the oven.
WARNING
Before replacing the oven light, make sure power is disconnected from the
electrical box and the oven is cooled completely. Disassemble the light cover and
replace the light bulb with a 40-watt halogen bulb. Install the light cover properly.
Oven Operation
Temperature gauge
1. The gauge shows the oven temperature in both CELSIUS degree and FAHRENHEIT degree.
2. Correct reading can be obtained when the temperature inside the oven is steady.
3. For model FFSGS6291-48, the gauge is available for the big oven(30” oven) only.
Oven Ignition
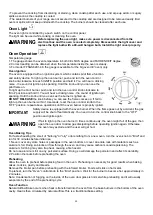
The oven is equipped with an ignition system which contains pilot flame function
and safety device. To light up the oven burner, push and turn the oven control
knob anti-clockwise to reach IGNITE position and hold it. You will hear a clicking
noise - the sound of ignition pin sparking. Hold the knob until you can see the
pilot flame on.
To light up the broil burner, push and turn the oven control knob clockwise to
“Broil” position and hold it. You will hear a clicking noise - the sound of ignition pin
sparking. Hold the knob until you can see the burner is lighted up.
DO NOT RELEASE
the knob before you can see the flame comes up. If fail to
light up the oven burner within 10 seconds, reset the oven control knob to the
“OFF” position, repeat above operations until the oven burner is properly ignited.
IMPORTANT
Safety device is equipped with the oven burner. When the flame goes out by accident, the gas
supply will be shut off automatically. You need to turn the control knob back to the “OFF”
position and ignite again.
WARNING
If fail to light up the oven burner 3 times continuously, the oven might full of the gas, then
open the oven door to allow gas dissipating before operating ignition again. Otherwise,
the oven may explode and the user will get hurt.
Oven Baking Tips
For fast exhausting the smell of "burning" or "oily" odor emitting from a new oven, turn the oven knob to "Broil" and
run for 30 minutes before initial use.
1. Never cover any slots, holes or passages in the oven bottom or cover an entire rack with materials such as
aluminum foil. Doing so blocks air flow through the oven and may cause carbon monoxide poisoning. The
aluminum foil lining may also trap heat, causing a fire hazard.
Do not use aluminum foil on any porcelain surface. Doing so will damage the porcelain and affect its durability.
2. Position the racks before preheating the oven.
Preheating
Allow the oven to preheat before placing food in the oven. Preheating is necessary for good results when baking
cakes, cookies, pastry and breads.
Remove the broiler pan before preheating with the infrared broiler. Foods will stick on hot metal.
To preheat, turn the “Oven” control knob to the “Broil” position. Wait for the burner to become hot, approximately in
2 minutes.
Note: Condensation or fogging on the inside of the oven door glass is normal while preheating and it will usually
evaporate by the end of the preheating cycle
Oven Function
Natural Airflow Bake occurs when heat is transferred into the oven from the bake burners in the bottom of the oven
cavity. Heat is then circulated by natural airflow.This is a traditional bake setting.

