background image

8

1

  Locate a position in facility where appropriate voltage and power receptacles  

are available to operate the heating press 


Warning

operating the press on incorrect voltage can cause serious damage and potential  
hazards. 

Before starting, ensure that you have enough belt material to cover the edges of the 
press. the belt material for the edges must be the same type and have the same thick-
ness as the rest of the material.

2

  Visually inspect power cord


Danger

a.  inspect cord for damage. do not use power cord in a damaged state. either replace 

cord or have an electrician remove damaged section and reattach plug.  
electrician must refer to wiring diagram on page 22 for proper attachment.

b.  Confirm compatibility between plug end and power receptacle. if incorrect,  

find alternate power source or have electrician apply correct plug,  
referring to wiring diagram on page 22.


Danger

c.  do not plug power cord into wall receptacle at this time. later in the operation,  

when ready to connect power follow these safe and proper operating procedures:

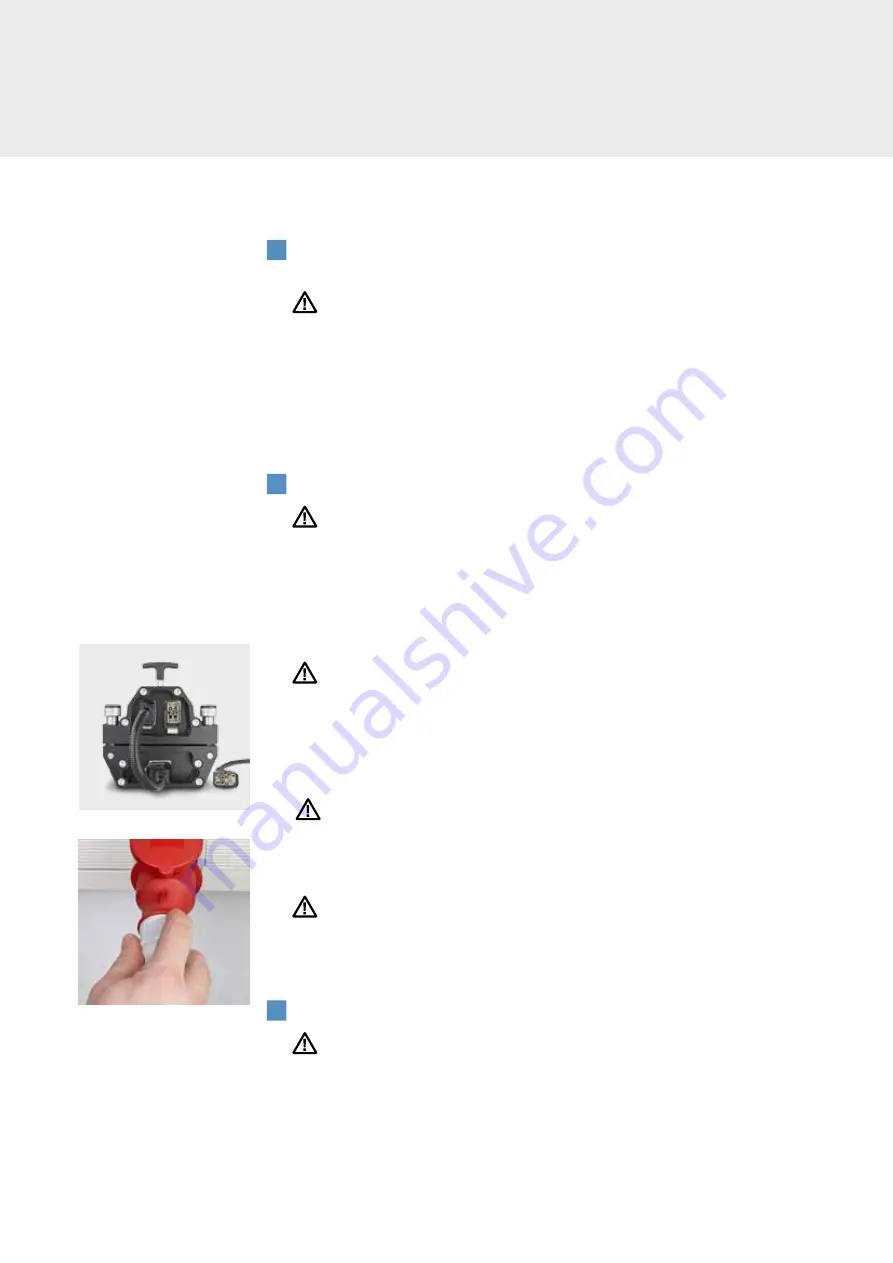
–  First, connect top and bottom press parts by means of connection cable. (Fig. 1)
–   Second, plug power cord into machine base power inlet. 
–   Third, insert plug end into wall receptacle. (Fig. 2)


Danger

–  Never leave power cord plugged into wall while detached from unit as this could 

lead to a serious electrical danger if it comes in contact with fluids, such as water. 


Danger

d.  all press power inlets and cable connectors have been supplied with keyed  

(patterned) guide pins and bushings. this keying will prevent incorrect connection. 

3

  Remove press from flight case 


Heavy object

note: use proper lifting techniques to avoid personal injury; ask for assistance for 
removal from flight case if press is heavier than you are comfortable handling by  
yourself. 

 Fig. 1

 Fig. 2

saFe operation

Содержание siegling blizzard HP 160/1000 AIR

Страница 1: ...Siegling total belting solutions operating manual Blizzard heating press Contents 3 English manual 27 German manual siegling blizzard splicing equipment TM ...

Страница 2: ...gleskom jeziku Šo ierīci drīkst lietot tikai personas kuras ir izlasījušas un iepazinušās ar turpmāk redzamo lietošanas instrukciju vācu vai angļu valodā Šį prietaisą leidžiama pradėti eksploatuoti tik asmenims perskaičiusiems ir supra tusiems toliau pateiktą vokišką arba anglišką instrukcijų žinyną Dit apparaat mag alleen door personen in gebruik worden genomen die de volgende Duitse of Engelse g...

Страница 3: ... BEFORE operating the press Please keep this manual available for other users and owners before they use the heating press 4 Main components 5 Technical data 6 Introduction 7 General safety rules 8 Safe operation 16 Plans and schemes 20 Wiring diagram of the power supply cables 22 Wiring diagram 26 Technical assistance Manufacturer s notification EC Declaration of conformity operating manual Blizz...

Страница 4: ...in components Front connections Front controls Handle Front connections Start button Front controls Timer Top frame controller Bottom frame controller Air bleeder button Pressure switch Top jumper connection Connection to the mains inlet Bottom jumper connection Bottom frame ...

Страница 5: ...t mm in 118 4 6 118 4 6 118 4 6 118 4 6 118 4 6 118 4 6 Height Bottom part mm in 84 3 3 84 3 3 84 3 3 84 3 3 84 3 3 84 3 3 Max pressure bar psi 2 5 36 3 2 5 36 3 2 5 36 3 2 5 36 3 2 5 36 3 2 29 Max temperature C F 200 392 200 392 200 392 200 392 200 392 200 392 Transport dimensions LxWxH mm 875 x 370 x 350 875 x 370 x 350 1275 x 370 x 350 1275 x 370 x 350 1775 x 370 x 350 1775 x 370 x 350 Transpor...

Страница 6: ...at stage the inside splice temperature can be reached much quicker minimizing the risk for unwanted flow of material discoloring or fabric shrinkage Basic process Splice pressure is applied by an internal compressor max 2 5 bar 36 3 psi Siegling Blizzard HP 160 1500 AIR max 2 0 bar 29 psi Heats up to a splice temperature of max 200 C 392 F Keeps it at the splice temperature adjustable dwell time C...

Страница 7: ...fety precautions Danger Terminate electrical hazards by removing power cord from wall receptacle or machine base inlet Warning Terminate pressure related hazards by pressing the red pressure relief button Caution Press platens develop over 5 tons of clamping force When operating the press keep the four press connector bolts in place by hand tightening Caution Avoid temperature related hazards by h...

Страница 8: ... electrician apply correct plug referring to wiring diagram on page 22 Danger c Do not plug power cord into wall receptacle at this time Later in the operation when ready to connect power follow these safe and proper operating procedures First connect top and bottom press parts by means of connection cable Fig 1 Second plug power cord into machine base power inlet Third insert plug end into wall r...

Страница 9: ...re damaged do not use press until they are replaced 5 Checking the heating press works Forbo Siegling recommends inspecting the heating press twice a year Tools required Temperature measurement device accuracy 1 C including a temperature sensor Pressure measurement device including pressure sensor Straightedge Use the tools listed to check the temperature pressure and flatness of your Siegling Bli...

Страница 10: ... platen Please ensure that the areas to be heated are centered correctly Depending on the belt type slight heat loss can occur in the outer areas of the heating zone A prepared finger splice or layer separation must be within the heating zone because any material outside it won t melt Fig 4 c Please follow this procedure if you want to make a finger splice For splices without any additional materi...

Страница 11: ...t is missing or broken replace with authorized factory parts only Warning To ensure proper thread engagement the prepared belt ends including various pads cannot exceed 15 mm 0 59 in This does not necessarily relate to the press heating capability Exceeding this thickness will not allow sufficient thread engagement of the Connecting bolts to ensure safe clamping of the press and can result in dama...

Страница 12: ...ure the voltage and receptacle is appropriate for the power cable you are using Incorrect excessive power voltage can cause serious damage to press and also present physical danger i e 460 volt outlet feeding into a 230 volt cable could cause a short circuit and or fire d Next insert power cable plug into the appropriate wall receptacle Fig 12 Important Only plug power cord into wall receptacle af...

Страница 13: ...ler Controls Joint temperature Stepped temperature and dwell time Parameters are entered in the same way as in the bottom digital control system The only values that are not entered in this one are the joint temperature and the cooling temperature For instance SoAK and AL 1 will not show up c Pressure switch Select the requiered pressure as well as the acceptable minimum pressure to restart the co...

Страница 14: ...f it is not the air compressor will supply pressure again what may cause a physical danger an also a damage to the press If the press is going to repeat a process just press the start button and it will automatically make another joint Once the pressure is released dismantle carefully the top part of the press When the press is disconnected the parameters of the last joint are stored 14 Disconnect...

Страница 15: ... engage the locking latches 18 Maintenance a The reading and the application of the advises of this handbook besides the right usage of the Blizzard are the primary premises for the right maintenance and the conservation of Forbo Siegling presses b Forbo Siegling suggest a visual checking of all the system each time working with Blizzard pressure indicators and electrical connections The usage of ...

Страница 16: ...16 PLANS AND SCHEMES Components of top frame ...

Страница 17: ...17 Components of bottom frame ...

Страница 18: ...18 PLANS AND SCHEMES Components of the connections Connection top E Bottom E Part Nº 36 Connection to the mains part nº 35 ...

Страница 19: ...ection 1 38 Bases top front 1 39 Top frame 1 40 Relay holder 1 41 Relay 2 42 Carril 1 43 Perforated plate 2 44 Nonslip rubber 2 45 Power source 1 46 Digital plate 1 47 Buzzer 1 48 Borna s 4 4 49 Fan A441352 3 50 Part 1 handle 2 51 Part 2 handle 2 52 Handle 2 58 Transformer 150 VA 1 Item no Description code Qty 1 Belt clamps bolt 4 2 Belt clamps 2 3 Bottomplaten 1 4 Resistance 1 5 Plate epoxy 1 6 W...

Страница 20: ...ly cables mono phase 230 V three phase 230 V III three phase 400 V III three phase 400 V III N T grey grey brown black black blue blue black blue blue brown black grey grey brown black brown black grey grey brown black brown black Ground Ground Ground Ground ...

Страница 21: ...21 ...

Страница 22: ... 2 3 4 5 6 7 8 A B C D E F Designación del proyecto Designación del folio PROGRAMA SEE TECHNICAL DE IGE XAO FOLIO REALIZADO CON EL Gamma 1000 400V III 19 3 15 Electric Diagram 23 4 15 Sr Mena Sr Perez Sr Perez 1 5 F A 230V 24V C C 0 1 0 1 1 2 R E 1 R E 2 3 4 3 4 CT 1 1 2 3 4 3 4 CT 2 8 2 1 1 2 3 4 T Review 5 GAMMA Handbook Electrical scheme ...

Страница 23: ...DO CON EL Gamma 1000 400V III 19 3 15 Electric Diagram 20 3 15 Sr Mena Sr Perez Sr Perez 2 5 0 1 CT 1 CT 2 C P Brown 24V Blue 24V Black 0 1 6 16 0 M K Ka 7 7 5 2 2 L P 18 Ka 7 1 1 0 0 MZ S CT 1 CT 2 CT 2 6 5 7 7 4 3 4 10 10 CT 2 CT 1 5 8 5 3 3 CT 1 20 16 19 0 0 S Ka 6 S 3 Ka 6 Ka 6 Ka 6 0 0 15 1 17 1 21 21 0 0 0 0 0 CT 1 Ka 1 Ka 2 Ka 1 R V 1 Ka 2 R V 2 R V 3 CT 1 Ka 4 6 9 1 15 0 7 5 6 1 J3 J3 J3 J...

Страница 24: ...icador 1 2 3 4 5 6 7 A B C D E F Designación del proyecto Designación del folio PROGRAMA SEE TECHNIC FOLIO REALIZADO CON EL Gamma 1000 400V III Electric Diagram Sr Mena Sr Perez Sr Perez Ka 1 Ka 2 Ka 4 1 0 7 RV 1 _ RV 2 _ RV 3 _ RV 4 _ RV 5 _ 0 24V J1 J2 J3 GAMMA 55 BR 4 6 15 ...

Страница 25: ... 15 Sr Mena Sr Perez Sr Perez 4 5 3 4 2 8 1 V B Top Plate Botton Plate 1 2 3 4 5 6 7 A B C D E T Transformer230V 400V 300VA Ka 6 F A R E 2 CT 2 C P S Ka 1 PowerSupply230V 24VDC160W SolidStateRelay Top SolidStateRelay Botton TemperatureController Top TemperatureController Botton PressureController CycleStartSwitch AuxiliaryRelay Cooling Ka 4 AuxiliaryRelay Buzzer Ka 7 AuxiliaryRelay AirCompressor M...

Страница 26: ...Low Voltage Equipment Directive 2006 95 EC Electromagnetic Compatibility Directive 2004 108 EC Manufacturer s notification Technical assistance The splice presses Blizzard 400 Blizzard 600 Blizzard 800 Blizzard 1000 Blizzard 1200 and Blizzard 1500 are made in Spain for Forbo Movement Systems If technical assistance or repair parts are needed please turn to our customer service www forbo siegling c...

Страница 27: ...eses Handbuch gelesen und verstanden haben Halten Sie dieses Handbuch auch für andere Nutzer und Eigentümer griffbereit damit sie es vor Benutzung der Heizpresse lesen können 29 Hauptkomponenten 29 Technische Daten 30 Einführung 31 Allgemeine Sicherheitsregeln 32 Sichere Bedienung 41 Aufbau und Schemata 45 Schaltplan der Stromversorgungskabel 46 Schaltplan Elektrik 50 Kundendienst Herstellerhinwei...

Страница 28: ... Steuerungs seite Anschlußseite Anschlußseite Steuerungsseite Timer Controller Heizpressenunterteil ControllerHeizpressenoberteil Druckentlastungsknopf Druckregler Griff Steckerdose zur Verbindung mit Pressenunterteil Anschluss für Haupt Stromversorgungskabel Steckerdose zur Verbindung mit Pressenoberteil Heizpressenunterteil ...

Страница 29: ...he Oberteil mm in 118 4 6 118 4 6 118 4 6 118 4 6 118 4 6 118 4 6 Höhe Unterteil mm in 84 3 3 84 3 3 84 3 3 84 3 3 84 3 3 84 3 3 Druck maximal bar psi 2 5 36 3 2 5 36 3 2 5 36 3 2 5 36 3 2 5 36 3 2 29 Temperatur maximal C F 200 392 200 392 200 392 200 392 200 392 200 392 Transportmaße L x B x H mm 875 x 370 x 350 875 x 370 x 350 1275 x 370 x 350 1275 x 370 x 350 1775 x 370 x 350 1775 x 370 x 350 T...

Страница 30: ...er Vorwärmphase lässt sich die Heiztemperatur im Inneren viel schneller erreichen und so das Risiko eines unerwünschten Materialflusses einer Verfärbung oder einer Gewebeschrumpfung minimieren Grundsätzlicher Ablauf Aufbau des Heizdrucks von bis zu 2 5 bar 36 3 psi Siegling Blizzard HP 160 1500 AIR max 2 0 bar 29 psi durch den integrierten Kompressor Erzeugung der Heiztemperatur von bis zu 200 C d...

Страница 31: ...Elektrik entfernen Sie das Haupt Stromversorgungskabel aus der Steckdose oder dem Netzanschluss am Fuß des Geräts Warnung Zur Beseitigung von Gefahren in Verbindung mit Druck betätigen Sie den roten Druckentlastungsknopf Vorsicht Die Press Heizplatten entwickeln über 5 Tonnen Klemm kraft Vor Betrieb der Heizpresse müssen Sie die vier Heizpressenverbindungsschrauben mit der Hand fest schrauben Vors...

Страница 32: ...en Sie einen Elektriker den richtigen Stecker anbringen dafür den Schaltplan auf Seite 46 beachten Gefahr c Das Stromversorgungskabel noch nicht in die Steckdose stecken Sobald alle Vorbereitungen zum Anschließen an die Steckdose erledigt sind befolgen Sie diese sichere korrekte Anleitung Verbinden Sie zuerst das Ober und Unterteil der Presse über das Verbindungskabel miteinander Abb 1 Stecken Sie...

Страница 33: ...sser abgespritzt werden Zum Reinigen einen Lappen mit einem Lösungsmittel auf Ammoniakbasis tränken und die Heizpresse damit abwischen Die Heizpresse mit einem sauberen trockenen Lappen abtrocknen d Alle Kabel auf einwandfreien Zustand untersuchen Die Heizpresse nicht mit beschädigten Kabeln verwenden 5 Funktionsprüfung der Heizpresse Forbo Siegling empfiehlt die Heizpresse 2 mal jährlich zu überp...

Страница 34: ...it das Erscheinungsbild der Verbindung nicht durch Quetsch falten beeinträchtigt wird Die Silikonmatten sollen verhindern dass das Bandmaterial an den Press Heizplatten haftet b Legen Sie die vorbereiteten Bandenden auf die untere Heizplatte Hinweis Der beheizte Bereich ist 160 mm breit und befindet sich in der Mitte der Heizplatte Achten Sie auf korrekte Zentrierung auf der Heizfläche Je nach Ban...

Страница 35: ... Heizpressenoberteil einsetzen a Setzen Sie das Heizpressenoberteil vorsichtig auf die vorbereiteten Bandenden auf Achten Sie darauf dass die vorbereiteten Bandenden bzw die Finger nicht getrennt werden Schwerer Gegenstand Wenn Sie aufgrund der Breite bzw des Gewichts der Heizpresse Mühe haben sie anzuheben bitten Sie eine weitere Person um Unterstützung Gefahr b Den oberen Balken zentrieren so da...

Страница 36: ...lig aussetzen 12 Stromversorgungskabel an der Heizpresse anschließen Abb 11 Warnung Es ist äußerst wichtig dass das Stromverbindungskabel zuerst an der Heizpresse und erst danach an die Steckdose angeschlossen wird Erfolgt dies in umgekehrter Reihenfolge besteht die Gefahr eines tödlichen Elektroschocks und es kann ein gefährlicher Lichtbogen entstehen a Den Gerätestecker des Stromversorgungskabel...

Страница 37: ...tur Voreinstellung 173 C an Um die Temperatur zu erhöhen drücken Sie auf Um die Temperatur zu senken drücken Sie auf Verwenden Sie zum Ändern der Ziffer Durch Drücken von öffnet sich die LAdJ Anzeige Durch Drücken von wird SP 0 angezeigt Dieser Parameter dient zum Einstellen der Vorwärm temperatur Durch erneutes Drücken von wird SoAK angezeigt Mit diesem Parameter wird die Haltezeit Voreinstellung...

Страница 38: ...gezeigt Die Presse ist mit einer Druckentlastungsvorrichtung ausgestattet die den maximal aufgebrachten Druck auf 2 7 bar begrenzt Warnung Drücken Sie nicht für längere Zeit auf die SET Taste während der Hauptbildschirm geöffnet ist Andernfalls wird auf dem Bildschirm Unt angezeigt Drücken Sie in diesem Fall erneut auf SET und halten Sie die Taste etwa 3 Sekunden lang gedrückt um wieder zum Hauptb...

Страница 39: ...n Gerätestecker ziehen liegt weiterhin Spannung am Stromversorgungskabel an was bei Kontakt mit Wasser oder anderen Flüssigkeiten zu einem schweren bis tödlichen Stromschlag führen kann 15 Stromverbindungskabel vom Pressenoberteil trennen a Gerätestecker entriegeln b Vorsicht beim Abziehen 16 Pressenoberteil ausbauen a Lösen Sie alle vier Heizpressenverbindungsschrauben b Heben Sie das Pressenober...

Страница 40: ...ühren einschließlich Druckanzeigen und elektrischer Anschlüsse Die Verwendung des Produkts liegt in der Verantwortung des Eigen tümers bzw Be die ners Forbo Siegling gibt in diesem Handbuch nur Empfehlungen für die rich tige Vor ge hensweise um die Sicherheit von Personen zu gewährleisten und die Geräte zu schützen 19 Störungssuche und behebung Symptom Mögliche Abhilfe Keine Stromzufuhr Netzanschl...

Страница 41: ...41 Aufbau und Schemata Komponenten des Pressenoberteils ...

Страница 42: ...42 Aufbau und Schemata Komponenten des Pressenunterteils ...

Страница 43: ...43 Komponenten der Anschlüsse Anschluss Oberteil E Unterteil E Teile Nr 36 Anschluss Netzversorgung Teile Nr 35 ...

Страница 44: ...ung Anschlußseite 1 39 Oberer Rahmen 1 40 Relaishalterung 1 41 Relais 2 42 Schiene 1 43 Perforierte Platte 2 44 Rutschfester Gummi 2 45 Stromversorgung 1 46 Digitale Steuereinheit 1 47 Summer 1 48 Klemme s 4 4 49 Lüfter A441352 3 50 Griff Teil 1 2 51 Griff Teil 2 2 52 Griff 2 58 Transformator 150 VA 1 Teile Nr Beschreibung Menge 1 Schraube für Bandklemme 4 2 Bandklemmen 2 3 Untere Heizplatte 1 4 W...

Страница 45: ...un Schwarz Schwarz Blau Blau Schwarz Blau Blau Braun ERDE ERDE ERDE ERDE Schwarz Grau Grau Braun Schwarz Braun Schwarz Grau Grau Braun Schwarz Braun Schwarz einphasig 230 V dreiphasig 230 V III dreiphasig 400 V III dreiphasig 400 V III N T EU und UK Kabel ...

Страница 46: ...2 3 4 5 6 7 8 A B C D E F Designación del proyecto Designación del folio PROGRAMA SEE TECHNICAL DE IGE XAO FOLIO REALIZADO CON EL Gamma 1000 400V III 19 3 15 Electric Diagram 23 4 15 Sr Mena Sr Perez Sr Perez 1 5 F A 230V 24V C C 0 1 0 1 1 2 R E 1 R E 2 3 4 3 4 CT 1 1 2 3 4 3 4 CT 2 8 2 1 1 2 3 4 T Review 5 GAMMA Handbook Elektrischer Schaltplan ...

Страница 47: ...DO CON EL Gamma 1000 400V III 19 3 15 Electric Diagram 20 3 15 Sr Mena Sr Perez Sr Perez 2 5 0 1 CT 1 CT 2 C P Brown 24V Blue 24V Black 0 1 6 16 0 M K Ka 7 7 5 2 2 L P 18 Ka 7 1 1 0 0 MZ S CT 1 CT 2 CT 2 6 5 7 7 4 3 4 10 10 CT 2 CT 1 5 8 5 3 3 CT 1 20 16 19 0 0 S Ka 6 S 3 Ka 6 Ka 6 Ka 6 0 0 15 1 17 1 21 21 0 0 0 0 0 CT 1 Ka 1 Ka 2 Ka 1 R V 1 Ka 2 R V 2 R V 3 CT 1 Ka 4 6 9 1 15 0 7 5 6 1 J3 J3 J3 J...

Страница 48: ...ificador 1 2 3 4 5 6 7 A B C D E F Designación del proyecto Designación del folio PROGRAMA SEE TECHNIC FOLIO REALIZADO CON EL Gamma 1000 400V III Electric Diagram Sr Mena Sr Perez Sr Perez Ka 1 Ka 2 Ka 4 1 0 7 RV 1 _ RV 2 _ RV 3 _ RV 4 _ RV 5 _ 0 24V J1 J2 J3 GAMMA 55 BR 4 6 15 ...

Страница 49: ...olidStateRelay Top SolidStateRelay Botton TemperatureController Top TemperatureController Botton PressureController CycleStartSwitch AuxiliaryRelay Cooling Ka 4 AuxiliaryRelay Buzzer Ka 7 AuxiliaryRelay AirCompressor M K AirCompressor R V CoolingFan L P Pressurelimiter Description Acronym Description Acronym Controlrelay R E 1 CT 1 Stromversorgung 230 V 24 V DC 160 W Halbleiterrelais Oberteil Halb...

Страница 50: ...inenrichtlinie 2006 42 EG Niederspannungsrichtlinie 2006 95 EG EMV Richtlinie 2004 108 EG Herstellerhinweis Kundendienst Die Heizpressen Blizzard 400 Blizzard 600 Blizzard 800 Blizzard 1000 Blizzard 1200 and Blizzard 1500 werden in Spanien für Forbo Movement Systems hergestellt Wenn Sie technische Unterstützung oder Ersatzteile benötigen wenden Sie sich an unseren Kundendienst www forbo siegling c...

Страница 51: ...51 ...

Страница 52: ...Siegling total belting solutions Ref no 326 1 2 02 20 UD Reproduction of text or parts thereof only with our approval Subject to change ...

Отзывы: