For-x MAESTRO-8DSP Скачать руководство пользователя страница 25

MAESTRO-8DSP Special DSP Amplifier

22

3. Software Operation

User Manual

step1:

Click on the main interface to the top menu " Memory " button will pop up all

the scenes action item (see Figure 3.4.1).
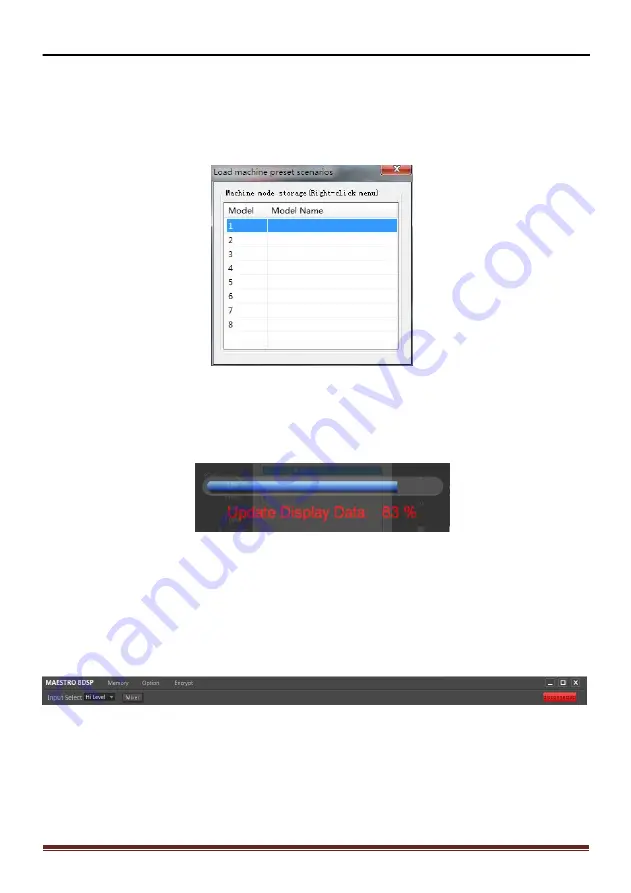
Step2:

Click "Load machine preset " item will pop up after loading machine preset

scene window dialog box (Figure 3.4.5).

Figure 3.4.5

Step3:

As dialog box of figure 3.4.5, select the machine where the user wants to load

a preset number (as selected on the 3rd), and then point below the "Load" button on
the pop-up shown 3.4.6 loading data transfer progress shown in the wait window.

Figure 3.4.6

Step 4:

After data transfer is completed, the machine load preset scene is complete,

but you can see the upper left corner of the software will appear as the currently
running preset scene the name of (Figure 3.4.7 but once in the console interface
parameters changed, it will become the" Custom "in the name, because this time the
machine is running and the data has been loaded set of data that is different).

Figure 3.4.7

3.4.2 Load and Save to store scene files on your computer
1. Save as a scene file on the computer

This function is to save the current machine working scene data to a computer in

order to prepare the late call.

Содержание MAESTRO-8DSP

Страница 1: ...User Manual MAESTRO 8DSP SPECIAL DSP AMPLIFIER Please read this manual carefully before using this product and keep it for future reference...

Страница 2: ...rn off power immediately and do not open cover by yourself Please contact with professional engineer for checking to avoid accident happen Packing List For every package including below items please n...

Страница 3: ...oftware Installation 11 3 2 Run and turn off 11 3 3 Software interface 12 3 3 1 Input signal select 12 3 3 2 Output switch 13 3 3 3 Output voice delay type mute and phase setting 13 3 3 4 Output signa...

Страница 4: ...e light flash alternately Open the Bluetooth of your android mobile searching DSP to pairing it to finish the connected 1 User Operation Instruction Main Interface Main volume adjustment The main volu...

Страница 5: ...subwoofer volume The main volume is 0 60 subwoofer volume is 0 60 Click EQ to enter EQ interface Setting EQ Output channel 1 EQ curve gain Q value and frequency 2 Output EQ gain setting A total of 31...

Страница 6: ...Channel high low pass crossover setting with high low pass independent filtering 2 Frequency Range 20Hz 20KHz Slope selection 6 dB Oct 12dB Oct 18dB Oct 24dB Oct 30dB Oct 36dB Oct 42dB Oct 48dB Oct O...

Страница 7: ...ifier 4 Mixer settings Click Mixer to enter Mixer interface It can Perform 8 Output Channel adjustment USB L USB R digital left and digital right Bluetooth left and Bluetooth right mix selection and a...

Страница 8: ...nput high level input main voice choosing output input adaptor CH1 Output voice 1 8 each output channel is independent of the 31 segment equalizer Filter Slope choice Mute limiter RCA Low level Output...

Страница 9: ...etooth port 6 USB 2 0 port 7 Low level RCA output 8 RCA input 1 3 Software Introduction MAESTRO 8DSP PC software control please check 3 Software Operation detail 1 Automatically detect whatever the ha...

Страница 10: ...ound position and speaker type Output signal gain Gain range Mute 59 9dB to 6 0dB Output signal equalizer 1 8 Each output channel 31 band equalizer engine 1 Equalizer type 1st equalizer for Q and low...

Страница 11: ...ng method is for two units input please refer below 1 Please use Plug Play cable to connect original car unit and MAESTRO 8DSP for upgrade audio system effects Please use OUT5 and OUT6 RCA output when...

Страница 12: ...o high level input lines of FL FL are defined When there is original car or other high level input the machine will detect the audio signal to start the machine Note when do not use high level input o...

Страница 13: ...other functions 2 VOL LED Rotate the knob to increase or decrease Volume 3 SUB VOL LED Rotate the knob to increase or decrease SUB Volume 4 MEMORY LED Rotate the knob to switch to the memory 1 to 8 c...

Страница 14: ...2 Turn on and turn off Double click the MAESTRO 8DSP icon to open the software and the main interface before online is shown in figure 3 2 1 the upper right corner refers to the unconnected state Fig...

Страница 15: ...as shown in figure 3 2 2 5 shows the setting of delay space 6 as shown in figure 3 2 2 6 output channel configuration and common parameter adjustment area 7 as shown in figure 3 2 2 7 shows the setti...

Страница 16: ...1 The output volume control volume control for each channel independently and the master volume pushing the volume fader below each channel label can be in OFF off adjust between 59dB to 6dB while on...

Страница 17: ...woofer output CH8 Right subwoofer output Users can be customizing the speaker type for each output channel the specific methods of operation The first step Click on the right side of the Reset Output...

Страница 18: ...channel label click on the type of drop down menu box type options will not pop up 1 the output delay adjustment is set in the delay space area to the left of the illustrated adjustment as follows Fig...

Страница 19: ...d in real time will also be revealed at the top as shown in Figure 3 3 8 parametric equalizer case Figure 3 3 8 Straight balanced the button shown in Figure 3 3 4 the current channel as long as there...

Страница 20: ...nkwitz Riley Bessel and Butterworth and other three options Frequency setting via direct input value scroll the mouse wheel up and down keys on the keyboard and other ways to adjust low cut or high cu...

Страница 21: ...ion when clicked will pop up prompt for users to choose Empty is to get all the output signal is not connected to any output channel speaker of course there will be no signal output in preparation for...

Страница 22: ...ocked FBI the item associated tone has an FBI logo be displayed Mixer settings click mixer in the 7 area in Figure 3 2 2 then you can switch to Figure 3 3 14 the relevant parameter settings for the co...

Страница 23: ...r stored a total volume not save scene data load operation 3 The whole scene data is to copy all the data in the machine to machine or save all of the data on existing machines as computer files of co...

Страница 24: ...as 4 abc named in the point you want as shown in Input Scene name dialog box shown in 3 4 3 OK button to save and return as shown in Figure 3 4 4 Point Exit button to complete the save as preset scen...

Страница 25: ...3 4 6 loading data transfer progress shown in the wait window Figure 3 4 6 Step 4 After data transfer is completed the machine load preset scene is complete but you can see the upper left corner of th...

Страница 26: ...le name in the pop up window you want save point on it 2 Loading scene files on your computer This function is previously stored in the scene file on the computer the machine work load for the current...

Страница 27: ...nction is to load previously saved on the computer the whole machine to machine data files data file of the whole machine including the current job scenario six groups of preset machine all the scenes...

Страница 28: ...Subwoofer volume and Bluetooth volume Figure 3 5 3 3 5 4 Information about the inquiry In the Options menu use the mouse to click on the About option the system will pop up a message Query dialog box...

Страница 29: ...inking correct 2 please check if REM IN if linking correct 2 No voice 1 please check if turn on mute style 2 please check if input channel is correct 3 Cannot link USB 1 please check if USB cable is s...

Страница 30: ......

Отзывы: