FOR-A IVS-200 Скачать руководство пользователя страница 14

14 

4. Powering On 

The IVS-200 will turn on when the unit is connected to an DC power source though the DC12V IN 
connector on the rear panel. 
The IVS-200 automatically recognizes the input video format (NTSC or PAL) when it is turned on. If 
there is no signal input at startup, it will start its performance based on the previously run format.  


IMPORTANT

To effect automatic input signal format recognition, power ON the IVS-200 under 
stable input signal conditions. 


Startup Screen 

When power is turned on, the screen resumes from the last display before the power was turned 
off. However, if the power is turned off while the unit is in menu mode, the screen resumes from 
the last display before menu mode.  


Factory Data Reset 

The IVS-200 can be returned to the state of factory default in case a reset is needed such as 
after relocation, system change, or the data becomes out of use.  


Hold down the menu control knob, turn the power on, and keep holding down the knob until the 
message “INITIALIZE” appears. The IVS-200 returns to the factory default. See section 5 “Menu 
Operation” for the factory default settin
gs. 


Video Loss Indication 

The power indicator blinks to indicate signal input is lost if the cable connection to VIDEO IN is 
cut or there is no signal input.  
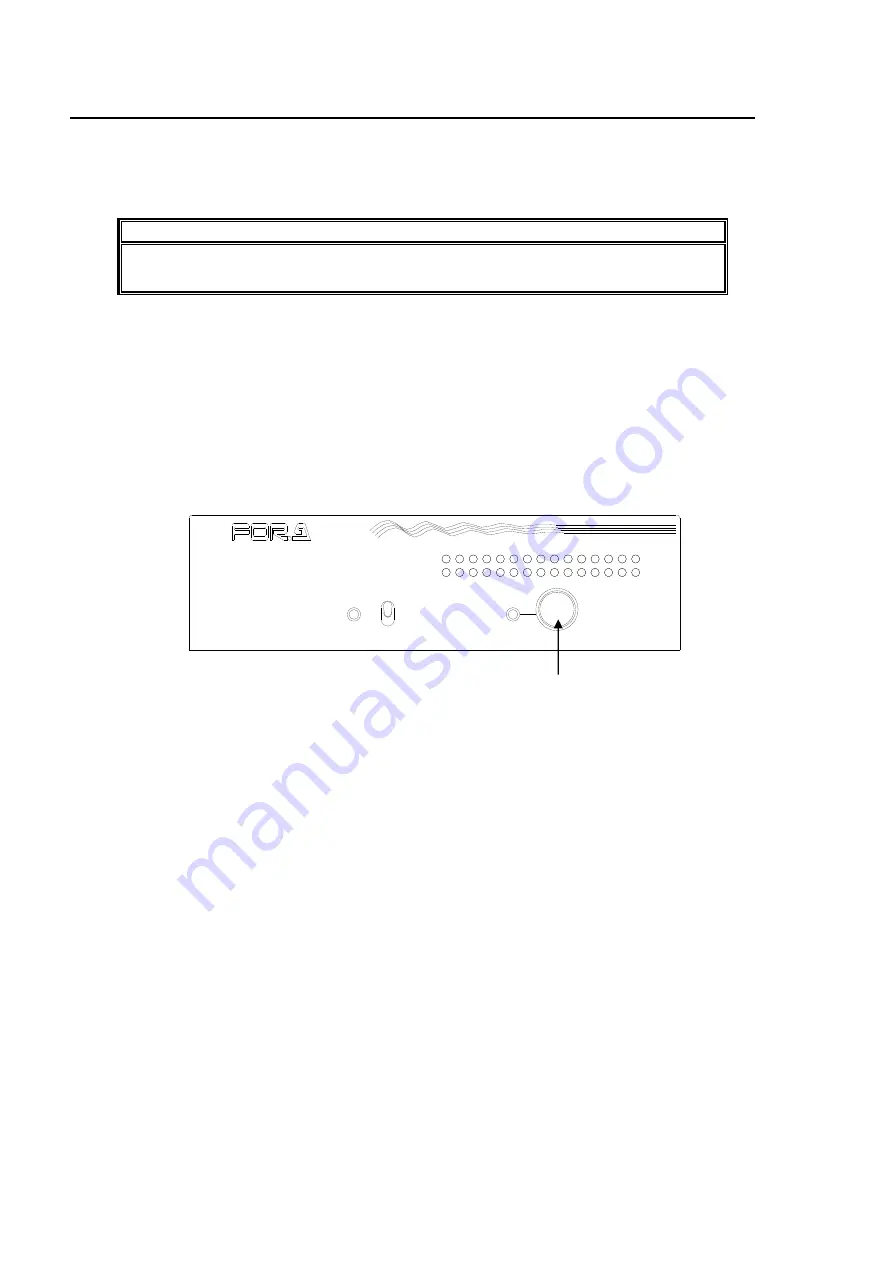


To Enter Menu Mode 

Hold down the menu control knob for at least 2 seconds to enter Menu mode.  


BY-PASS

POWER

OPERATE

MENU

(PUSH)

I V S - 2 0 0

V I D E O   S T A B I L I Z E R

Menu control knob 

Содержание IVS-200

Страница 1: ...IVS 200 Video Stabilizer 1st Edition Rev 3 OPERATION MANUAL...

Страница 2: ...History Edit Rev Date Description Where 1 2010 10 24 1 1 2012 02 23 Added rack mount brackets Other text amendments 1 2 2013 11 29 Added description of DC cord retaining clip 1 3 2015 05 27 Deleted Gr...

Страница 3: ...d Do not operate the unit under hazardous or potentially explosive atmospheric conditions Doing so could result in fire explosion or other hazardous results Hazard Do not allow liquids metal pieces or...

Страница 4: ...n the power off and disconnect the power cord to avoid potentially hazardous conditions If problems similar to the above occur contact an authorized service representative before attempting to operate...

Страница 5: ...nt Brackets 1 set For separate purchase CD ROM 1 Operation Manual PDF Packing List 1 Check Check to ensure no damage has occurred during shipment If damage has occurred or items are missing inform you...

Страница 6: ...19 5 4 STABILIZE 2 20 5 4 1 Pixel Aspect Ratio DISTORTION 21 5 4 2 Effective Area 22 5 4 3 Correction Area 24 5 4 4 Motion Detection Area MOTION DETECT AREA 25 5 4 5 Title Separation TITLE PASTE 27 5...

Страница 7: ...8 3 7 AVO LEVEL 51 8 3 8 SAMPLE AREA 52 8 3 9 DATE TIME 53 8 3 10 TITLE 55 8 3 11 LAN 57 8 3 12 SYSTEM 57 9 Troubleshooting 58 10 Specifications Dimensions 59 10 1 Specifications 59 10 2 External Dime...

Страница 8: ......

Страница 9: ...utter speed of 1 240 sec or higher is recommended although the result will depend on the shooting subjects shaking speed and other conditions IVS 200 may not properly detect shaking images with some v...

Страница 10: ...shaking Input signals are output without correction See section 6 OPERATE BY PASS for details 3 Menu LED Lights up green when IVS 200 is in menu mode 4 Menu Control knob Used to enter menu mode or cha...

Страница 11: ...S switch Output video 1 ON OPERATE Corrected video BY PASS Input video uncorrected OFF Input video uncorrected 2 ON OPERATE BY PASS Corrected video OFF None 3 REMOTE Used for remote control 9 pin D su...

Страница 12: ...ble to directly connect a computer to the IVS 200 Use a straight LAN cable for hub or router connections IMPORTANT The OPERATE BY PASS setting determines whether to correct for shaking of the input vi...

Страница 13: ...for the number set for the IVS 200 unit and the gateway number In this example yyy 200 Subnet mask Set to 255 255 255 0 2 Setting in Windows XP with the default Start menu setting Click Start on the...

Страница 14: ...nit is in menu mode the screen resumes from the last display before menu mode Factory Data Reset The IVS 200 can be returned to the state of factory default in case a reset is needed such as after rel...

Страница 15: ...ges Move the cursor over the desired submenu and press the menu control knob The selected submenu will be displayed on the output screen To change settings move the cursor over the menu item which you...

Страница 16: ...DEO OPTIMIZER Allows you to access auto video optimizer submenus 5 5 3 DATE TIME Allows you to access date time display submenus 5 6 4 TITLE Allows you to access title display submenus 5 7 5 LAN Allow...

Страница 17: ...ange 0 to 16 Default value 7 5 3 3 4 MOTION FILTER V Allows you to select strength of vertical correction Setting range 0 to 16 Default value 7 5 MOTION FILTER R Allows you to select strength of rotat...

Страница 18: ...pendix Input Image and Correction Range for the details on the relation between correction and magnification For your reference Lower than 4 effective for small vibrations caused by machines wind etc...

Страница 19: ...ancement ENHANCE The Enhance menu allows you to adjust the edge enhancement function The enhancement level can be adjusted separately for horizontal and vertical edges in the range 0 to 15 Enhance lev...

Страница 20: ...that allows you to set areas for titles to be excluded from the motion detection area 5 4 5 6 DIRECT USE Allows you to select a parameter that can be directly controlled by the menu control knob Sett...

Страница 21: ...Opens the STABIZIE 2 menu 5 4 3 MAIN MENU Returns to the main menu 5 2 4 EXIT Exits menus Select a suitable pixel aspect ratio for input signals If the pixel aspect ratio is not suitable the resulting...

Страница 22: ...menu 5 4 7 MAIN MENU Returns to the main menu 5 2 8 EXIT Exits menus The effective area menu allows you to specify the effective area where images are present in a screen This adjustment is useful in...

Страница 23: ...ues 4 3 0 to 7 16 9 7 to 7 The preset values are effective when input images constantly have black bars both at the top and bottom 2 When using ADJUST settings The Adjust settings are effective when i...

Страница 24: ...Correction level high However sufficient shake correction can be obtained by setting a small Correction area large set value although the image will be displayed with black bars Larger shaking can be...

Страница 25: ...n area Setting range START V 12 to 197 NTSC 14 to 239 PAL END V 44 to 229 NTSC 46 to 271 PAL Default value START 24 END 216 NTSC 260 PAL 5 STABILIZE 2 Opens the STABILIZE 2 menu 5 4 6 MAIN MENU Return...

Страница 26: ...bounding box that is displayed on the VIDEO OUT output while setting the motion detection area will disappear when the setting is complete START H START V END H END V Motion detection area END H END V...

Страница 27: ...PASTE area Setting range 0 to 242 NTSC 0 to 286 PAL Default value TITLE PASTE1 START V 10 END V 60 TITLE PASTE2 START V 182 END V 232 NTSC START V 226 END V 276 PAL 7 STABILIZE 2 Opens the STABILIZE 2...

Страница 28: ...e input images under the following conditions When the title and date time displays are large or they are clear but the image around them is unclear The correction becomes inaccurate When a shaky titl...

Страница 29: ...ayed value The parameter that is enabled for direct operation can also be changed on the menu as usual 5 4 7 Remote Control The remote control menu allows you to select how to change the OPERATE BY PA...

Страница 30: ...menu 5 5 3 4 RESPONSE Allows you to set the AVO filtering level Setting range 1 5 Default value 3 5 5 4 5 GAMMA MODE Allows you to enable or disable Gamma correction Setting range ON OFF Default valu...

Страница 31: ...ntage for the ADJUST correction selected under CORRECTION LEVEL Setting range 1 to 20 Default value 3 4 TARGET WHITE LEVEL Allows you to set a target maximum luminance level in percentage for the ADJU...

Страница 32: ...ng the results to become unstable If the value is too large it increases contrast but may cause the images to be underexposed The figures below are luminance histograms of input X axis Luminance level...

Страница 33: ...ut and the actual values after correction full line If TARGET BLACK LVL is set to a large value 0 100 TARGET BLACK LVL If TARGET BLACK LVL is set to a small value 0 100 TARGET BLACK LVL If TARGET WHIT...

Страница 34: ...34 Relationship between IN BLACK LVL and IN WHITE LVL and TARGET BLACK LVL and TARGET WHITE LVL 0 100 0 100 IN WHITE LVL IN BLACK LVL TARGET BLACK LVL TARGET WHITE LVL Input image Output image...

Страница 35: ...t value START V 0 END V 228 NTSC 268 PAL 6 AUTO VIDEO OPTIMIZER Returns to AUTO VIDEO OPTIMIZER menu 5 5 7 MAIN MENU Returns to the main menu 5 2 8 EXIT Exits menus IMPORTANT Sample Area determines th...

Страница 36: ...te Time display Setting range 8 to 26 Default value 24 6 FORMAT Allows you to select a Date Time display format YMD appears as year month day MDY appears as month day year and DMY as Day month year Se...

Страница 37: ...fault value EDGE 3 POSITION H Allows you to set the horizontal position for titles Setting range 0 to 720 Default value 244 4 POSITION V Allows you to set the vertical position for titles Setting rang...

Страница 38: ...2 SUBNET MASK Allows you to set the subnet mask length for the device Setting range 0 to 31 Default value 24 3 GATEWAY If your network does not have a gateway this setting is not required Setting rang...

Страница 39: ...erence 1 SOFTWARE VERSION Displays the software version information 2 HARDWARE VERSION Displays the hardware version information 3 INPUT SIGNAL Displays the current input signal format 4 MAIN MENU Ret...

Страница 40: ...n the menu signals will not be corrected however images can be magnified If REMOTE CONTROL is set to either WEB REMOTE or SERIAL the OPERATE BY PASS switch is disabled BY PASS Push up the OPERATE BY P...

Страница 41: ...unction High Low 1 VCC 5V 2 OPERATE BY PASS Output OPERATE BY PASS selection BY PASS OPERATE 3 VIDEO IN Output Input signal presence None Yes 4 Unused 5 STABILIZE Output STABILIZE setting OFF ON 6 OPE...

Страница 42: ...ing to the internal external supply voltage and LED characteristics The current for each circuit must be kept below 30mA Example of connection with Remote input circuit Inside IVS 200 6 7PIN 9PIN DC5V...

Страница 43: ...as http 192 168 0 20 When connection is established the Main Menu as shown below is displayed IMPORTANT If the IVS 200 is restarted while connected to Internet Explorer performance on a web browser af...

Страница 44: ...44 8 3 Menu Operation 8 3 1 MAIN MENU Once the connection is established MAIN MENU as shown below opens Click on each submenu to go to the corresponding submenus...

Страница 45: ...Default value 10 5 3 2 4 MOTION FILTER H Allows you to select strength of horizontal correction Setting range 0 to 16 Default value 7 5 3 3 5 MOTION FILTER V Allows you to select strength of vertical...

Страница 46: ...an be directly controlled by the menu control knob on the IVS 200 front panel Setting range OFF CORR LEVEL FILTER H FILTER V FILTER R Default value OFF 5 4 6 14 REMOTE CONTROL Allows you to select how...

Страница 47: ...tput Setting range ON OFF Default value OFF 3 START H 4 END H Allows you to set the horizontal extent of the effective area if EFFECTIVE AREA is set to ADJUST Setting range 0 to 720 Odd values cannot...

Страница 48: ...of the motion detection area Setting range START H 18 to 310 END H 50 to 342 Default value START H 26 END H 334 Odd values cannot be set If an odd value is entered the value will be adjusted to the e...

Страница 49: ...ASTE 1 area Setting range 0 to 242 NTSC 0 to 286 PAL Default value START 10 END 60 6 TITLE PASTE 2 Allows you to enable or disable TITLE PASTE2 Setting range ON OFF Default value OFF 7 START H 2 8 END...

Страница 50: ...D and OFF Default value AUTO 5 5 1 2 CORRECTION LEVEL Opens the AVO correction level setting menu 8 3 7 3 SAMPLE AREA Opens the AVO sample area setting menu 8 3 8 4 RESPONSE Allows you to set the AVO...

Страница 51: ...ACK LEVEL Allows you to set the minimum luminance in percentage for the ADJUST correction selected under AVO LEVEL Setting range 1 to 20 Default value 3 4 TARGET WHITE LEVEL Allows you to set a target...

Страница 52: ...lows you to set the horizontal size of the sample area if ADJUST is selected under SAMPLE AREA Setting range 0 to 704 Default value START H 0 END H 704 Odd values cannot be set If an odd value is ente...

Страница 53: ...ot be set If an odd value is entered the value will be adjusted to the entered value minus 1 4 POSITION V Allows you to set the vertical position for the Date Time display Setting range 0 to 480 NTSC...

Страница 54: ...Date Time display Setting range 0 to 255 Default value 0 10 EDGE KEY Allows you to set edge and matte background transparency for the Date Time display The larger the value the more transparent Settin...

Страница 55: ...e color Setting range EDGE MAT OFF Default value EDGE 4 POSITION H Allows you to set the horizontal position for titles Setting range 0 to 720 Default value 244 Odd values cannot be set If an odd valu...

Страница 56: ...LOR RED GREEN BLUE Allows you to set edge and matte colors for titles Setting range 0 to 255 Default value 0 10 EDGE KEY Allows you to set transparency for title edge and matte colors The larger the v...

Страница 57: ...00 s gateway 4 MAC ADDRESS Displays the IVS 200 s MAC ADDRESS 5 MAIN MENU Returns to the MAIN menu 8 3 1 8 3 12 SYSTEM Click SYSTEM in the MAIN MENU to open the SYSTEM menu as shown below Item Setting...

Страница 58: ...dy The STABILIZE OPERATE BY PASS setting cannot be changed by the front panel toggle switch Is REMOTE CONTROL set to REMOTE WEB or SERIAL Set REMOTE CONTROL to FRONT Video input signals are not bypass...

Страница 59: ...OFF Menu selectable Correction Level Preset 5 steps manually adjustable Title Display Number of characters 16 characters x 1 line Characters Alphanumeric charactors and symbols Time Display Display fo...

Страница 60: ...External Dimensions All dimensions in mm BY PASS POWER OPERATE 22 101 MENU PUSH I V S 2 0 0 12 7 22 3 6 40 145 V I D E O S T A B I L I Z E R 162 127 20 15 1 2 LAN REMOTE DC 12V IN SER NO VIDEO OUT VI...

Страница 61: ...STABILIZER I V S 2 0 0 POWER BY PASS OPERATE MENU PUSH POWER BY PASS OPERATE VIDEO STABILIZER I V S 2 0 0 MENU PUSH POWER BY PASS OPERATE VIDEO STABILIZER MENU I V S 2 0 0 PUSH 6 32 6 6 4 44 22 6 VID...

Страница 62: ...nwanted shakes and jitters The basic processing is as described below Input video image When input video images are horizontally shaking as shown below Output video image The shaky input video images...

Страница 63: ...d in the monitor A steady video is output by tracking the enclosed image according to the detected motion within the correction range Inut video image Output video image If CORRECTION LEVEL is set to...

Страница 64: ...PAL Correction Level Horizontal Vertical Horizontal Vertical 0 100 1 1 1 1 1 102 3 2 3 3 2 104 2 4 3 5 3 106 4 6 5 6 4 108 5 8 7 8 5 111 8 10 9 10 6 114 9 12 11 12 7 116 11 14 13 14 8 119 13 16 15 17...

Отзывы: