68
Instructions for the installer
3.18 Adaptation to other gas types and burner adjustment
WARNING
This boiler is built to run on the type of gas specified on the order, which is shown on the packaging and on the boiler rating plate.
Any later transformation is to be exclusively carried out by qualified personnel, using manufacturer designed accessories and
following the procedure and adjustment instructions for an accurate boiler setting-up.
3.18.1 Switching from NATURAL GAS to PROPANE
• Disconnect the boiler from the electric power supply.
• Remove boiler outer front panel.
• Loosen the three screws securing combustion chamber front panel to frame, then remove panel.
• Loosen the screw securing intake pipe to mixer, and remove pipe (see Fig. 26 Intake pipe).
• Disconnect the gas pipe from the mixer (see Fig. 26 Intake pipe).
• Loosen the three socket head screws, and remove the mixer (see Fig. 27 Mixer).
• Loosen the two retaining screws, and slide out mixer plastic body (see Fig. 28 Mixer plastic body).
• Using a 6 mm Allen wrench, loosen the two mixer nozzles (see Fig. 28 Mixer plastic body).
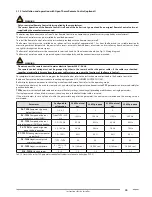
• Screw the new nozzles for propane listed in Tab. 15 Diameter of nozzles - diaphragms (mm), taking care to drive them fully home, without
tightening.
• Only for the KB 32 model, insert the 7.2 mm diaphragm on the outlet of the gas valve.
WARNING
In case the nozzle idles when reaching the bottom of the nozzle threaded seat, it means that the thread is damaged and perfect
sealing is not ensured. The whole mixer shall be replaced.
• To refit the plastic body (Venturi), insert it inside mixer and secure it in place with the retaining screws. Take care not to damage the O-rings
assembled on plastic body ends (see Fig. 28 Mixer plastic body) and to respect the assembling direction (see Fig. 29 Assembling direction).
• Refit the reassembled mixer onto the fan with the socket head screws, making sure to insert the O-ring between mixer and fan (see Fig. 28
Mixer plastic body).
• Reconnect boiler to electric power supply, and open the gas cock.
• Edit value for parameter P0-TSP0 depending on boiler power (see par.
Edit parameter P0-TSP0
on page
71
.
• Adjust the gas valve (see par.
Gas valve setting
on page
71
).


