


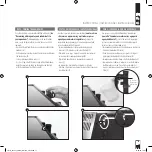
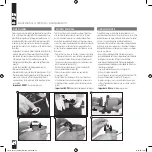
ADJUSTING THE LENGTH OF THE VENTURI TUBING
The purpose of the venturi tubing is to help oxygenate the water. The tube sucks in the air; the air mixes with the water flow; and the air bubbles to the surface.
Note:
the venturi valve must be positioned higher than the water level to avoid water backing up into the tubing and causing flooding.
• Cut tubing to desired length (A).
• Insert the venturi value onto the new cut end of the tubing (B).
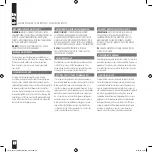
• Attach the clip to the tubing (C).
• Attach the clip to the filter module’s electrical cord to hold tubing in position (D).
OPTION:
If you do not require this bubble feature, you may remove the venturi tubing completely (E).
AJUSTEMENT DE LA LONGUEUR DU TUYAU VENTURI
Le tuyau venturi sert à oxygéner l’eau. Il aspire l’air, qui se mélange ensuite au débit d’eau, et crée ainsi des bulles d’air à la surface.
Note :
La soupape venturi doit être placée plus haut que le niveau de l’eau pour que l’eau ne s’accumule pas dans le tuyau et cause ainsi un dégât d’eau.
• Couper le tuyau à la longueur souhaitée (A).
• Insérer la soupape venturi dans l’extrémité du tuyau nouvellement coupée (B).
• Entrer le tuyau dans l’une des deux extrémités de l’attache (C).
• Entrer le cordon électrique du système de filtration dans l’autre extrémité de l’attache afin que le tuyau reste en place (D).
OPTION :
Si les bulles d’air ne sont pas requises, il est possible d’enlever le tuyau venturi complètement (E).
CÓMO AJUSTAR LA LONGITUD DE LA MANGUERA VENTURI
El objetivo de la manguera Venturi consiste en ayudar a oxigenar el agua. La manguera chupa el aire, este se mezcla con el caudal y las burbujas de aire salen a la superficie.
Nota:
La válvula Venturi debe colocarse a una altura superior al nivel del agua para evitar que el agua reingrese en la manguera y cause una inundación.
• Corte la manguera hasta la longitud deseada (A).
• Introduzca la válvula Venturi en el extremo cortado de la manguera (B).
• Sujete la presilla a la manguera (C).
• Sujete la presilla al cable eléctrico del módulo de filtro para sostener la manguera en su lugar (D).
OPCIÓN:
Si no necesita esta función burbujeante, puede quitar la manguera Venturi por completo (E).
INSTRUCTIONS / INSTRUCTIONS / INSTRUCCIONES
EN
EN
FR
ES
11
fluval_Accent_manual_March4_proof.indd 12
13-03-05 12:01


