11.3 Backup and reset
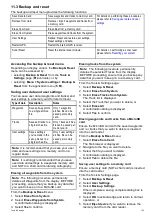
The backup and reset menu provides the following functions:
Save Data to Card
Save waypoints and tracks to memory card.
Retrieve from Card
Retrieve / import waypoints and tracks from
a memory card.
Erase from Card
Erase iles from a memory card.
Erase from System
Erase waypoints and tracks from the system.
User Settings
Backup, Reset and restore user settings,
Reset settings and data.
For details on performing these procedures
please refer to
.
Restart GPS
Restart the internal GPS receiver.
Sonar Reset
Reset the internal sonar module.
For details on performing a sonar reset
please refer to
.
Accessing the backup & reset menu
Depending on display variant, the
Backup & Reset
menu can be accessed by:
• selecting
Backup & Reset
from the
Tools &
Settings
page (
Pro
variants), or by
• selecting:
Menu > System settings > Backup &
Reset
from the application menu (
5 M
).
Saving user data and user settings
You can save user data (waypoints and tracks) and
user settings to a memory card for later retrieval.
Type of data
Description
Notes
Waypoints
Saves all waypoints
to a single archive
ile.
Only 1 waypoints
archive ile can be
saved per memory
card.
Tracks
Saves all tracks to a
single archive ile.
Only 1 tracks archive
ile can be saved per
memory card.
User settings
Saves settings
you've made in the
set-up menus to a
single archive ile.
Only 1 user settings
archive ile can be
saved per memory
card.
Note:
It is recommended that you save your user
data and user settings to a memory card on a
regular basis.
Note:
It is strongly recommended that you save
user data and settings to a separate memory card,
and NOT to a chart card containing cartography.
Erasing all waypoints from the system
Note:
The following procedure permanently
deletes all Waypoints from the display. BEFORE
proceeding, ensure that you backup any data that
you want to keep on to a MicroSD card.
From the
Backup & Reset
menu:
1. Select
Erase from System
.
2. Select
Erase Waypoints from System
.
A conirmation dialog is displayed.
3. Select
Yes
to conirm.
Erasing tracks from the system
Note:
The following procedure permanently
deletes the selected Tracks from the display.
BEFORE proceeding, ensure that you backup any
data that you want to keep on to a memory card.
From the Tools & Settings page:
1. Select
Backup & Reset
.
2. Select
Erase from System
.
3. Select
Erase Tracks from System
.
The Track list is displayed.
4. Select the Track that you want to delete, or
5. Select
Erase All
.
A conirmation dialog is displayed.
6. Select
Yes
to conirm.
Erasing waypoints and tracks from a MicroSD
card
Ensure the MicroSD card with the saved waypoints
and / or tracks that you want to delete is inserted
into the card reader.
From the
Backup & Reset
menu:
1. Select
Erase from Card
.
The ile browser is displayed.
2. Navigate to the ile you want to delete.
3. Select the ile you want to delete.
A conirmation dialog is displayed.
4. Select
Yes
to delete the ile.
Saving user settings to a memory card
Ensure a memory card (NOT a chart card) is inserted
into the card reader.
From the Tools & Settings page.
1. Select
Backup & Reset
.
2. Select
User Settings
.
3. Select
Back-up Settings
.
When complete a saving complete dialog box is
displayed.
4. Select
OK
to acknowledge and return to normal
operation, or
5. Select
Eject device
if you want to remove the
memory card from the card reader.
Tools & Settings
105
Содержание E70290
Страница 2: ......
Страница 4: ......
Страница 12: ...12 Dragonly 4 Dragonly 5 Dragonly 7 Wi Fish ...
Страница 18: ...18 Dragonly 4 Dragonly 5 Dragonly 7 Wi Fish ...
Страница 34: ...34 Dragonly 4 Dragonly 5 Dragonly 7 Wi Fish ...
Страница 42: ...42 Dragonly 4 Dragonly 5 Dragonly 7 Wi Fish ...
Страница 108: ...108 Dragonly 4 Dragonly 5 Dragonly 7 Wi Fish ...
Страница 112: ...112 Dragonly 4 Dragonly 5 Dragonly 7 Wi Fish ...
Страница 122: ...122 Dragonly 4 Dragonly 5 Dragonly 7 Wi Fish ...
Страница 126: ...126 Dragonly 4 Dragonly 5 Dragonly 7 Wi Fish ...
Страница 132: ...132 Dragonly 4 Dragonly 5 Dragonly 7 Wi Fish ...
Страница 133: ...Chapter 16 Spares and accessories Chapter contents 16 1 Spares Accessories on page 134 Spares and accessories 133 ...
Страница 135: ......

