background image


18 


Preset /  Using  horizontal  /  vertical  /  Zoom  /  Focus  /  Iris movement  of  PTZ  Camera,  zoom  or 
focus  or  Iris  a  certain  spot  of  the  image  by  designating  the  coordinates  and  move  to  the 
designated coordinates quickly. 


Home Position Time - If there are no controlling signals to PTZ camera after a certain time, it 
goes automatically to the Preset No.1 position as Preset No. 1 is designated as Home Position 


-

  Playback 


-

-


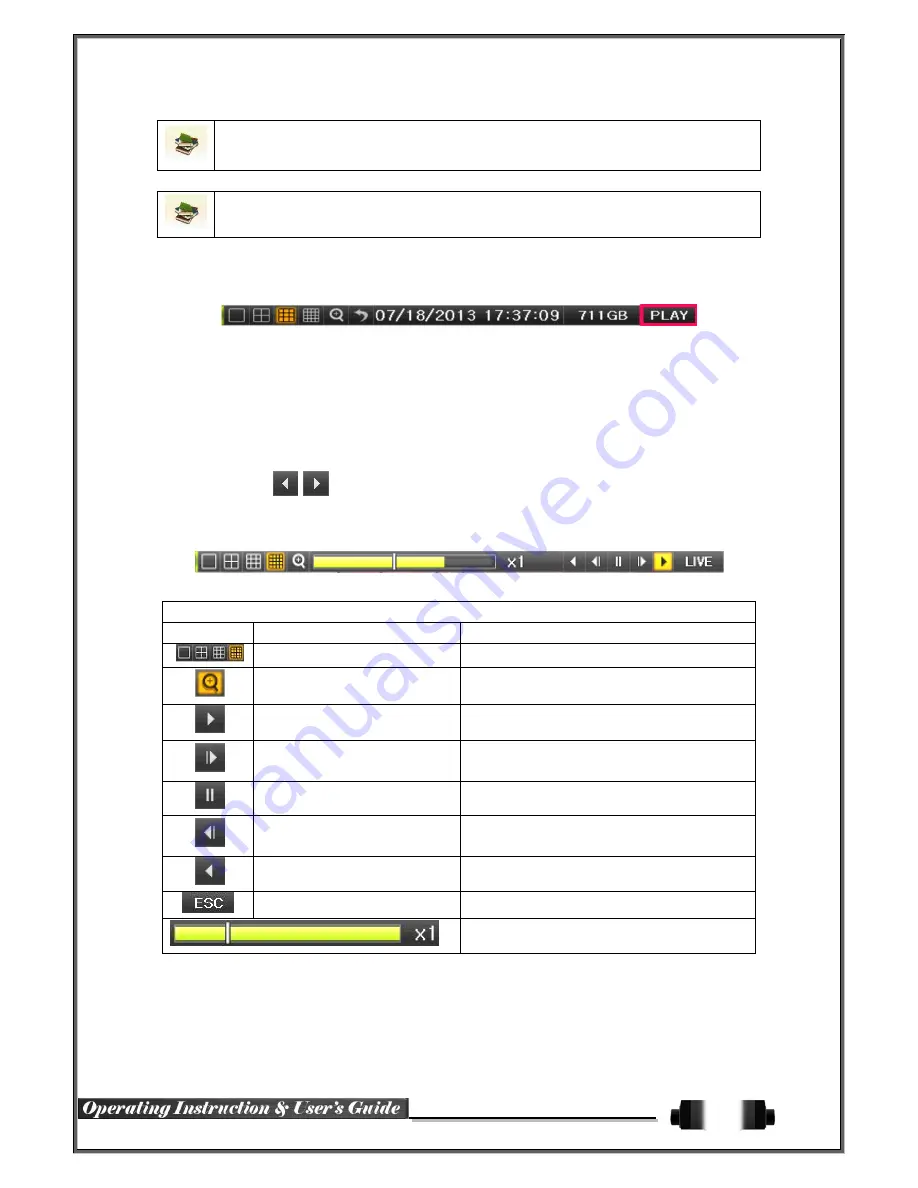
Playback and Playback Speed Control 


In  the  Playback  mode,  the  user  can  play  back  video  contents  by  using  buttons  as  shown     

below. 


After  the  data  is  played  to  the  end,  the  data  of  the  next  time  zone  will  be  automatically       

searched  and  played  (this  function  is  possible  only  in  the  Multi-channel  Playback  mode;         
both  backward  playback  and  forward  playback  are  possible). 


Pressing 


  buttons,  the  user  can  adjust  the  playback  speed  by(

1)  /  (

2)  /  (

4)  / 

(

8)  /  (

16)  /  (

32)  /  (

300). 


Description of the Search Buttons 

Button 

Name 

Features 


Channel Mode Change 

Switch the channel mode. 


Zoom Mode 

Switch to the Zoom mode. 


Forward Play / Fast Forward 

Pressing  one  more  time  in  x300  leads  to  x1 
back. 


Forward Frame by Frame 

Playback frame-by-frame 

Pause 


Pause 

Pause 


Reverse Frame by Frame 

Reverse playback frame by frame 

Pause 


Reverse Play / Fast Reverse 

Pressing  one  more  time  in  x300  leads  to  x1 
back. 


ESC 

Exit out of Playback Mode. 


Status  bar  indicating  information  of  the  hourly 
recorded image data and the speed. 


Selecting the right-mouse button or menu button in the Playback Mode pops up the {Playback Menu} as shown 
below. 

Содержание FWR303-00N

Страница 1: ...NVR R3 Series FWR303 00N FWR303 04P FWR303 08P User Manual ver 1 1 2014 1...

Страница 2: ...e following conditions operating temperature of 5 C 40 C operating humidity of 10 80 2 Install the NVR in a safe place that is free from external vibration 3 Install the NVR in a well ventilated place...

Страница 3: ...2 Warning and Caution are indicated as follows Possible injury or product damage Risk of minor injury or product damage Cautions for the usage of the product Information for the usage of the product...

Страница 4: ...er Operation Setup Tools 8 Remote Controller 8 Mouse 9 Chapter NVR Operation Setup 9 Storage Installation 9 Network Setup 10 IP Camera Registration PoE port connection 11 4 3 1 Non PoE model 11 4 3 2...

Страница 5: ...8Mbps Channel Playback Search Go to first rec time Go to last rec time Go to last search time Calendar Log viewer Smart search Multi time Multi day search Event search Mode Event only playback Backwa...

Страница 6: ...el 5 Consumption 60Watts PoE Consumption FWR303 08P 48V 2A FWR303 04P 48V 1A Operation Temp Humidity 5 40 10 80 Dimension 340 x 59 x 300 mm Certification CE FCC RoHS Compliance Components After unpack...

Страница 7: ...on upon HDD operation NVR series Rear No Name Feature Type 1 e SATA External SATA USB Type A e SATA 2 TV CCTV monitor displays the output images BNC 3 HDMI HDMI Output HDMI type C 4 VGA OUT VGA Monit...

Страница 8: ...k Connection RJ 45 10 Terminal Block RS 485 SENSOR IN RELAY OUT POS Terminal Block 11 CONFIG NTSC PAL HD XGA DIP S W 2 pin 12 Power DC 12V 5A 60Watts DC Jack Configuration Switch Setup Switch 2 Termin...

Страница 9: ...ay require the power supply depending on its type Be cautious Chapter Operation Setup Tools NVR Model can be controlled easily by using the front panel remote controller and mouse Remote Controller PO...

Страница 10: ...ion 1 1 Open the top case by using screw driver 1 Normal termination of the system and fully unplugged power code are required before conducting HDD installation 2 Touch a grounded metal substance or...

Страница 11: ...0 Network Setup Connect the NVR Network Port found in rear to Ethernet hub Connect IP cameras to Ethernet hub Gigabit HUB are recommended for NVR 1 NVR with one Network Port 2 NVR with one Network Por...

Страница 12: ...Registration Menu window pops up as shown below After an IP Camera is found the IP Cameras Port ID password protocol can be inputted Please take careful note that if there is any mistake or typo in a...

Страница 13: ...u After logging out the user cannot use Menu 4 3 2 NVR with PoE port NVR with PoE models support the up to FWR303 08P port NVR with PoE support the PnP function NVR will automatically detect the IP ca...

Страница 14: ...48V 2A FWR303 08P DIN Jack 2 Connect the PoE camera to the PoE port and Registration Menu window pops up as below 3 After IP camera registration the live screen and channel indication clock are shown...

Страница 15: ...etection Recording Sensor Recording Text Recording Recording Mode Video Recording Audio Recording Text Recording Recording Event Icons are still displayed despite of the recording stop Recording Mode...

Страница 16: ...g NVR Model provides the 5 screen division mode including 1 4 9 16 Auto Sequence and 1 4 9 16 are Basic Mode In Basic Mode 1 4 9 16 pressing the same mode button leads to screens as shown below 1 Chan...

Страница 17: ...e mode Auto Sequence in Basic 1 4 9 Division Mode 1 16 2 3 1 Channel Mode Sequence 4 Channel Mode Sequence 9 Channel Mode Sequence Channel Grouping Channel Grouping is to switch the image location in...

Страница 18: ...mal x4 x16 Those 3 levels can be controlled by the wheel of the mouse The user also can left click and drag the yellow box to move the focused ima ge in higher than the x4 mode Using remote controller...

Страница 19: ...ed this function is possible only in the Multi channel Playback mode both backward playback and forward playback are possible Pressing buttons the user can adjust the playback speed by 1 2 4 8 16 32 3...

Страница 20: ...de search 25 frames once Detail Search Search all frames Move to the Smart Search and select the desired channel After shifting to the 1 channel mode select areas to be smart searched The 14 15 pixel...

Страница 21: ...Channel Multi Channel Search is to play recorded images of the different channel over a certain designated time Event Event is to search and play events All Motion Sensor Backup The user can save the...

Страница 22: ...n 2 Daylight Saving Time DST Setup Regardless of whether NTP server or DST server is referred to DST is automatically processed according to the time 3 Time Setup by User The user can set the time dir...

Страница 23: ...w keys and the Select button For a weekly setting in the Start Time and End Time fields set Day to 0 After the Daylight Saving Time is selected the existing data will be displayed as OLD_ in the searc...

Страница 24: ...careful note that if there is any mistake or typo in any of the 4 Settings Port ID PW Protocol then connection will not be possible 2 PTZ This enables the user the real time monitoring by using PTZ c...

Страница 25: ...Menu Setup Camera Event Source Motion Area The user can setup the motion detection area Area setup related to motion can be decided Motion Sensitivity Lowest Low Middle High Highest Sound Sensitive L...

Страница 26: ...on the event frame rate Sensor When input signal from an external sensor is generated recording will be initiated based on the event frame value Text Input When a text is received from POS device reco...

Страница 27: ...ration Setup Pre Recording On OFF Post Recording 5 10 15 20 60 150 300 seconds in Pre Recording images of the last 7 seconds before the event occurrence are recorded 6 Log Setup On Off for Motion Sens...

Страница 28: ...On the Holiday Registration Window select the date by using the arrow keys and the Select button and press the Select button After setting the holiday move to Save at the bottom of the menu Afterward...

Страница 29: ...y the New command Depending on the storage type the storage is used only for Recording or Backup purposes New All storages initially detected are managed in New All initially detected storages are dis...

Страница 30: ...utton and initialize the disk as a Recording or a Backup disk The following describes the method of setting the recording storage Recording shows the status of the newly installed disk online Selectin...

Страница 31: ...remote place thru internet with web server functions which is equipped in NVR Select On Off of DDNS or a domain name to use by using arrow keys and the selection button In case of DDNS On enter the ho...

Страница 32: ...Default is 80 but can be set between 2000 65527 4 E mail Move to Menu Setup Network E mail To use the e mail function DNS or sub DNS in Menu Setup Network Ethernet need to be configured This is to set...

Страница 33: ...nsmission Codec JPEC H 264 System 1 NVR Name Used to name the NVR device 2 ID For Key Controller Unique system controller number setting 3 User Registration Used to register add or delete users 4 Upgr...

Страница 34: ...the network 4 Upgrade The firmware and menu setting of the product can be easily upgraded through the use of the external storage devices or portable storage devices with USB 2 0 port Find and copy t...

Страница 35: ...Setup and the upgrade file list stored in the selected device and simple version info of the selected file are then displayed Select a file and then the upgrade starts immediately Select a file and t...

Страница 36: ...the remote controller and mouse the system automatically shifts to the real time monitoring mode Move to Menu Setup System 9 Menu time Out In the selection window select the time zone you want to set...

Страница 37: ...as shown below Year Month Day Selection Select the desired Year Month Day The color of the icon at the top left of square in the calendar indicates the recording status Time Index Every time when the...

Страница 38: ...Multi Day Search The user can playback the video contents of the certain channel recorded in different dates simultaneously Entering into the search mode during the Multi Day playback leads to the Mu...

Страница 39: ...xternal devices refer to Appendix The user can back up data in the real time monitoring search log or the playback mode 1 Backup in The Real Time Monitoring Mode In the real time monitoring mode selec...

Страница 40: ...s see 5 12 5 Common Backup Procedure 4 Backup in Playback Mode In the Playback mode select Menu Backup Any playback in progress at this time will stop The automatic backup time is set to 5 minutes bef...

Страница 41: ...row keys and press the ESC button Changing the backup time causes the name of the directory to be backed up to be changed as well If the file to be backed up exceeds the free space its size is display...

Страница 42: ...rage devices excluding ODD devices a window for selecting the device will be displayed If the selected device is an ODD device a prompt asking whether to back up in the ODD device Log Backup This is t...

Страница 43: ...ersion Date Time Move to Menu Setup System 4 Upgrade Setup after insert the backup device With this way the user can upgrade a new device with the current setup values in easy way Chapter Miscellaneou...

Страница 44: ...loss and network connection failure All Logs related to all system operations System Log Viewer On the activated calendar window select the desired date year month day by using the arr ow keys and th...

Страница 45: ...displayed at an unchanged date To view the log details select the desired date with a red icon Selecting a date with the blue icon causes the changed date list window to appear Control In the real tim...

Страница 46: ...Setting it becomes the 1 channel mode and a menu pops up as shown below Screen Saver Monitor connected with NVR can be shut down to protect monitor Menu Miscellaneous Display Setting Screen Saver Name...

Страница 47: ...46 A P P E N D I X Recommended HDD Specification Recommended USB2 0 Devices USB2 0 Device Media File System Memory Stick Flash Type FAT32 2 5 Portable USB HDD HDD Type FAT32...

Отзывы: