


1 . 1 - W h a t ' s I n c l u d e d
1.2 - Getting Started
1 x Flexs Q5
1 x DIN Rail Mounting Kit
1 x Product Manual
Once power is connected, the Q5 display will illuminate indicating that the Q5 has successfully started.
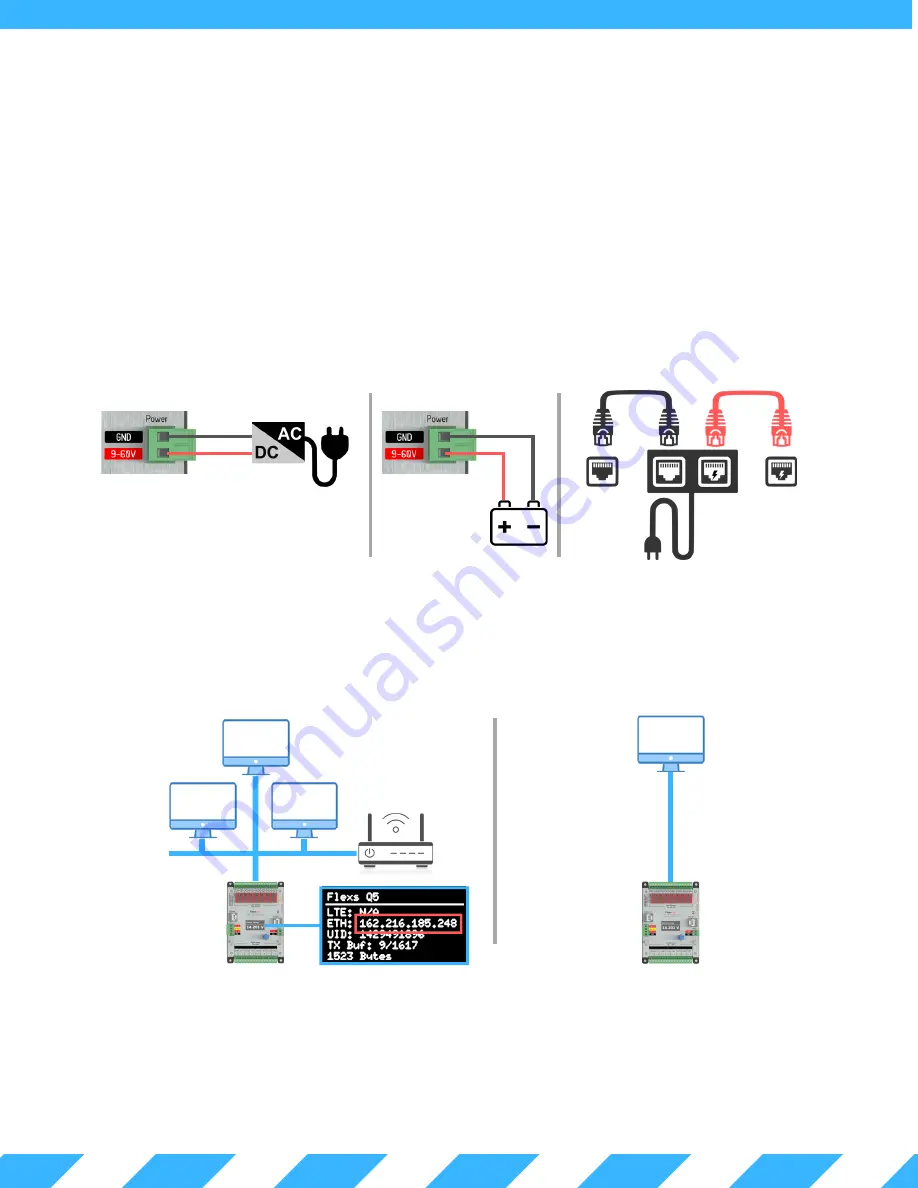
The Q5 will then search for a router on the network to get an IP address. If the Q5 fails to find a router within the first 10s
of bootup, it will fallback to standalone mode. In standalone mode, the Q5 will use the fallback IP (default 192.168.1.20).
Using Chrome, Firefox or Safari enter the device IP in the address bar to load the Q5's web interface.
The default password for the device is "flexscada".
Network Connected Mode
Standalone Mode
Connect using the following addresses:
http://192.168.1.20 OR with IPv6
http://[fe80::744]
Connect using the IP assigned by your network.
This IP can be found on the Q5 display
(highlighted in red above)
This section provides a brief overview on how to connect to a FlexsQ5 for the first time.
Attach the Q5 to a power source (9 to 60 VDC) using the two pin power terminal located beside the Ethernet port.
The Q5 can alternatively be powered via POE over the Ethernet port.
DC Power
Supply
DO NOT POWER THIS DEVICE DIRECTLY FROM AN AC POWER SOURCE! DOING SO WILL VOID YOUR WARRANTY!
AC Power
Q5 Power Input
AC Power
24 V PoE
PC Ethernet
Q5 Ethernet
Powering with a Passive PoE
Powering with a DC Power Supply
Powering with a Battery
Q5 Power Input
9 - 60 V Battery
IT IS HIGHLY RECOMMENDED TO CHANGE THIS PASSWORD WITH A SECURE PASSWORD TO AVOID
UNAUTHORIZED ACCESS TO THE DEVICE.


