background image

 13

STEP 4 

STEP-4

B

N-4

N-3

N-5

O

N-5x2

N-3x2

N-4x2


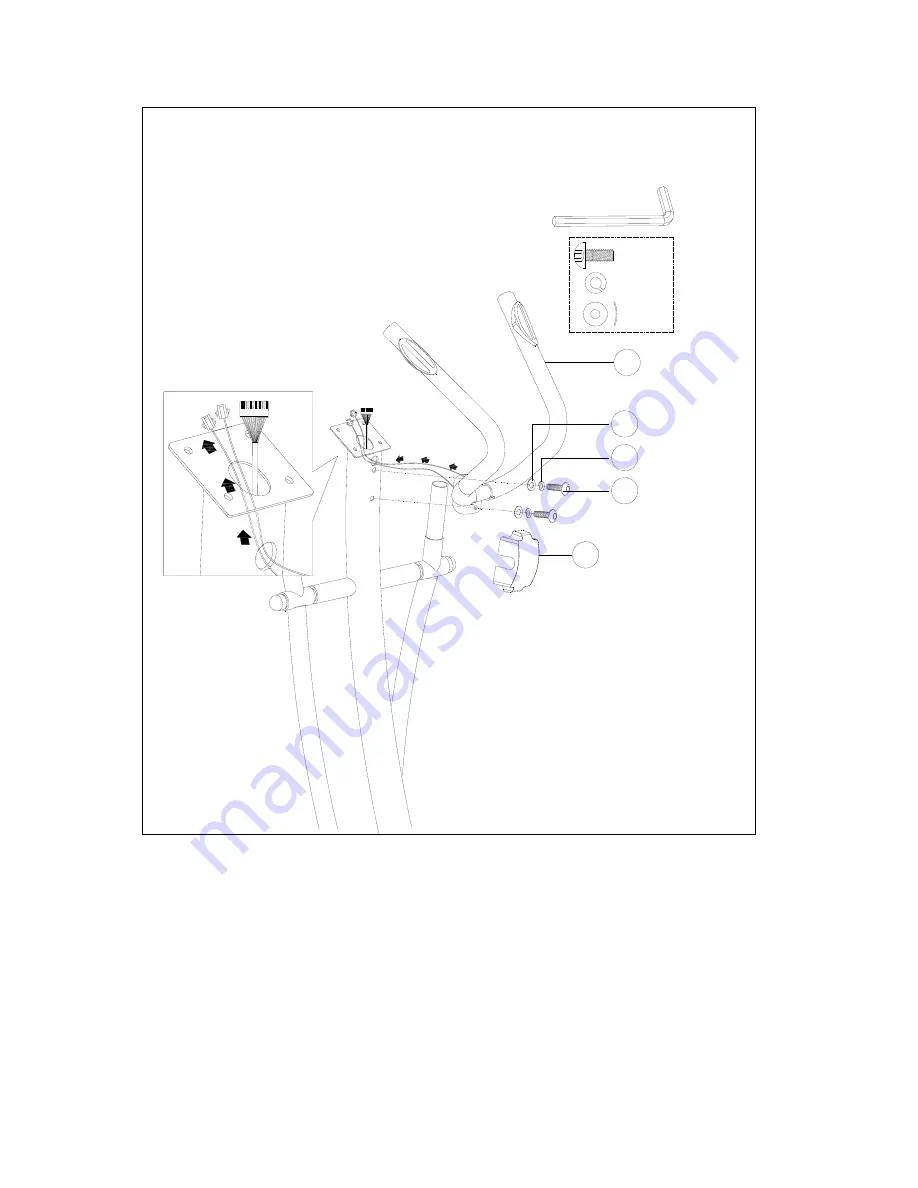
1)  Assemble the fixed handlebar (B) and the cover (O) on the handlebar post (C) by 

using the curved washer (N-4), the spring washer (N-3) and the Allen bolt (N-5). 

2) Through the upper computer cable and handpulse cable out from the handlebar 

post 


Содержание KH-706J2

Страница 1: ...1 USER S MANUAL Elliptical bike KH 706J2...

Страница 2: ...use the exerciser only under adult supervision and be instructed on the correct and proper use of the exerciser The exerciser is not a toy Make sure there is sufficient free space around the exercise...

Страница 3: ...ercisers and training devices are no toys Therefore they must only be used by properly informed or instructed persons Stop your work out immediately in case of dizziness nausea chest pain or any other...

Страница 4: ...6 M 7 M 8 M 9 H 2 N 7 N 8 P 2 P 3 P 4 P 5 P 6 P 7 P 8 P 9 P 10 N 15 N 9 N 2 N 3 N 4 G 1 Q 2 Q 4 Q 3 D 2 D 4 D 3 D 7 D 5 D 6 D 8 L 10 L 11 I 2 I 3 I 4 J 2 J 3 J 4 D 10 T 2 T 3 T 4 T 5 T 6 F 2 F 3 F 4...

Страница 5: ...1 C 2 Bushing D19 15x D25 6x32 xL 17 3 2 C 3 Upper computer cable 900L 1 D Main frame set 1 D 1 Main frame 1 D 2 Inner tube D56 97 1 D 3 Motor 1 D 4 Screw ST4 2 1 4 15L 2 D 5 Sensor cable 100L 1 D 6...

Страница 6: ...5 2 J Chain cover set 1 J 1 Upper decorative cover 530 85 1 J 2 Round ring for chain cover D81 D62 9T 1 J 3 Left chain cover 800 75 520 1 J 4 Right chain cover 800 75 520 1 J 5 Screw ST4 2x1 4x20L 9 J...

Страница 7: ...2 1 5T 1 M 3 C clip S 17 1T 2 M 4 Belt 1118L PJ5 1 M 5 Belt wheel D280 19 1 M 6 Crank axle 1 M 7 Round magnet M02 1 M 8 Bolt M6 1 0 15L 4 M 9 Nylon nut M6x1 0x6T 4 N 1 Square neck bolt M8x1 25x75L 4...

Страница 8: ...5xD17 5x1 2T 4 P 8 Joint 2 P 9 Flat washer D24 D13 5 2 5T 2 P 10 Ladder bolt M10 1 5 58L 2 P 11 pedal axle D19 128 5L 2 Q 1 Moveable supporting tube 2 Q 2 Bushing D19 15x D25 6x32 xL 17 3 8 Q 3 Front...

Страница 9: ...2xD8 5x1 5T 4PCS N 4 D22xD8 5x1 5T 4PCS N 4 D15 4xD8 2x2T 6PCS N 3 D 1 4 D 8 4 T 2PCS N 6 D15 4xD8 2x2T 2PCS N 3 N 10 D 2 6 D 1 9 5 0 3 T 2PCS D 2 5 D 8 5 2 T 2PCS N 13 M8 1 25 25L 2PCS N 12 D15 4xD8...

Страница 10: ...3x4 N 2x4 1 Assemble the front stabilizer F and rear stabilizer G onto the main frame D by using the square neck bolt N 1 the curved washer N 4 the spring washer N 3 and the cup nut N 2 2 Adjust the...

Страница 11: ...16 N 17x2 N 16x2 1 Connect the upper computer cable C 3 to the lower computer D 7 then insert the handlebar post C on the main frame 2 Assemble the pedal axle cover N 16 on the pedal axle 3 Fix the pe...

Страница 12: ...M8 N 11x2 N 3x4 N 11 1 Connect the movable handlebar support E to the handlebar support Q 1 by using the bolt N 5 the flat washer N 3 and the waved washer N 4 2 Joint the moving handlebar E with fron...

Страница 13: ...3x2 N 4x2 1 Assemble the fixed handlebar B and the cover O on the handlebar post C by using the curved washer N 4 the spring washer N 3 and the Allen bolt N 5 2 Through the upper computer cable and ha...

Страница 14: ...6x2 M12 M10 N 14X2 N 15X2 N 6 1 Fix the pedal H onto the pedal support tube P by using bolt N 9 knob N 7 and flat washer N 8 Fig A 2 Cap the bolt cover N 14 and N 15 3 Insert the handlebar post into t...

Страница 15: ...R A 1 C 3 1 Connect the upper computer cable C 3 and the handle pulse cable B 4 with the computer A 1 then fix the computer A 1 on the handlebar post by using the screws A 2 2 Connect the adaptor R t...

Страница 16: ...ed during exercise Range 0 0 99 9 CALORIES Burned calories during workout display Range 0 999 PULSE Pulse bpm displayed during exercise Pulse alarm when over preset target pulse RPM Rotation per minut...

Страница 17: ...and press MODE to enter 2 Press UP or DOWN to preset TIME DISTANCE CALORIES PULSE and press MODE to confirm 3 Press START STOP keys to start workout Press UP or DOWN to adjust load level 4 Press STAR...

Страница 18: ...load level of each column and press MODE to next one Total column 20 3 Hold on pressing MODE to finish or quit setting 4 Press UP or DOWN to preset workout TIME 5 Press START STOP button to start work...

Страница 19: ...ery status Body Fat Mode 1 When workout stop press BODY FAT key 2 Hold on handgrip after 8 seconds computer will show BMI FAT and fat symbol 3 Press BODY FAT key again reverse to main menu REFERENCE B...

Отзывы: