background image


FINISHING THE BODY AND NECK 


Although the overall tone and playing characteristics of the instrument will not 
be affected, a high quality finish is a real source of pride to the builder. 
 
Both the neck and body of your Electric Guitar Kit have been sanded and are 
ready for final sanding and then finishing. 
 

FINISHING THE BODY  

First  you  will  need  to  decide  whether  you  would  like  a  natural  finish  or  a 
coloured finish on the body. For a natural finish, go directly to "Clear Coat". 
 

COLOR COAT  

For  the  colour  coat  your  first  stop  is  a  shop  that  specializes  in  automotive 
products. The 

acrylic lacquer

 made by the automotive industry is particularly 

well  suited  to  your  needs.  In  addition  to  providing  a  full  range  of  colour 
choices, acrylic lacquer is extremely durable and resistant to cracking.  
Choose  your  colour  from  the  many  available  shades  (including  metallic 
options)  used  for  automobile  touch  up  work.  A  spray  can  will  make  your  job 
much easier and will produce great results. 
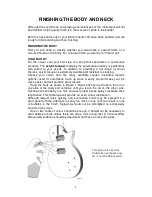
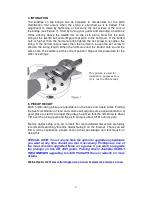
 - Hang the body as shown in Figure 1. Begin each spray stroke in the air on 
one  side  of  the  body  and  continue  until  you  reach  the  air  on  the  other  side. 
Overlap each stroke by one half, and every other stroke spray crosswise, then 
length wise. This technique will provide an even colour distribution.  
Although  lacquer  dries  quickly,  and  successive  coats  may  be  sprayed  in  a 
short period of time, attempts to spray too much in one coat can result in runs 
or  bubbles  in  the  finish.  Spraying  should  not  be  attempted  on  excessively 
humid or rainy days.  
 - One or two coats of colour should be enough. It should not be necessary to 
sand between coats unless there are drips, runs or bug feet (!) to be levelled. 
All exposed surfaces should be dead level and have a nice satin gloss. 


This picture is used for  
Illustration purposes only 
(It is not the PRS model)  

Содержание SPR01

Страница 1: ...KIT SP SP SP SPR R R R 01 01 01 01 Joint Bolt on Body Basswood with Flamed Maple Top Neck Maple Fingerboard Rosewood Tuning Machines Chrome Die cast Scale Length 628mm 24 75 Fret 22 Control 1V 1T 3 Wa...

Страница 2: ...u may order replacements from your local music shop or directly from us Quantity Description A 1 Basswood with Flame Maple Carve top body B 1 Maple Neck with Rosewood Fingerboard C 1 Output Jack Chrom...

Страница 3: ...ur from the many available shades including metallic options used for automobile touch up work A spray can will make your job much easier and will produce great results Hang the body as shown in Figur...

Страница 4: ...l ventilated while spraying and until all vapour is gone Do not smoke Do not breathe the vapour and keep doors and windows open during application and drying SHAPING THE HEADSTOCK The headstock of the...

Страница 5: ...n as wet and dry During sanding be sure to place a firm material behind the sandpaper A large rubber eraser works fine The eraser is flexible enough to sand the gradual curves but is stiff enough to p...

Страница 6: ...the locator holes on the back of the body 2 THREE WAY PICKUP SWITCH PART E Looking at the back of the guitar body push the threaded shaft of the switch through the 1 2 hole on the bottom right of the...

Страница 7: ...ol cavity also Attach the bridge position humbucking pickup to the body with four 5 8 screws 5 VOLUME AND TONE CONTROLS PART D There is one volume and one tone control for this guitar The 1 volume and...

Страница 8: ...ece of wood on top of the bushing to prevent damage and tap the bushing in place with an ordinary hammer Now screw the tailpiece mounting screws back into the bushings 8 THE BRIDGE PART J Now tap the...

Страница 9: ...might want to make some adjustment Here s how to do it Push the sixth string down between second and third fret The space between the top of the first fret and the bottom of the string should be about...

Страница 10: ...humbucking pickup is adjustable on the bass and treble sides Finding the best combination of tone and volume will require some experimentation A good place to start is to adjust the pickup height so t...

Страница 11: ...10...
Отзывы: