background image

Isotemp   

|


3

-

7

Fisher Scientific

Installation  

 |


Chapter 3

Draining

Drain the bath before moving or storing. 

Ensure the fluid is at a safe handling temperature, ~40°C or lower. Wear protective 

clothing and gloves.

  Place a suitable receptacle underneath the drain. 

  Slowly turn the drain plug until flow is observed.

  When the flow stops close the drain plug.

Draining 

(GPD 10, GPD 20, GPD 28 and GPD 15D only)

CAUTION

Drain Kit Accessory

Coupler

Quick Disconnect

Neoprene Hose (3/8ID x 5/8OD)

Figure 3-4 

– Drain  Kit Accessory

CAUTION

Accessories

Only use the accessories supplied by Fisher Scientific.

Figure 3-3 

–  GPD Bath Drain Hose

  Remove the drain hose from its 

housing and insert the fitting into the 
drain quick disconnect.

  When the flow stops remove the 

hose and reinsert it back into the 
housing.

  Before filling the bath remove the 

drain plug from the bath drain.

  Wrap coupler with Teflon

®

 tape, or 

equivalent, and install into bath drain.

  Insert quick disconnect into hose.

  To start draining snap quick  

disconnect onto coupler.

  To remove quick disconnect from 

coupler and stop draining press  
down on the disconnect's grey 
release.

Содержание Isotemp

Страница 1: ...User s Manual Manual P N U01318 Rev 11 05 2015 Isotemp Shaking and General Purpose Water Baths...

Страница 2: ...irements 3 2 Approved Fluids 3 3 Filling Requirements 3 6 Filling with Thermal Lab Beads 3 6 Draining 3 7 Accessories 3 7 Drain Kit Accessory 3 7 Chapter 4 Operation 4 1 Controller 4 1 Start Up 4 2 Ch...

Страница 3: ...Isotemp Fisher Scientific...

Страница 4: ...e reservoir with a minimum of one inch of water and the maximum level lower than the tray shaft fitting Make allowance for water splashing from tray oscillations For GPD Baths fill the reservoir with...

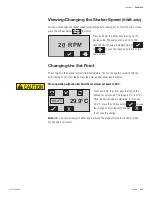
Страница 5: ...n view change the speed value with the bath running or not From the home screen press the soft key below to display Press and hold the arrow keys to bring up the desired value The values are 0 and 30...

Страница 6: ...hstens bis unterhalb der Halterung f r den Tablettschaft Lassen Sie etwas Platz f r Spritzwasser durch die Schwingungen des Tabletts F r GPD B der f llen Sie den Beh lter mindestens bis zu einer F llh...

Страница 7: ...eschwindigkeitseinstellung l sst sich sowohl bei eingeschaltetem als auch bei ausgeschaltetem Bad anzeigen ndern Vom Einstiegsbildschirm aus dr cken Sie die Schaltfl che unten zur Anzeige von Dr cken...

Страница 8: ...te les claboussures dues aux oscillations du plateau Pour les bains GPD remplissez le r servoir d au moins 2 5 centim tres 1 pouce d eau et assurez vous que le niveau maximum se trouve 2 5 centim tres...

Страница 9: ...icher Appuyez sur les touches fl che et maintenez les enfonc es jusqu atteindre la valeur d sir e Les valeurs sont 0 et de 30 200 Une fois que la valeur d sir e est affich e appuyez sur ou pour enregi...

Страница 10: ...inferior al ajuste del eje de la bandeja Tenga en cuenta las salpicaduras de agua procedentes de las oscilaciones de la bandeja En el caso de ba eras GPD llene el dep sito con un m nimo de dos cent m...

Страница 11: ...echa para seleccionar el valor del punto de ajuste deseado Una vez que aparezca resaltado el punto de ajuste pulse la siguiente tecla multifunci n para guardar los cambios y volver a la pantalla de in...

Страница 12: ...legada de gua e o n vel m ximo mais baixo que a conex o do eixo da bandeja Deixe uma folga para respingos de gua durante as oscila es da bandeja Para Banhos GPD encha o reservat rio com no m nimo uma...

Страница 13: ...trar o valor de ajuste desejado A varia o de 5 C a 100 C Quando o valor desejado for exibido neste caso 50 C pressione a tecla program vel abaixo para salvar a altera o ou pressione a tecla program ve...

Страница 14: ...does not have handles Take into account its weight when unpacking and transporting We recommend two people lift heavier baths from the bottom After sale Support Fisher Scientific is committed to cust...

Страница 15: ...istributor s sole option any Product which is defective in material or workmanship Distributor expressly disclaims all other warranties whether expressed implied or statutory including the warranties...

Страница 16: ...l result in death or serious injury WARNING indicates a potentially hazardous situation which if not avoided could result in death or serious injury CAUTION indicates a potentially hazardous situation...

Страница 17: ...removed Operating the baths at high temperature will cause condensation on the underside of the cover Remove the cover with care so the water falls back into the reservoir and not on the bath surface...

Страница 18: ...is designed for operation with water The body is made from galvanized steel and is painted for added protection A drain is located at the far left hand end of the bath A stainless steel gable cover r...

Страница 19: ...1200 1500 Bath Volume liters 15 27 Overall Bath Dimensions L x W x H cm inches 39 4 x 63 2 x 24 9 15 5 x 24 9 x 9 8 39 4 x 93 8 x 24 9 15 5 x 36 9 x 9 8 Bath Work Area Dimensions L x W x H cm inches 2...

Страница 20: ...bient Temperature C Range F 15 to 45 59 to 113 Stability 37 C 0 1 Uniformity 37 C 0 2 Heating Output watts 200 300 300 800 Bath Volume liters 2 2 5 10 Overall Bath Dimensions L x W x H cm inches 23 0...

Страница 21: ...to 100 9 to 212 Ambient Temperature C Range F 15 to 45 59 to 113 Stability 37 C 0 1 Uniformity 37 C 0 2 Heating Output watts 1200 1200 300 and 800 Bath Volume liters 20 28 5 and 10 Overall Bath Dimens...

Страница 22: ...tion The bath is designed for continuous operation and for indoor use Never place the bath in a location where excessive heat moisture or corrosive materials are present Ventilation No special ventila...

Страница 23: ...ion is provided The circuit protector on the rear of the bath is designed to protect the bath s internal components Note If the circuit protector activates allow the temperature to cool before resetti...

Страница 24: ...mmended to regularly drain and replace fluid especially when higher temperatures are utilized above 40 C Draining and drying the bath after each use is recommended as leaving standing water for any pe...

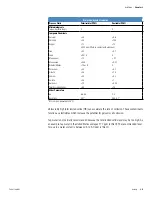
Страница 25: ...vent electrical leaks to ground through the recirculating fluid De ionized water is in an unbalanced state and will leach the missing ions from the materials it comes in contact with The aggressive na...

Страница 26: ...e 25 1 0 Sodium 20 0 3 Sulfate 25 1 Hardness 17 0 05 Total Dissolved Solids 50 10 Other Parameters pH 6 5 8 5 7 8 Resistivity 0 01 0 05 0 1 M cm compensated to 25 C Unfavorably high total ionized soli...

Страница 27: ...mum of one inch of water and the maximum level lower than the tray shaft fitting For General Purpose Baths fill the reservoir with a minimum of one inch of water and a maximum level one inch lower tha...

Страница 28: ...Hose 3 8ID x 5 8OD Figure 3 4 Drain Kit Accessory CAUTION Accessories Only use the accessories supplied by Fisher Scientific Figure 3 3 GPD Bath Drain Hose Remove the drain hose from its housing and...

Страница 29: ...3 8 Isotemp Fisher Scientific Chapter 3 Installation...

Страница 30: ...ss the two navigation arrows to move through the controller displays and to adjust values Press a soft key to select additional displays Indicates the heater is on The icon flashes when the reservoir...

Страница 31: ...glass vessels are secure Unrestrained vessels may shift and break when shaking is engaged Flask clips and trays are available from Fisher Scientific Do not run the bath until fluid is added to the res...

Страница 32: ...the soft key below to save the change or press the soft key below x to not save the change Note After a 30 second delay if neither key is pressed the display returns to the home screen any change is n...

Страница 33: ...the audible alarm status The top indicates it is enabled the bottom indicates disabled Press to toggle between enabled disabled Use the arrow keys to highlight another setting or press to return to th...

Страница 34: ...The top indicates it is enabled the bottom is disabled Press to toggle between enabled disabled Press to return to the home screen When enabled and the reservoir level nears empty the bath will shut...

Страница 35: ...meter and press again Then press and hold the arrow keys to change the value Once the desired value is displayed press If desired press the arrow keys to highlight another preset parameter or press to...

Страница 36: ...th shut down place the circuit protector located on the rear of the bath to the O position To disconnect the bath remove the electrical plug from its power source With the bath running and after 30 se...

Страница 37: ...4 8 Isotemp Fisher Scientific Chapter 4 Operation...

Страница 38: ...cloth and warm water only After time the circulating bath s stainless steel surfaces may show spots and become tarnished Normal stainless steel cleaners can be used Clean the reservoir and built in c...

Страница 39: ...ing the top right panel 2 Swing panel assembly open Do not operate the bath with the panel open 3 Rotate disc by grasping aluminum components of the eccentric only one turn clockwise and verify that d...

Страница 40: ...high temp protection limit exceeded allow bath to cool down restart the bath if the HTC fault cannot be cleared the bath must be serviced by an authorized Fisher Scientific Temperature Control Service...

Страница 41: ...fy the set point Low end temperature set points require supplemental cooling GPD 02 baths require insulation especially in the lid for operation above 90 C Ensure bath installation complies with the s...

Страница 42: ......

Отзывы: