background image

26

USINg yOUR wATER DISPENSER / ICE MAKER – ICE & wATER

Removing and replacing the ice box

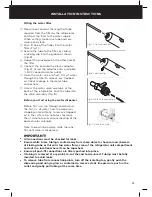
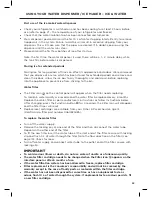
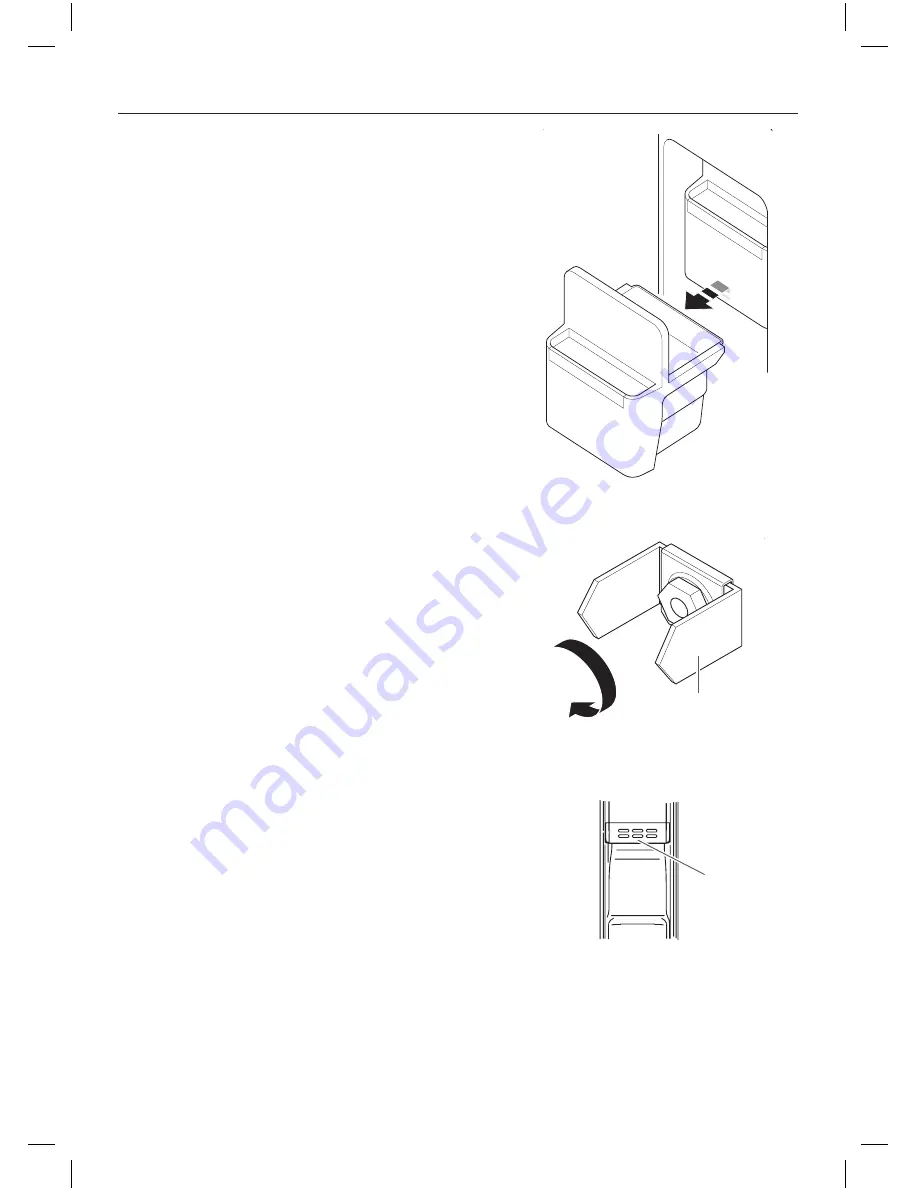
To remove the icebox, lift the box and then 
pull towards you, releasing the unit (Fig. 11).

Note: water moisture may have condensed 
and frozen the icebox in place.

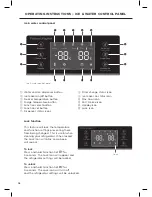
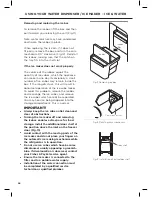
When replacing the ice bin, if it does not 
fit easily, remove the box and turn the cam 
mechanism 90° clockwise (Fig. 12). Reinstall 
the icebox, making sure that the catch on 
the tray fits into the shelf slot.

If the ice maker does not work properly

The volume of the icebox equals the 
quantity of ice cubes, which the appliance 
can make in one day. Occasionally a small 
number of ice cubes may remain inside the 
box. If the ice gets stuck, this will result in 
abnormal operation of the ice cube maker. 
To avoid this problem, remove the icebox 
and rearrange the ice cubes, and remove 
the ice cubes which cannot be separated.
You may hear ice being dropped into the 
storage compartment. This is normal.

ImpORTANT!

Always keep the ice cube outlet clean and 

clear of obstructions.

Turning the ice maker off and removing 

the icebox enables extra space for food 

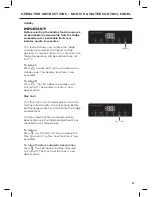
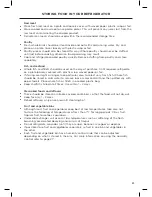
storage. Install the additional door shelf at 

the position above the inlet on the freezer 

door (fig. 13).

Avoid contact with the moving parts of the 

ice maker and do not place your fingers on 

the automatic ice making mechanism while 

the refrigerator is in operation.

Do not use ice cubes which have become 

discoloured, usually appearing a greenish-

blue. If discolouration is observed, contact 

your fisher & Paykel service agent. 

Ensure the ice maker is connected to the 

filter and to a potable water supply.

Installation of the water connection must 

be completed by a qualified service 

technician or qualified plumber.

Fig. 11 Removing icebox

Icebox

Icebox

Fig. 12 Rotating cam mechanism 

Cam mechanism

Fig. 13 Installation of extra door shelf 

Door shelf 

Содержание RX611DUX

Страница 1: ...Side by side refrigerator RX611DUX RX628DX and RX628DW models NZ AU INSTALLATION INSTRUCTIONS USER GUIDE...

Страница 2: ......

Страница 3: ...g Care Exterior 28 Cleaning Care Interior 29 Storing food in your refrigerator 30 Storing food in your freezer 32 Troubleshooting 34 Manufacturer s Warranty 38 Customer Care 40 Important SAVE THESE IN...

Страница 4: ...Many hours have been spent researching how you our customer use your refrigerator and what we can do to make life easier for you As your life changes so can your refrigerator This book explains the fe...

Страница 5: ...hildren should be supervised to ensure they do not play with the appliance The manufacturer s installation instructions for product and cabinetry ventilation must be followed when installing the appli...

Страница 6: ...uately trained service technician or qualified electrician Cleaning Many commercially available cleaning products contain solvents which may attack plastic components of your refrigerator and cause th...

Страница 7: ...hawed Ice crystals still visible food may be refrozen but should be stored for a shorter period than recommended Thawed but refrigerator cold refreezing generally not recommended Fruits and some cooke...

Страница 8: ...y 220 240 V 50 Hz with the plug and lead which are fitted Connections to the mains supply should be in accordance with local regulations Location Your refrigerator should not be located in direct sunl...

Страница 9: ...with refrigerator chassis full door rotation E Inside width 941 F Inside depth 635 MINIMUM CLEARANCES G Side clearance 20 H Rear clearance 30 I Door clearance hinge side flush with chassis full rotat...

Страница 10: ...spacing must be left for opening the doors and removing the shelves This appliance should be at least 100 mm from any electric or gas cooker If this is not possible make sure that appropriate insulat...

Страница 11: ...remove the water tube ArtNo 600 0048 DxD water connect Fig 2 Releasing water coupler Fig 1 Removing kick strip Kick strip Doors omitted for clarity The freezer door 1 Undo the hinge cover screw and re...

Страница 12: ...en push the cover towards the centre of the appliance and pull upwards to release 2 Undo screws holding down the hinge bracket Fig 6 3 Pull the door up and then away from the cabinet Fig 6 Removing hi...

Страница 13: ...he slots of the adjustable feet Wind to the left to raise the foot and to the right to lower the foot Levelling the doors To raise the left hand door wind the left hand foot to the left To raise the r...

Страница 14: ...of the filter system DO NOT mount the filter in such a position that it will be struck by other items such as wastebaskets etc DO NOT install the filter or any water tubing in direct sunlight as prolo...

Страница 15: ...first use run through and discard the first 3 L of water from the dispenser stopping intermittently to remove trapped air in the system Do not press for more than 1 minute to prevent overheating of th...

Страница 16: ......

Страница 17: ...ft on its side for any length of time leave it standing upright as long as possible at least a few hours before turning it on Storing your appliance When storing your cleaned appliance leave the door...

Страница 18: ...box 2 Freezer main shelves 3 Ice water dispenser 4 Freezer light 5 Freezer drawers 6 Freezer door shelves 7 Fridge light 8 Fridge door shelves 9 Fridge main shelves 0 Vegetable drawers 1 Fridge drawe...

Страница 19: ...zer light 2 Freezer door shelves 3 Freezer main shelves 4 Ice trays 5 Ice box 6 Freezer drawers 7 Fridge light 8 Fridge door shelves 9 Fridge main shelves 0 Vegetable drawers 1 Fridge drawer 1 2 3 4 5...

Страница 20: ...x Cool icon 1 Fast Freeze icon 2 Holiday icon 3 Lock icon Lock function This feature will lock the temperature and function settings preventing these from being changed This is useful when cleaning yo...

Страница 21: ...ress Function until the Holiday icon is selected 2 Press Function Set the Holiday icon will turn off Holiday function is now deactivated Max Cool This function is designed to chill food quickly to ret...

Страница 22: ...ained during the freezing process The Fast Freeze function will automatically deactivate after a set time period Use this feature before putting large quantities of food into the freezer for example a...

Страница 23: ...ezer is in the temperature setting mode 2 Press to scroll through the freezer temperature range from 14 C to 24 C When the desired temperature is displayed wait 5 seconds The blinking will stop and th...

Страница 24: ...function settings preventing these from being changed This is useful when cleaning your refrigerator When locked the Lock icon will blink and a beep will sound To turn on Press and hold for 3 seconds...

Страница 25: ...he Holiday function is now activated To turn off Press The LED above the Holiday icon will turn off The Holiday function is now deactivated Max Cool This function is to chill food quickly to retain fr...

Страница 26: ...eactivated Adjusting the fridge temperature 1 Press The fridge temperature display will start blinking indicating that the fridge is in the temperature setting mode 2 Press to scroll though the fridge...

Страница 27: ...ilter be replaced every 6 months Replace the water filter as per manufacturers instructions or follow instructions below After changing press the Function button for 3 seconds the Filter icon will dis...

Страница 28: ...e the ice cubes which cannot be separated You may hear ice being dropped into the storage compartment This is normal Important Always keep the ice cube outlet clean and clear of obstructions Turning t...

Страница 29: ...mixture of fruit and vegetables position the humidity slide in the centre Door alarms If the refrigerator or freezer door is left open the alarm will beep at regular intervals to remind you to close t...

Страница 30: ...ers and solvents will damage the door surface Other exterior surfaces Clean all other exterior surfaces with a mix of warm water and liquid dishwashing detergent and a soft cloth If necessary clean th...

Страница 31: ...remove old stale refrigerator smells add a few drops of vanilla essence or vinegar to the water before cleaning Do not use harsh abrasive cloths or cleaners or highly perfumed strong smelling cleaner...

Страница 32: ...ll be accelerated Avoid placing food directly in front of air outlets as it may freeze and cold air needs to circulate to maintain safe food storage Do not open the refrigerator door unnecessarily Coo...

Страница 33: ...ect very fresh fish Whole fish should be rinsed in cold water to remove loose scales and dirt and then patted dry with paper towels Place whole fish or fillets in a sealed plastic bag Keep shellfish c...

Страница 34: ...ts It is recommended that the function is activated approximately 2 hours before required For more information refer to page 26 Freeze immediately or as quickly as possible Freeze only small quantitie...

Страница 35: ...is to be used Fruits packed in syrup are ideal for desserts whereas fruits packed without sugar are better used for cooking Most fruits can be stored for 8 12 months Vegetables Most vegetables freeze...

Страница 36: ...erator not working Check refrigerator is turned on at wall Motor operates for long periods Hot weather Minimise door openings to allow temperature to stabilise Frequent door openings Large amount of f...

Страница 37: ...door openings Door gasket leaking Check that gasket is sitting flat and sealing tightly Not unusual during periods of high humidity Wipe dry Door handles out of alignment With time and usage movement...

Страница 38: ...be transmitting odour taste Old cubes need to be discarded Ensure food packaging is sealed Interior of freezer needs cleaning Ice storage bin needs to be emptied and washed Clean refrigerator refer t...

Страница 39: ...tank Increase temperature to a warmer setting in fresh food compartment and freezer Water in first glass is warm Water dispenser not used for extended period Discard first glass of water dispensed Ta...

Страница 40: ...s considered normal eg drain fan sounds refrigeration noises or user warning beeps 6 Correcting damage caused by pests eg rats cockroaches etc 7 Replacement light bulbs B Defects caused by factors oth...

Страница 41: ...tralian Customers This warranty is an extra benefit and does not affect your legal rights Our goods come with guarantees that cannot be excluded under the Australian Consumer Law You are entitled to a...

Страница 42: ...a network of independent Fisher Paykel Authorised Repairers whose fully trained technicians can carry out any service necessary on your appliance Your dealer or our Customer Care Centre can recommend...

Страница 43: ...41 customer care Complete and keep for safe reference Model Serial No Purchase Date Purchaser Dealer Suburb Town Country...

Страница 44: ...s in this booklet apply to the specific products and models described at the date of issue Under our policy of continuous product improvement these specifications may change at any time You should the...

Отзывы: