background image

8

INSTALLATION

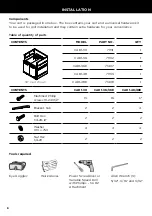
Eye Goggles

Work Gloves

Allen Wrench (3):
5/32”, 3/16” and 3/32”

Power Screwdriver or 
Variable Speed Drill 
with Phillips - tip #2 
Attachment

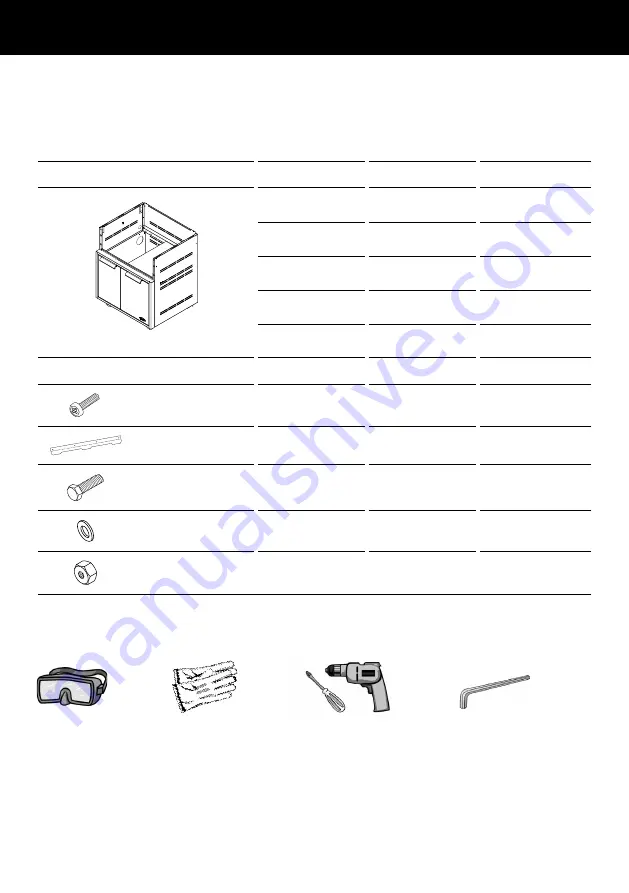
Components

Your cart is packaged in one box. The box contains your cart and a universal hardware kit 
to be used for grill installation and may contain extra hardware for your convenience. 

Table of quantity of parts

CONTENTS

MODEL

PART NO.

QTY

22.5” 

11-1/2” 

    X 

19-3/4” 

12-3/16” 

     X 

19-3/4” 

24.128” 

26.6” 

19.08” 

2.497” 


30” Cart shown

CAD1-30

71131

1

CAD1-36

71132

1

CAD1-36E

71407

1

CAD1-48

71133

1

CAD1-48E

71408

1

CONTENTS

CAD1-30

CAD1-36/36E

CAD1-48/48E

Machined Phillip 
screws 10-24X1/2”

13

16

17

Bracket, Tab

2

2

4

Bolt Hex 
1/4-20-12”

2

2

2

Washer
.313 x .750

4

4

4

Nut Hex 
1/4-20

2

2

2

Tools required

Содержание DCS CAD1 Series

Страница 1: ...INSTALLATION GUIDE USER GUIDE US CA PROFESSIONAL GRILL CART CAD1 models ...

Страница 2: ......

Страница 3: ...te listed on the back cover or contact your DCS by Fisher Paykel dealer Safety and warnings 2 Introduction 4 Model identification dimensions 5 Shipping inspection 6 Locating the cart 7 Cart assembly instructions 7 Components 8 Cart assembly instructions 9 Side shelf assembly instructions optional 14 Using the cart 15 Removing the drawers 15 Re installing the drawers 15 Freezer pack optional kit 70...

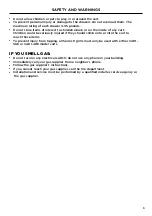
Страница 4: ...r appliance An LP cylinder not connected for use shall not be stored inside or in the vicinity of this unit WARNING Tip Hazard Failure to follow this advice may result in injury Do not push down on the top of the drawers The unit could tip forward Do not overload drawers Maximum rating of each drawer is 35 pounds WARNING Crush Hazard Failure to follow this advice may result in injury Improper hand...

Страница 5: ...uld climb onto or into the cart to reach these items z To prevent injury from tipping all Series 9 grills must only be used with either CAD1 36E or CAD1 48E model carts IF YOU SMELL GAS z Do not turn on any electrical switch do not use any phone in your building z Immediately call your gas supplier from a neighbor s phone z Follow the gas supplier s instructions z If you cannot reach your gas supp...

Страница 6: ... guide contains valuable information on how to properly install and maintain your new Professional Grill Cart for years of safe and enjoyable use For your convenience product questions can be answered by a DCS Customer Care Representative at www dcsappliances com or email customer care fisherpaykel com ...

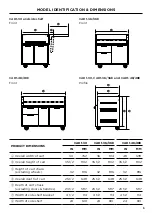
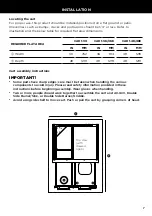
Страница 7: ...els 32 816 32 816 32 816 D Overall depth of cart 25 1 2 648 25 1 2 648 25 1 2 648 E Depth of cart chasis excluding doors handles 23 1 2 597 23 1 2 597 23 1 2 597 F Width of side shelf bracket 4 1 2 114 4 1 2 114 4 1 2 114 G Width of side shelf 24 610 24 610 24 610 A f E g D c b A A A f E g D c b A A A f E g D c b A A A f E g D c b A A CAD1 30 and side shelf Front CAD1 36 36E Front CAD1 48 48E Fron...

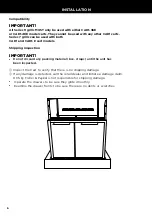
Страница 8: ...hipping inspection IMPORTANT z Do not discard any packing material box straps until the unit has been inspected 1 Inspect the Cart to verify that there is no shipping damage 2 If any damage is detected call the retail dealer and initiate a damage claim DCS by Fisher Paykel is not responsible for shipping damage z Operate the drawers to be sure they glide smoothly z Examine the drawer fronts to be ...

Страница 9: ... MM IN MM IN MM A Width 30 762 36 914 48 1219 B Depth 48 1219 48 1219 48 1219 Cart assembly instructions IMPORTANT z Some parts have sharp edges care must be taken when handling the various components to avoid injury Please read safety information provided in these instructions before beginning assembly Wear gloves when handling z Two or more people should work together to assemble the cart and Al...

Страница 10: ... to be used for grill installation and may contain extra hardware for your convenience Table of quantity of parts CONTENTS MODEL PART NO QTY 24 128 26 6 19 08 2 497 30 Cart shown CAD1 30 71131 1 CAD1 36 71132 1 CAD1 36E 71407 1 CAD1 48 71133 1 CAD1 48E 71408 1 CONTENTS CAD1 30 CAD1 36 36E CAD1 48 48E Machined Phillip screws 10 24X1 2 13 16 17 Bracket Tab 2 2 4 Bolt Hex 1 4 20 12 2 2 2 Washer 313 x...

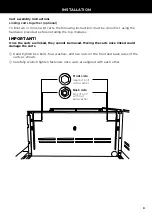
Страница 11: ...nstalling the top modules IMPORTANT Once the carts are linked they cannot be moved Moving the carts once linked could damage the carts 1 Hand tighten two bolts four washers and two nuts on the front and back sides of the carts as shown 2 Carefully wrench tighten fasteners once carts are aligned with each other Front side Head of bolt with washer Back side End of bolt with nut and washer ...

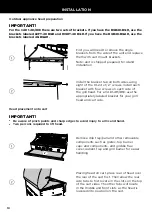
Страница 12: ... the appropriately labeled bracket for your grill head and cart side Placing head on cart place rear of head over the rear of the cart first Then allow the rear side tabs to first locate in the slots on the top of the cart sides The other tabs will locate in the middle and front slots as the head is lowered into position on the cart 1 1 2 2 Outdoor appliance head preparation IMPORTANT For the CAD1...

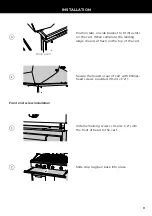
Страница 13: ...he landing ledge should sit flush on the top of the cart Install remaining screws 10 24 x 1 2 into the front of head to the cart Secure the head to rear of cart with Phillips head screws provided 10 24 x 1 2 Slide drip tray pan back into place 3 1 4 2 Front end screw installation Pinch point ...

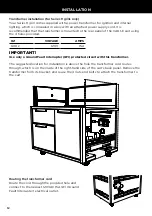
Страница 14: ... Hz 120V 15A IMPORTANT Use only a Ground Fault Interrupter GFI protected circuit with this transformer The suggested location for installation is above the hole the transformer cord routes through which is on the inside of the right hand side of the cart s back panel Remove the transformer from its bracket and reuse the 4 nuts and bolts to attach the transformer to the cart INSTALLATION Routing th...

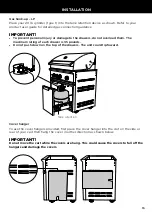
Страница 15: ...load them The maximum rating of each drawer is 35 pounds z Do not push down on the top of the drawers The unit could tip foward Cover hanger To use the cover hangers provided first place the cover hanger into the slot on the side or rear of your cart then hang the cover in either direction as shown below IMPORTANT Do not move the cart while the covers are hung This could cause the covers to fall o...

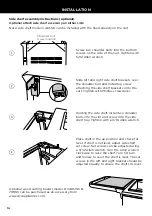
Страница 16: ...screwdriver Holding the side shelf install two shoulder bolts into the slot and screw into the side shelf tray Tighten with a 3 16 Allen wrench Place shelf in the up position and check for level If shelf is not level adjust side shelf set screw Set screws can be adjusted using a 3 32 Allen wrench Turn the Allen wrench clockwise to raise the shelf Turn 1 4 turn and review to see if the shelf is lev...

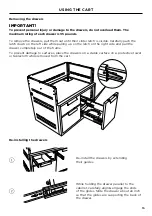
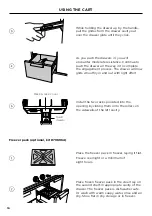
Страница 17: ...while pulling up on the latch on the right side and pull the drawer completely out of the frame To prevent damage to surfaces place the drawers on a stable surface on a protective towel or tablecloth while removed from the cart Re installing the drawers Re install the drawers by extending their guides While holding the drawer parallel to the cabinet carefully align engage the ends of the glides Sl...

Страница 18: ... out with light effort Install the two racks provided into the opening by sliding them onto the rollers on the sidewalls of the left cavity 3 4 5 Rack rack cover Drain drawer Freezer pack optional kit 70696A Place the freezer pack in freezer laying it flat Freeze overnight or a minimum of eight hours Place frozen freezer pack in the steel tray on the second shelf in appropriate cavity of the drawe...

Страница 19: ...eel polish lines grain The cleaner will be more effective when used in the direction of the polish lines 3 Use only clean sponges soft cloths paper towels plastic non metal soap pads for cleaning or scouring as recommended in this section Use only soap pads with soap still in them An empty pad can scratch 4 Be sure to rinse all parts thoroughly and to wipe dry to avoid water marks 5 After cleaning...

Страница 20: ...ved to your satisfaction please write or email us at Write Fisher Paykel Appliances Inc Attention DCS Customer Care 695 Town Center Drive Suite 180 Costa Mesa CA 92626 1902 USA Email customer care fisherpaykel com US CA 591649C 11 19 DCSAPPLIANCES COM Fisher Paykel Appliances 2019 All rights reserved The product specifications in this document apply to the specific products and models described at...

Отзывы: