background image

TRINITY EASY SETUP GUIDE

7

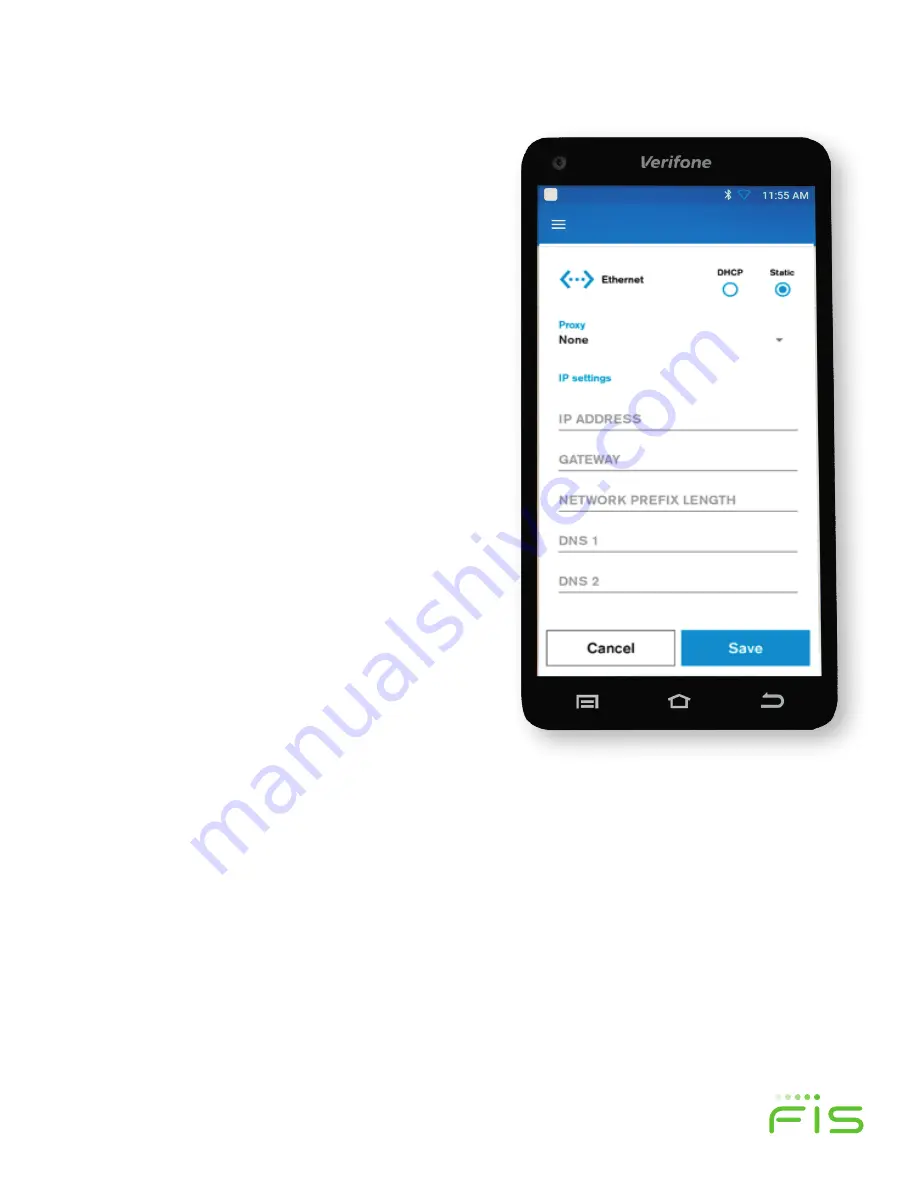
3b.  Setting up Static IP Connection: 

Utilize these steps only if your company requires the use 

of a specific IP address and connection for your terminal.  

•  If the Ethernet cord was properly connected to the ETH 

port in Step 1, you will see the Ethernet option above the 

Next

 button as shown in Figure 8. Select the Ethernet 

option and it will take  you to the Ethernet configuration 

screen.

•  Select Static radio button as shown in Figure 10 and 

enter all 5 IP Settings in the corresponding fields and 

Press the blue 

Save

 button to proceed. If you do not 

know these settings, please contact your internet service 

provider or your company IT support team.

•  Once the Network Connection is established (figure 

9), the 

T650c

 will automatically configure the date 

and time. A screen prompt will confirm the internet 

connection, date and time and link to the VHQ data 

(Verifone Headquarters Network).

•  Proceed to Step 4.

3c. Setting up a Wi-Fi Connection:

Wi-Fi gives you untethered payment processing, allowing 

you the freedom for easier terminal placement. If you 

wish to connect via an Ethernet cord, return to Step 1.

On the next screen (figure 8), the 

Trinity T650c

 will 

scan for available Wi-Fi Networks. This may take a few 

moments.

•  Select your Wi-Fi Network from the options listed by 

selecting the corresponding radio button on the touch 

screen. Press the blue, 

Next

 button. You will need a 

secure Wi-Fi Network and will be prompted to enter your 

password on the next screen.

•  Once the network connection is established (figure 9), 

the 

T650c

 will automatically configure the date and time. 

A screen prompt will confirm the internet connection, 

date and time and link to the VHQ data (Verifone 

Headquarters Network).

•  Proceed to Step 4.

Figure 10

Содержание Trinity T650c

Страница 1: ...TRINITY EASY SETUP GUIDE 1 Welcome Trinity T650c Easy Setup Guide Important Please review the entire guide before you begin...

Страница 2: ...ng terminal and or PIN pad according to your company s secure disposal policy for electronic devices Section 2 Do This First Important The Verifone Trinity T650c installation setup can take up to an h...

Страница 3: ...l into the tray as shown in figure 2 and close the cover Make sure the paper comes off the spool towards the bottom on the T650c Locate the indentations on each side of the printer paper cover as show...

Страница 4: ...additional instructions If you plan to use a PIN pad plug the provided PIN pad cable into the port labeled USB STEP 1 continued Figure 4 Figure 5 Lay all cords flat and feed into the channel guides pr...

Страница 5: ...Language and then press the blue Next Button Ethernet connected devices can skip Step 3 STEP 3 Setting up a Wi Fi Connection Wi Fi gives you untethered payment processing Allowing you the freedom for...

Страница 6: ...H port in Step 1 you will see the option for Ethernet Setting above the blue Next button as shown in Figure 8 Figure 9 Press the blue Next button and once the Network connection is established figure...

Страница 7: ...date and time A screen prompt will confirm the internet connection date and time and link to the VHQ data Verifone Headquarters Network Proceed to Step 4 3c Setting up a Wi Fi Connection Wi Fi gives...

Страница 8: ...tes the Trinity T650c terminal may automatically reboot multiple times During this process you may see several Software Update PLEASE WAIT screen prompts figure 10 as the device checks for and then do...

Страница 9: ...ed the ability for a terminal to calculate the total sale including sales tax prior to authorization The Trinity T650c has this capability Press Skip if you do not want the terminal to calculate sales...

Страница 10: ...e card is enabled for contactless payments NOTE Please test with an active credit debit card then void the transaction so that the charge does not settle STEP 5 continued un test transaction er a test...

Страница 11: ...saction Use the Reversal instructions below in the right hand column Table 2 to void the test transaction You can also review the Quick Reference Guide that also comes with your T650c which shows how...

Страница 12: ...B001 08 20 2020 FIS Advancing the way the world pays banks and investsTM Worldpay the logo and any other associated brand names are trademarks or registered trademarks of FIS All other trademarks are...

Отзывы: