TRINITY EASY SETUP GUIDE
5
TRINITY OUT-OF-BOX EASY SETUP GUIDE
STEP 2: Installing Your Trinity T650c Terminal
•
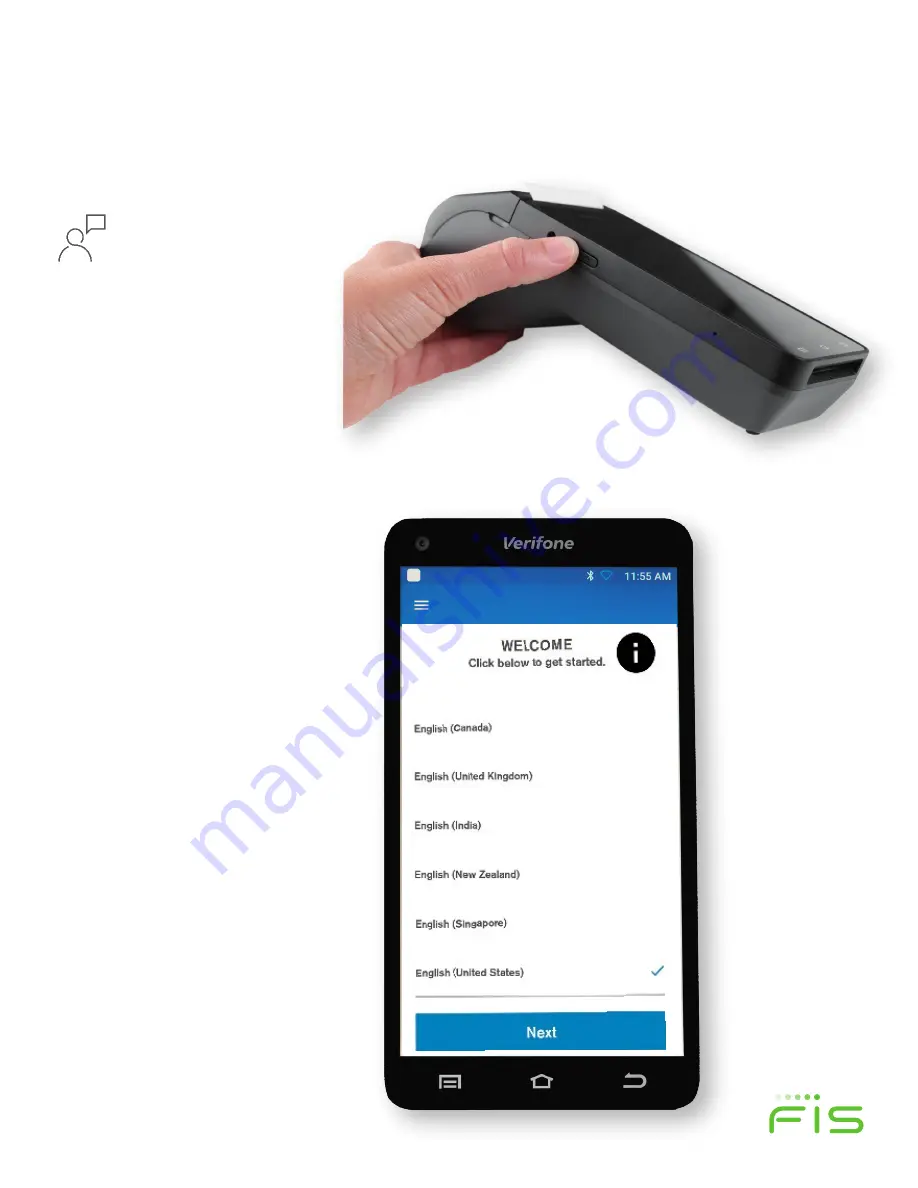
Turn on terminal by pushing the on/off
button on the left side of the unit (as shown
in figure 6) until you see the Verifone
Screen
. Press for 3-4 seconds to power on and
1-2 seconds to shut down.
•
You will be taken to the Welcome Screen and
asked to select your preferred
Language
and
then press the blue,
Next Button
.
•
Ethernet connected devices can skip Step
3.
STEP 3: Setting up a Wi-Fi Connection
•
Wi-Fi gives you untethered payment processing—Allowing you the freedom for
easier terminal placement.
If you wish to connect via an Ethernet cord, return to
Step 1.
•
On the next screen (figure 8), the Trinity T650c will scan for available Wi-Fi
Networks. This may take a few moments.
Figure 6
Figure 7
TRI
NI
TY
OUT
-OF
-B
O
X E
A
SY
SET
U
P G
U
ID
E
ST
EP
2:
Inst
alling Y
our
T
rinit
y
T650c
Ter
m
inal
•
Tur
n on t
er
m
inal
by
pu
shi
ng t
he on/
of
f
but
ton on t
he l
ef
t s
ide of
the uni
t (
as
s
how
n
in
figur
e 6)
unt
il y
ou s
ee t
he
Ver
ifone
Sc
reen
.
Pres
s for
3
-4 s
ec
onds
to p
ow
er
on and
1-2 s
ec
onds
to s
hut dow
n.
•
You w
ill be t
ak
en to the
Wel
com
e S
creen and
as
ked to s
elec
t y
ou
r pr
ef
er
red
Lan
gu
age
and
then pr
es
s the bl
ue,
N
ext
B
utto
n
.
•
Ether
net
connec
ted de
vic
es
c
an s
kip S
tep
3.
ST
EP
3:
Set
ting up a Wi
-Fi
C
onnect
ion
•
Wi
-Fi
gi
ves
y
ou unt
et
her
ed pay
m
ent
pr
oc
es
sing
—
Allo
w
ing y
ou t
he f
reedom
for
eas
ier
ter
m
inal
p
lac
em
ent
.
If you
w
ish t
o connect
vi
a an E
ther
net
cor
d,
re
tur
n t
o
Step 1
.
•
O
n t
he nex
t s
creen
(figur
e 8)
, the Tr
ini
ty T650c
w
ill s
can
for
av
ai
labl
e W
i-Fi
Ne
two
rks
.
Thi
s m
ay
tak
e a f
ew
m
om
ent
s.
Fig
ure
6
Fig
ure
7
TRINITY OUT-OF-BOX EASY SETUP GUIDE
STEP 2: Installing Your Trinity T650c Terminal
•
Turn on terminal by pushing the on/off
button on the left side of the unit (as shown
in figure 6) until you see the Verifone
Screen
. Press for 3-4 seconds to power on and
1-2 seconds to shut down.
•
You will be taken to the Welcome Screen and
asked to select your preferred
Language
and
then press the blue,
Next Button
.
•
Ethernet connected devices can skip Step
3.
STEP 3: Setting up a Wi-Fi Connection
•
Wi-Fi gives you untethered payment processing—Allowing you the freedom for
easier terminal placement.
If you wish to connect via an Ethernet cord, return to
Step 1.
•
On the next screen (figure 8), the Trinity T650c will scan for available Wi-Fi
Networks. This may take a few moments.
Figure 6
Figure 7
STEP 2:
Installing Your Trinity T650c Terminal
Figure 6
Figure 7
Turn on your terminal
by pushing the on/off
power button on the
left side of the unit (as
shown in figure 6) until
you see the Verifone
screen. Press for 3-4
seconds to power on.
At the Welcome screen
(as shown in figure 7),
select your preferred
Language
and then press
the blue,
Next
button.


