background image

English   

- 9 -

   Connecting to a DVD Player 

 If you want to connect a DVD player to your LCD 
TV, you can use connectors of the TV set. DVD 
players may have different connectors. Please refer 
to your DVD player’s instruction book for additional 
information. Power off both the TV and the device 
before making any connections. 

 Note

: Cables shown in the illustration are not supplied. 

 • If your DVD player has an HDMI socket, you can connect via 

HDMI. When you connect to DVD player as illustrated below, 
switch to HDMI source. See, “Input Selection” section.

• Most DVD players are connected through 

COMPONENT SOCKETS. Use a component 
video cable to connect video input. To enable sound 
connection, use AUDIO IN located side of the TV 
(YPbPr cable is not supplied).

• When the connection is made, switch to YPbPr 

source. See, “Input selection” section.

• You may also connect through the SCART socket. 

Use a SCART cable as shown below.


HDMI

inputs

Scart  sockets

Component 

video

inputs

Component 

audio

inputs

DVD  Player


Note

 : These methods of connection perform the same 

function but in different levels of quality. It is not necessary 
to connect by all three methods. 


 Using Side AV Connectors 

 You can connect a range of optional equipment to your LCD 
TV. Possible connections are shown below. Note that cables 
shown in the illustration are not supplied. 
  • For connecting a camcorder, connect to the VIDEO 

IN socket and the AUDIO SOCKETS. For selecting 
the related source, see the section “Input selection” 
in the following parts. 

• To listen the TV sound from headphones, connect 

to the HEADPHONE jack of theTV 


Camcorder

Headphone


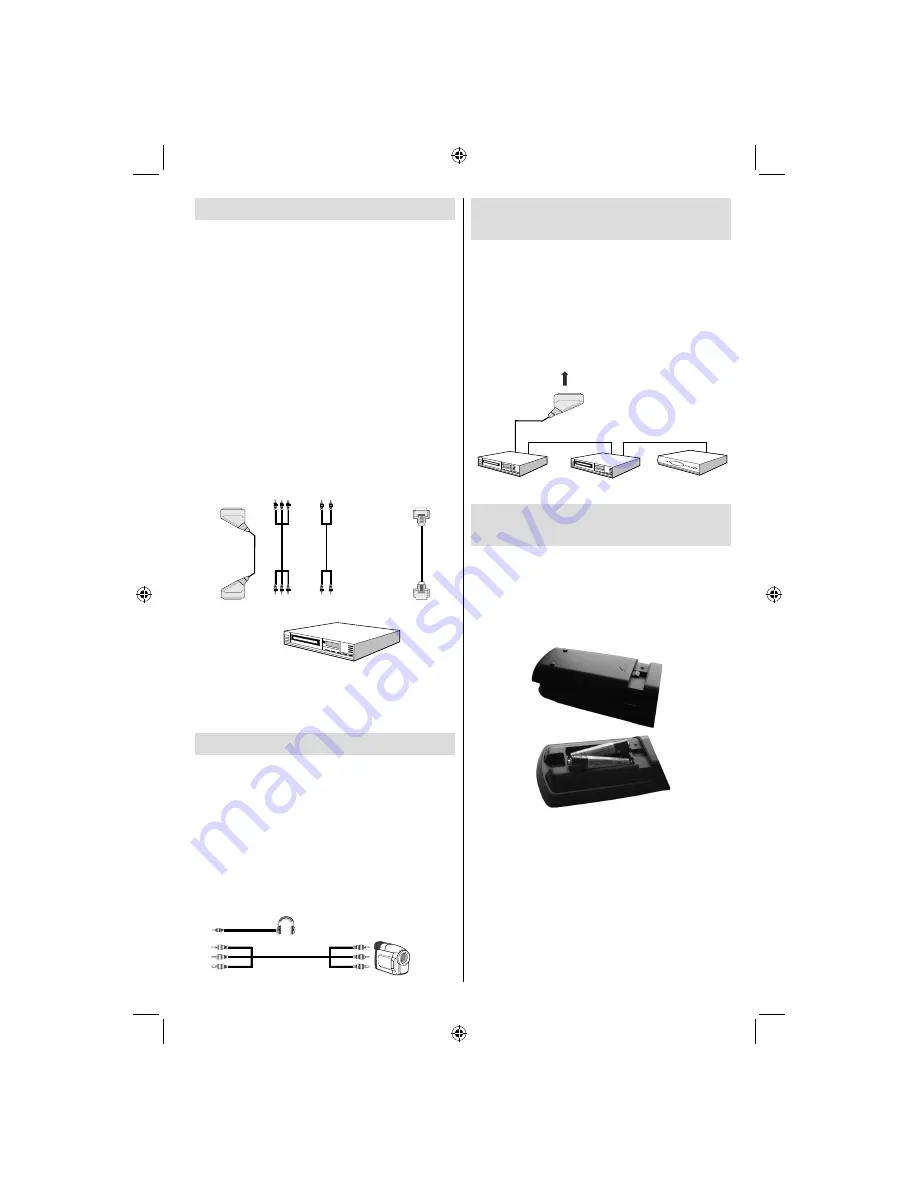
    Connecting Other Equipment 
via Scart

  Most devices support SCART connection. You can 
connect a; DVD recorder, a VCR or a decoder to 
your LCD TV by using the SCART socket. Note that 
cables shown in the illustration are not supplied. 
Power off both the TV and the devices before making 
any connections.
For more information, refer to your device’s own 
instruction book. 


Scart  socket

Decoder

DVD  Recorder

Video  Recorder

  Inserting Batteries into the 
Remote Control Handset

  • Remove the battery cover located on the back of 

the handset by gently pulling backwards from the 
indicated part.

  • Insert two  

AAA/R3

  or equivalent type batteries 

inside. Place the batteries in the right directions and 
replace the battery cover. 


Note

 : Remove the batteries from remote control handset 

when it is not to be used for a long period. Otherwise it can 
be damaged due to any leakage of batteries. 


01_MB45M_[GB]_5110UK_IDTV_SILVER8_26905W_10073317_50190400.indd   9

01_MB45M_[GB]_5110UK_IDTV_SILVER8_26905W_10073317_50190400.indd   9

11.05.2011   17:56:06

11.05.2011   17:56:06

Содержание FIN26FLD905HU

Страница 1: ...FIN26FLD905HU colour television owner s manual...

Страница 2: ...Disposal 3 Information for Users in European Union Countries 3 Disconnecting the Device 3 Headphone Volume 3 Installation 3 LCD Screen 3 Warning 3 Connection to a Television Distribution System Cable...

Страница 3: ...e TV please read this manual thoroughly Please keep this manual in a safe place for future references Preparation For ventilation leave a free space of at least 10 cm all around the set To prevent any...

Страница 4: ...r house Moisture and Water Do not use this device in a humid and damp place avoid the bathroom the sink in the kitchen and near the washing machine Do not expose this device to rain or water as this m...

Страница 5: ...you do not use However it is highly recommended to activate Power Save Mode setting to reduce your annual power consumption Please helps us to save environment by following these steps Repair Informa...

Страница 6: ...e 15 Return Exit in DTV mode Index page in 16 TXT mode No function 17 No function 18 No function 19 Picture mode selection 20 Electronic programme guide in DTV mode 21 Sleep timer 22 Menu on off 23 OK...

Страница 7: ...to an antenna or a cable 4 Note that if you use a decoder or a media recorder you should connect the aerial cable through the device to the television with an appropriate antenna cable as shown in th...

Страница 8: ...ternal devices 5 Connect the audio cable between the AUDIO INPUTS on the TV and the AUDIO OUTPUT jacks on your device Also to enable PC YPbPr sound connection in such a case use an appropriate audio c...

Страница 9: ...e physical dam age to the USB player and especially the USB device itself SIDE VIEW USB MEMORY USB Memory Connection Plug your USB device to the USB input of the TV Connecting the LCD TV to a PC For d...

Страница 10: ...V Possible connections are shown below Note that cables shown in the illustration are not supplied For connecting a camcorder connect to the VIDEO IN socket and the AUDIO SOCKETS For selecting the rel...

Страница 11: ...the Buttons on the TV Volume Setting Press button to decrease volume or button to increase volume so a volume level scale slider will be displayed on the screen Programme Selection Press P CH button...

Страница 12: ...s the BLUE button For more information on this process see Install Menu section Note For proper functioning of digital teletext in DTV mode you should set country as UK in analogue AUTO PROGRAM for UK...

Страница 13: ...message appears on the screen press the OK button When the button is pressed the TV returns to television broadcasting With digital terrestrial broadcasting DVB T in addition to digital teletext broa...

Страница 14: ...Then the message below appears on the screen Press or button to highlight the desired option If OK button is pressed while Yes is highlighted the highlighted channel is deleted Selecting No cancels th...

Страница 15: ...Operations part Timers To display timers window activate the item from the main menu To add a timer press the YELLOW button on the remote control Then Add Timer window appears Channel or keys will na...

Страница 16: ...to select Hard of Hearing and then press or button to set this setting as On or Off If the broadcaster enables any special signal concerning the audio you can set this setting as On to receive such s...

Страница 17: ...to highlight the Time Zone Setting Time Zone Setting is set using or buttons It can be set to AUTO or MANUAL WhenAUTO is selected Current Time and Time Zone options will not be available to be set If...

Страница 18: ...ress OK and Language Settings submenu will be displayed on the screen Use or buttons to highlight the menu item that will be adjusted and then press or button to set Notes System Language determines t...

Страница 19: ...user can use this item to load default settings which were loaded to the receiver at the factory To install factory settings highlight First Time Installation menu item and press OK button then you wi...

Страница 20: ...le using the numeric buttons OK views the selected picture in full screen Play Slideshow Green button starts the slideshow with all pictures in the folder Slideshow Options Pause Yellow button Pause t...

Страница 21: ...picture is noisy use Noise Reduction setting to reduce the noise amount Press or button to select Noise Reduction Press or to choose from one of these options Low Medium High or Off Game Mode optional...

Страница 22: ...sound to obtain fixed output level between programmes For instance volume level of advertisements tend to be louder than programmes Press or button to select AVL Press or button to set the AVL as On...

Страница 23: ...en ratio correctly This item might be inactive in some resolutions Note If you connect an HDMI device and switch the TV to HDMI mode this feature will be visible except for 1080i 1080P resolution Full...

Страница 24: ...ion is done automatically Name To change the name of a programme select the programme and press the RED button The first letter of the selected name will be highlighted Press or button to change that...

Страница 25: ...screen image to ensure best results H Horizontal Position This item shifts the image horizontally to right hand side or left hand side of the screen Select H Position item by using or button Use or bu...

Страница 26: ...spect ratio of the screen is adjusted by the information provided by the selected source if available The format being displayed in AUTO mode is completely independent of WSS information which could b...

Страница 27: ...ing off the TV for a while To avoid this do not leave the screen in still picture for extended periods No Power If your TV system has no power please check the main power cable and connection to the m...

Страница 28: ...75 37 5 VESA 4 800 600 56 35 2 VESA 5 800 600 60 37 9 VESA 6 800 600 70 43 8 7 800 600 72 48 1 VESA 8 800 600 75 46 9 VESA 9 832 624 75 49 7 MAC 10 1024 768 60 48 4 VESA 11 1024 768 70 56 5 VESA 12 1...

Страница 29: ...720P 60Hz O 1080I 50Hz O 1080I 60Hz O 1080P 24Hz O 1080P 25Hz O 1080P 30HZ O 1080P 50HZ O 1080P 60HZ O X Not Available O Available Note In some cases a signal on the LCD TV may not be displayed prope...

Страница 30: ...e 64K 320Kbps Photo jpg Baseline JPEG WxH 8902x8902 up to 77Mega pixel Support format 444 440 422 420 Grayscale Progressive JPEG Up to 4 Mega pixel Support format 444 440 422 420 Grayscale External Su...

Страница 31: ...ereo AUDIO OUTPUT POWER WRMS 10 THD 2 x 6 POWER CONSUMPTION W 100 W max 1 W Standby PANEL 26 wide display DIMENSIONS mm DxLxH With foot 164 75 x 649 40 x 477 60 Weight Kg 8 45 DxLxH Without foot 89 70...

Страница 32: ...o the terminal which is marked with the letter N or coloured Black The wire which is coloured brown or red must be connected to the terminal which is marked with the letter L or coloured Red For conti...

Страница 33: ...50190400...

Отзывы: