


English
- 14 -
Some stream packets may not be recorded because
of signal problems, as a result sometimes videos may
freeze during playback.
While recording a programme in the background you
can use menu options, switch to another source or use
Media Browser
functions, such as viewing pictures,
playing video and music files, and even play back the
ongoing recording.
Timeshift Recording
Press
Pause
button while watching a broadcast to
activate timeshifting mode. In timeshifting mode, the
programme is paused and simultaneously recorded to
the connected USB disk.
Press
Play
button again to resume the paused
programme from where you stopped. Press the
Stop
button to stop timeshift recording and return to the
live broadcast.
Timeshift cannot be used while in radio mode.
You can use the timeshift rewind feature after resuming
normal playback or fast forward option.
Instant Recording
Press
Record
button to start recording an event
instantly while watching a programme. Press
Stop
button to cancel instant recording.
You can not switch broadcasts during the recording
mode. While recording a programme or during the
timeshifting, a warning message appears on the screen
if your USB device speed is not sufficient.
Watching Recorded Programmes
Select
Recordings
from the
TV
menu. Select a
recorded item from the list (if previously recorded).
Press the
OK
button to view the
Options
menu. Select
an option then press
OK
button.
Note: Viewing main menu and menu items will not be available
during the playback.
Press the
Stop
button to stop a playback and return
to the
Recordings
.
Slow Forward
If you press
Pause
button while watching recorded
programmes, the slow forward feature will be available.
You can use
Fast Forward
button to slow forward.
Pressing
Fast Forward
button consecutively will
change slow forwarding speed.
Recording Settings
You can configure your recording preferences using the
Settings
tab in the
TV>Recordings
menu. Highlight
Settings
tab by using
Left
or
Right
button and press
OK
. Then select the desired
item in the sub-menu and
set by using
Left
or
Right
button.
Start early:
You can set recording timer’s starting time
to start earlier by using this setting.
End late:
You can set recording timer’s end time to
end later by using this setting.
Max Timeshift:
This setting allows you to set the
maximum duration for the timeshift recording. Available
options are approximate and the actual recording time
may change in practice depending on the broadcast.
The reserved and free storage space values will
change according to this setting. Make sure that you
have enough free space otherwise instant recording
may not be possible.
Auto discard:
You can set the
Discard
type as
None
,
Oldest
,
Longest
or
Shortest
. If it is not set to
None
,
you can set the
Unplayed
option as
Included
or
Excluded
. These options determine the preferences
for deleting the recordings in order to obtain more
storage space for ongoing records.
Hard disk information:
You can view detailed
information about the USB storage device connected
to your TV. Highlight and press
OK
to see and press
Back/Return
to close.
Format Disk:
If you want to delete all files on the
connected USB storage device and convert the disk
format to FAT32, you can use this option. Press
OK
button while the
Format Disk
option is highlighted. A
menu will appear on the screen, requiring you to enter
the PIN
(*)
. After you enter the PIN, a confirmation
message will be displayed. Select
Yes
and press
OK
to start formatting the USB storage device. Select
No
and press
OK
to cancel.
(*) Default PIN could have been set to 0000 or 1234. If you
have defined the PIN(is requested depending on the country
selection) during the First Time Installation use the PIN that
you have defined.
IMPORTANT:
Formatting your USB drive will erase
ALL the data on it and it’s file system will be converted
to FAT32. In most cases operation errors will be fixed
after a format but you will lose ALL your data.
If “
USB disk writing speed too slow to record
”
message is displayed on the screen while starting a
recording, try restarting the recording. If you still get
the same error, it is possible that your USB disk does
not meet the speed requirements. Try connecting
another USB disk.
Media Browser
You can play back music and movie files and display
photo files stored on a USB storage device by
connecting it to your TV. Connect a USB storage device
to one of the USB inputs located on the side of the TV.
After connecting a USB storage device to your TV
Media Browser
menu will be displayed on the screen.
You can access the content of the connected USB
device any time later from the
Sources
menu. Select
the related USB input option from this menu and press
OK
. You can also press the
Source
button on the
remote and then select your USB storage device from
the list of sources. Then select the file of your choice
and press
OK
to display or play it back.
English
- 15 -
You can set your
Media
Browser
preferences by
using the
Settings
menu.
Settings
menu can be
accessed via the information bar which is displayed
on the bottom of the screen while playing back a video
or an audio file or displaying a picture file. Press the
Info
button if the information bar has disappeared,
highlight the gear wheel symbol positioned on the
right side of the information bar and press
OK
.
Picture
Settings
,
Sound Settings
,
Media Browser Settings
and
Options
menus will be available. The contents
of these menus may change according to the type of
the currently open media file. Only
Sound Settings
menu will be available while playing back audio files.
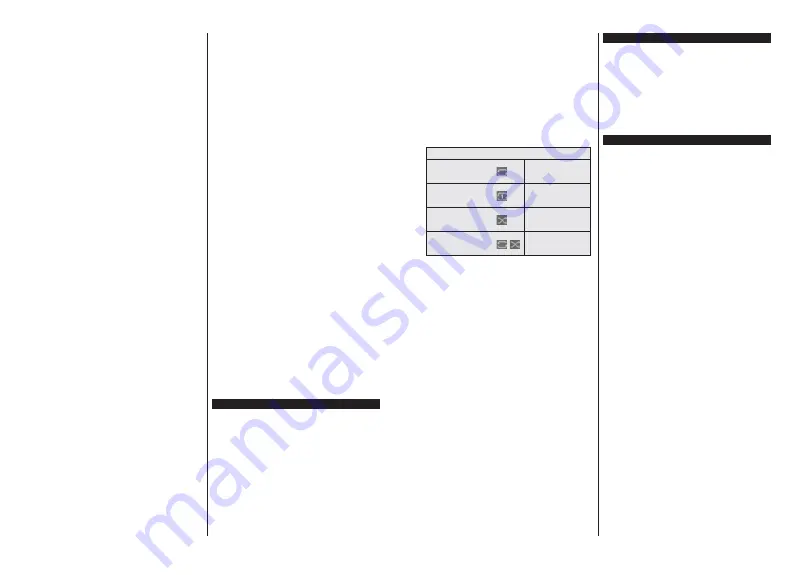
Loop/Shuffle Mode Operation
Start playback and activate
All files in the list will be
continuously played in
original order
Start playback and activate
The same file will be
played continuously
(repeat)
Start playback and activate
All files in the list will be
played once in random
order
Start playback and activate
,
All files in the list will be
continuously played in
the same random order
To use the functions on the information bar highlight the
symbol of the function and press
OK
. To change the
status of a function highlight the symbol of the function
and press
OK
as much as needed. If the symbol is
marked with a red cross, that means it is deactivated.
Custom Boot Up Logo
You can personalize your TV and see your favourite
image or photo on the screen each time your TV boots
up. To do this, copy your favourite image files into a
USB disk and open them in the
Media Browser
. Select
USB input from the
Sources
menu and press
OK
. You
can also press the
Source
button on the remote and
then select your USB storage device from the list of
sources. When you have chosen the desired image,
highlight it and press
OK
to view it in full screen. Press
the
Info
button, highlight the gear wheel symbol on
the information bar and press
OK
. Select
Options
and press
OK
to enter.
Set Boot Logo
option will be
available. Highlight it and press
OK
again to choose the
image as custom boot logo. A confirmation message
will be displayed. Select
Yes
and press
OK
again. If
the image is suitable
(*)
you will see it on the screen
during the TV’s next boot up.
Note: If you perform a First Time Installation the TV will
return to using the default logo, if any.
(*) Images must have an aspect ratio between 4:3 to 16:9
and they must be in .jpeg, .jpg or .jpe file formats. The image
cannot be set as boot logo, which’s resolution doesn’t appear
on the info banner.
FollowMe TV
With your mobile device you can stream the current
broadcast from your smart TV using the
FollowMe
TV
feature. Install the appropriate Smart Center
application to your mobile device. Start the application.
For further information on using this feature refer to
the instructions of the application you use.
Note: Depending on model, your TV may not support this
function. The application may not be compatible with all mobile
devices. Both of the devices must be connected to the same
network. This feature is only functional on TV source.
CEC
This function allows to control the CEC-enabled
devices, that are connected through HDMI ports by
using the remote control of the TV.
The
CEC
option in the
Settings>System>Device
Settings
menu should be set as
Enabled
at first. Press
the
Source
button and select the HDMI input of the
connected CEC device from the
Sources List
menu.
When new CEC source device is connected, it will be
listed in source menu with its own name instead of
the connected HDMI ports name(such as DVD Player,
Recorder 1 etc.).
The TV remote is automatically able to perform the
main functions after the connected HDMI source has
been selected. To terminate this operation and control
the TV via the remote again, press and hold the “0-
Zero” button on the remote control for 3 seconds.
You can disable the CEC functionality by setting the
related option under the
Settings>System>Device
Settings
menu accordingly.
The TV supports ARC (Audio Return Channel). This
feature is an audio link meant to replace other cables
between the TV and an audio system (A/V receiver or
speaker system).
When ARC is active, the TV will mute its other audio
outputs, except the headphone jack, automatically
and volume control buttons are directed to connected
audio device. To activate ARC set the
Sound Output
option in the
Settings>Sound
menu as
HDMI ARC
.
Note: ARC is supported only via the HDMI2 input.
System Audio Control
Allows an Audio Amplifier/Receiver to be used with
the TV. The volume can be controlled using the re-
mote control of the TV. To activate this feature set the
Sound Output
option in the
Settings>Sound
menu
as
HDMI ARC
. When
HDMI ARC
option is selected,
CEC
option will be set as
Enabled
automatically, if it
is not already set. The TV speakers will be muted and
the sound of the watched source will be provided from
the connected sound system.
Note: The audio device should support System Audio Control
feature.


