


English
- 6 -
2.2. Guide
You can access the electronic programme guide menu
using this option. Refer to
Electronic Programme
Guide
section for more information.
2.3. Channels
You can access the
Channels
menu using this option.
Refer to
Using the Channel List
section for more
information.
2.4. Timers
You can set timers for future events using the options of
this menu. You can also review the previously created
timers under this menu.
To add a new timer select the
Add Timer
tab using the
Left/Right buttons and press
OK
. Set the sub-menu
options as desired and when finished press
OK
.
A new
timer will be created.
To edit a previously created timer, highlight that timer,
select the
Edit Selected Timer
tab and press
OK
.
Change the sub-menu options as desired and press
OK
to save your settings.
To cancel an already set timer, highlight that timer,
select
Delete Selected Timer
tab and press
OK
. A
confirmation message will be displayed. Highlight
Yes
and press
OK
to proceed. The timer will be cancelled.
It is not possible to set timers for two or more events
that will broadcasted in different channels at the same
time interval. In this case you will be asked to choose
one of these timers and cancel others. Highlight the
timer you want to cancel and press
OK
,
Options
menu
will be displayed. Then highlight
Set/Cancel
and press
OK
to cancel that timer. You will have to save changes
after that. In order to do that press
OK
, highlight
Save
Changes
and press
OK
again.
2.5. Recordings
You can manage your recordings using the options
of this menu. You can playback, edit, delete or sort
previously recorded events. Highlight a tab by using
the Left or Right direction button and press
OK
to see
available options. Refer to the
USB Recording
section
for more information.
3. Settings
You can manage the settings of your TV using the
options of this menu. Refer to
Settings Menu Content
section for more information.
4. Apps
When your TV is connected to the Internet related
contents will also be available, including
Apps
related
contents. Using the
Apps
menu you can access and
manage your applications. You can add new apps from
the market or delete the existing ones. Refer to
Apps
section for more information.
5. Sources
You can manage your input source references using
the options of this menu. To change the current source
highlight one of the options and press
OK
.
5.1. Source Settings
(GඈW WKH QDPHV HQDEOH RU GඈVDEOH VHOHFWHG VRXUFH
RSWඈRQV 7KHUH DUH DOVR
Regular
and
Enhanced
RSWඈRQV DYDඈODEOH IRU +'0, VRXUFHV
Regular
and
Enhanced
RSWඈRQVDUHDIIHFWඈQJWKHFRORXUVHWWඈQJVRI
the selected HDMI source.
You can reset your customisations on the
Home
and
Apps
menus to defaults using the
Reset Menu
option in the
Settings
menu (availability depends on
TV model and its features). Highlight this option and
press
OK
. A confirmation message will be displayed.
Highlight
Yes
and press
OK
to proceed. Note that you
will not be able to perform this operation again within
the next 2 minutes.
Inserting the Batteries into the Remote
Remove the back cover to reveal the battery compart-
ment. Insert two size
AAA
batteries. Make sure the (+)
and (-) signs match (observe correct polarity). Do not
mix old and new batteries. Replace only with same or
equivalent type. Place the cover back on.
A message will be displayed on the screen when the
batteries are low and must be replaced. Note that when
the batteries are low, the performance of the remote
control may be impaired.
Batteries should not be exposed to excessive heat
such as sunshine, fire or the like.
Power Connection
IMPORTANT
: The TV set is designed to operate on a
220-240V AC, 50 Hz
supply. After unpacking, allow the
TV set to reach the ambient room temperature before
you connect the set to the mains. Plug the power cable
to the mains socket outlet.
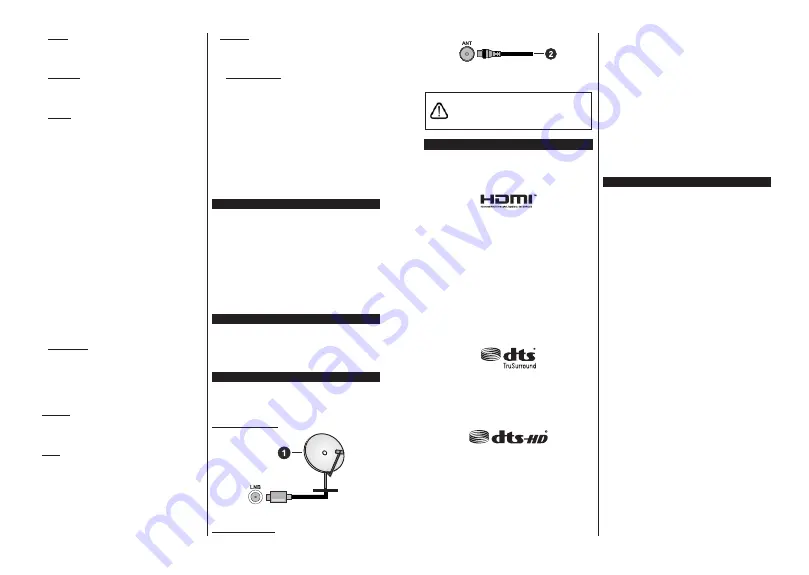
Antenna Connection
Connect the aerial or cable TV plug to the AERIAL
INPUT (ANT) socket located on the left side of the TV
or satellite plug to the SATELLITE INPUT (LNB) socket
located on the rear side of the TV.
Rear side of the TV
1.
Satellite
Left side of the TV
English
- 7 -
2.
Aerial or cable
If you want to connect a device to the TV, make
sure that both the TV and the device are turned off
before making any connection. After the connection
is done, you can turn on the units and use them.
License Notification
The terms HDMI, HDMI High-Definition Multimedia
Interface, and the HDMI Logo are trademarks or
registered trademarks of HDMI Licensing Administrator,
Inc.
Dolby, Dolby Vision, Dolby Audio, and the double-D
symbol are trademarks of Dolby Laboratories
Licensing Corporation. Manufactured under license
from Dolby Laboratories. Confidential unpublished
works. Copyright © 1992-2020 Dolby Laboratories.
All rights reserved.
YouTube and the YouTube logo are trademarks of
Google Inc.
For DTS patents, see http://patents.dts.com.
Manufactured under license from DTS Licensing
Limited. DTS, the Symbol, & DTS and the Symbol
together are registered trademarks, and DTS
TruSurround is a trademark of DTS, Inc.
©
DTS, Inc.
All Rights Reserved.
For DTS patents, see http://patents.dts.com.
Manufactured under license from DTS Licensing
Limited. DTS, DTS-HD, the Symbol, & DTS or DTS-HD
and the Symbol together are registered trademarks of
DTS, Inc.
©
DTS, Inc. All Rights Reserved.
This product contains technology subject to certain
intellectual property rights of Microsoft. Use or
distribution of this technology outside of this product
is prohibited without the appropriate license(s) from
Microsoft.
Content owners use Microsoft PlayReady™ content
access technology to protect their intellectual property,
including copyrighted content. This device uses
PlayReady technology to access PlayReady-protected
content and/or WMDRM-protected content. If the
device fails to properly enforce restrictions on content
usage, content owners may require Microsoft to revoke
the device’s ability to consume PlayReady-protected
content. Revocation should not affect unprotected
content or content protected by other content access
technologies. Content owners may require you to
upgrade PlayReady to access their content. If you
decline an upgrade, you will not be able to access
content that requires the upgrade.
The “CI Plus” Logo is a trademark of CI Plus LLP.
This product is protected by certain intellectual property
rights of Microsoft Corporation. Use or distribution of
such technology outside of this product is prohibited
without a license from Microsoft or an authorized
Microsoft subsidiary.
Disposal Information
[European Union]
These symbols indicate that the electrical and
electronic equipment and the battery with this symbol
should not be disposed of as general household
waste at its end-of-life. Instead, the products should
be handed over to the applicable collection points for
the recycling of electrical and electronic equipment as
well as batteries for proper treatment, recovery and
recycling in accordance with your national legislation
and the Directive 2012/19/EU and 2013/56/EU.
By disposing of these products correctly, you will help
to conserve natural resources and will help to prevent
potential negative effects on the environment and
human health which could otherwise be caused by
inappropriate waste handling of these products.
For more information about collection points and
recycling of these products, please contact your
local municipal office, your household waste disposal
service or the shop where you purchased the product.
Penalties may be applicable for incorrect disposal of
this waste, in accordance with national legislation.


