


English
- 7 -
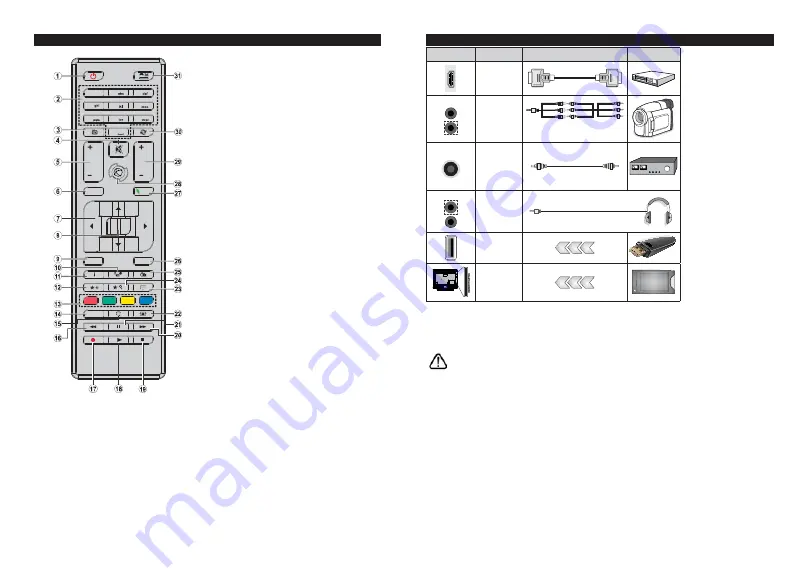
Remote Control
1.
Standby:
Switches
2Q2ႇWKH79
2.
Numeric buttons:
Switches the channel, enters a
number or a letter in the text box on the screen.
3.
TV:
Switches to TV Source
4.
Mute:
&RPSOHWHO\WXUQVRႇWKHYROXPHRIWKH79
5.
/-
6.
Menu:
Displays TV menu
7.
Directional buttons:
Helps navigate menus, content
etc. and displays the subpages in TXT mode when
pressed Right or Left
8.
OK:
&RQ¿UPVXVHUVHOHFWLRQVKROGVWKHSDJHLQ7;7
mode), views channel list (DTV mode)
9.
Back/Return:
Returns to previous screen, opens index
page (in TXT mode)
10. Media browser:
Opens the media browsing screen
11. Info:
Displays information about on-screen content,
shows hidden information (reveal - in TXT mode)
12. My button 1 (*)
13. Coloured Buttons:
Follow the on-screen instructions
for coloured button functions
14. Language:
Switches between sound modes (analogue
TV), displays and changes audio/subtitle language
(digital TV, where available)
15. Subtitles:
7XUQVVXEWLWOHVRQDQGRႇZKHUHDYDLODEOH
16. Rapid reverse:
Moves frames backwards in media
such as movies
17.
No function
18. Play:
Starts to play selected media
19. Stop:
Stops the media being played
20. Rapid advance:
Moves frames forward in media such
as movies
21. Pause:
Pauses the media being played
22. Screen:
Changes the aspect ratio of the screen
23. Text:
Displays teletext (where available), press again
to superimpose the teletext over a normal broadcast
picture (mix)
24. My button 2 (*)
25. EPG (Electronic programme guide):
Displays the
electronic programme guide
26. Exit:
Closes and exits from displayed menus or returns
to previous screen
27. Quick Menu:
Displays a list of menus for quick access
28.
No function
29. Pro/-
30. Swap:
Quickly cycles between previous and current
channels or sources
31. Source:
Shows all available broadcast and content
sources
(*) MY BUTTON 1 & MY BUTTON 2:
These buttons may have default functions depending on the
model. However you can set a special function to these buttons
E\SUHVVLQJRQWKHPIRU¿YHVHFRQGVZKHQRQDGHVLUHGVRXUFH
RUFKDQQHO$FRQ¿UPDWLRQPHVVDJHZLOOEHGLVSOD\HGRQWKH
screen. Now the selected MY BUTTON is associated with
the selected function.
Note that if you perform
First Time Installation
, MY BUTTON
1&2 will return to their default function.
English
- 8 -
Connections
Connector
Type
Cables
Device
HDMI
Connection
(back&side)
SIDE AV
Side AV
(Audio/Video)
Connection
(side)
Audio/Video
Cable
Side Audio/Video
Connection Cable
SPDIF
SPDIF
(Coaxial Out)
Connection
(side)
HEADPHONE
Headphone
Connection
(side)
USB
Connection
(side)
CI
Connection
(side)
CAM
module
See the illustrations o n t h e
left side. When using the wall
mounting kit (available from a
third party in the market, if not
supplied), we recommend that
you plug all your cables into the
back of the TV before mounting
on the wall. Insert or remove the
CI module only when the TV is
SWITCHED OFF. If a CI module is
used, it may block the headphone
and Side AV inputs. In this case,
it is recommended to make the
headphone and the Side AV con-
nections before the CI module is
inserted. You should refer to the
module instruction manual for
details of the settings. The/Each
USB input of your TV supports
devices up to 500mA. Connecting
devices that have current value
above 500mA may damage your
TV. When connecting equipment
using a HDMI cable to your TV,
to guarantee s
Xႈ
cient immunity
against parasitic frequency radia-
tion, you have to use a high speed
shielded (high grade) HDMI cable
with ferrites.
,I\RXZDQWWRFRQQHFWDGHYLFHWRWKH79PDNHVXUHWKDWERWKWKH79DQGWKHGHYLFHDUHWXUQHGRႇEHIRUHPDNLQJ
any connection. After the connection is done, you can turn on the units and use them.


