
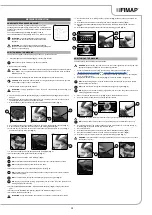

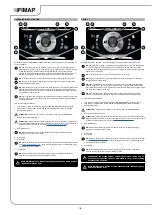
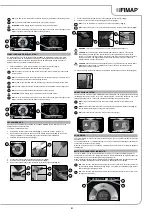
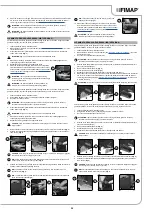


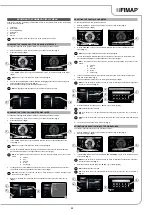


FIMAP LONG RANGE (FLR) SYSTEM
On request, the machine can be equipped with the FIMAP LONG RANGE (FLR) system, which
enables productivity to be increased when working, by reducing the number of stops required to
empty and fill the tanks, so that more square meters can be washed with the same amount of
detergent solution. To activate it, proceed as follows.
1. With the machine on, press the menu button (1) on the working screen (
Fig. 1
).
2.
Press the FLR system activation/deactivation button (2) (
Fig. 2
).
NB
:
if the symbol (2) is grey the FLR system is not active, if the symbol (2) is green the FLR
system is active.
NB
: to quit the menu screen, wait a short time without pressing anything, or else press on any
point of the display (except one of the displayed buttons).
NB
: the FLR system activates when the electric pump in the machine's water system starts.
NB
: if the FLR system is activated, the relative symbol (3) is displayed in the working screen.
NB
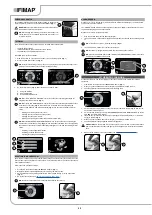
: if you want to deactivate the FLR system press button (2) again.
ATTENTION
: before starting any work, remember to start the FLR system.
NB
: to return to the working screen, press on any point of the screen (except the edges of the
display) or else wait three seconds without touching anything.
N.B.
: if the FSS system is activated, the relative symbol (3) is displayed in the working screen.
N.B.
: if you want to deactivate the FSS system press button (2) again.
ATTENTION
: before starting any work, remember to start the FSS system.
NB
: to return to the working screen, press on any point of the screen (except the edges of the
display) or else wait three seconds without touching anything.
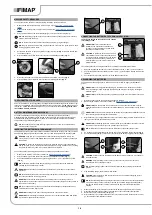
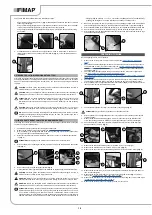
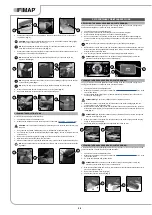
Upon request, the machine can be fitted with the VACUUM WAND system that vacuums up the
detergent solution more accurately.
To activate it, proceed as follows.
1. Using the DS selector on the control display (
Fig. 1
), select the “transfer” program” (1).
2. Remove all the vacuum kit components from the storage compartment (
Fig. 2
). To open the
storage compartment, use the handle (2) on the front of the control handlebars.
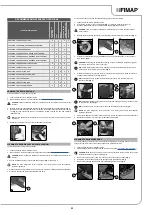
3. Assemble the steel extension tube (
Fig. 3
).
VACUUM WAND KIT
4. Connect the vacuum tube (4) to the extension tube (3) (
Fig. 4
).
5. Insert the vacuum brush (5) in the extension tube (3) (
Fig. 5
).
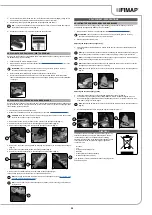
6. Remove the vacuum tube (6) from the sleeve (7) in the squeegee body (
Fig. 6
).
7. Connect the wand kit vacuum tube (4) to the squeegee vacuum tube (5) (
Fig. 7
).
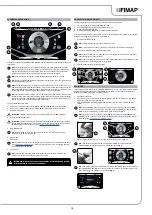
8. Activate the vacuum control kit by pressing the button (7) (
Fig. 8
).
NB
:
as soon as the button (7) is pressed, the LED on it will light up (
Fig. 8
).
NB
:
as soon as the button (7) on the control display is pressed, the symbol (8) will appear (
Fig. 9
).
WARNING
:
never pick up solid matter such as dust, cigarette stubs, paper, etc.
CAUTION
:
never collect gases, explosive/inflammable liquids or powders, nor acids and
solvents! These include gasoline, paint thinners and fuel oil (which, when mixed with the
vacuum air, can form explosive vapours or mixtures), and also non-diluted acids and solvents,
acetones, aluminium and magnesium powders. These substances may also corrode the
materials used to construct the machine.
CAUTION
:
if the machine is used in dangerous areas (e.g. petrol stations), the relative safety
standards must be observed. It is forbidden to use the machine in environments with a
potentially explosive atmosphere.
12.
After completing the task, the wand kit can be fixed in the side support on the machine (
Fig. 13
).
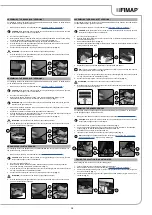
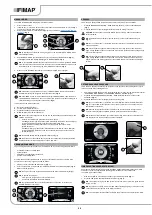
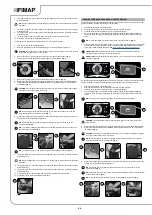
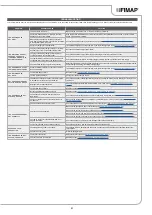
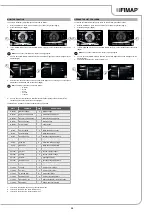
SMART DRYING SYSTEM
The machine has a function called “SMART DRYING”: shifting from the program that includes drying
(scrubbing with drying, or drying only) to the transfer program, this function delays the rise of the
squeegee coupling for max. 10 seconds, until the machine has moved another 3 metres.
NB
: as long as this function is active, the control display will visualise the relative screen
(
Fig. 1
).
NB
: when the function terminates, the control display will visualise the relative screen (
Fig. 2
)
and the actuator will bring the squeegee to its idle position.
NB
: to annul this function, press the “X” key on the screen (
Fig. 1
).
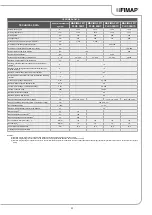
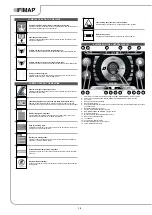
HOUR METER
BATTERY CHARGE LEVEL INDICATOR
The control display is in the control panel. At the centre top, you can see the total time the machine
has been used.
The numbers before the “.” symbol identify hours, while the number after it indicates hour decimals (an
hour decimal corresponds to six minutes).
When the “hour glass” symbol (1) is flashing, it indicates that the hour meter is counting the appliance
operating time.
The control display is in the control panel. At the centre top, you can see the battery charge level.
The indicator is composed of two charge level symbols, the first represented by a graphic symbol (2)
and the second by a number indicating the charge percentage (3).
With a low charge level, the graphic symbol (2) will start to flash and after a few seconds it will switch off.
In these conditions, take the machine to the place where its batteries can be charged.
NB
: a few seconds after the battery charge reaches the critical level, the brush gearmotors
switch off automatically. With the remaining charge, it is possible to complete the drying process
before starting the recharging process.
NB
: a few seconds after the battery charge reaches the discharge level, the vacuum motor
switches off automatically.
21
OFFICE
0000.00
100%
ECO mode
0000.00
100%
1
2
2
1
3
OFFICE
0000.00
100%
ECO mode
0000.00
100%
1
2
2
1
3
2
2
3
4
4
3
6
5
5
5
3
6
Back
0000.00
100%
1
1
7
4
5
8
7
0000.00
100%
9
8
13
DRIVE
0000.00
100%
DRIVE
0000.00
100%
1
2
DRIVE
0000.00
100%
3
2
1
Содержание MAXIMA 2017 PLUS
Страница 2: ......
Страница 36: ...36 NOTE ...
Страница 37: ...37 NOTE ...
Страница 38: ...38 NOTE ...
Страница 39: ......


