


Field of View GeoSnap Basic Manual 10
SYSTEM OPERATION
Required Equipment
Be sure to have a Windows laptop or desktop available with the ability to read a microSD card and with the Google
Chrome browser installed (necessary for viewing/editing the CONFIG.html file).
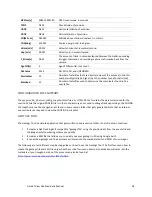
Image Number Reset
The GeoSnap does not get the actual image names from the camera. For each new session, the first event
recorded will always be labeled as event_00001. It is recommended to set the camera
’
s file numbering setting to
“
Reset
”
(using the camera
’
s menu). Then, before starting a new GeoSnap logging session, clear all images off the
camera
’
s SD card. This will cause the first image taken to be named DSC00001.JPG (or something similar depending
on which camera you have). By having the image numbering and the event numbering both start at 1, it is easier to
quickly ensure that there is an event for each image captured after your flight.
Operation Procedure:
1.
Make sure there is an appropriate microSD card in the GeoSnap and the CONFIG file settings are correct
for your mission (see the GeoSnap Basic Files section in the manual to learn more about the CONFIG file).
2.
Plug in the power cable. The blue Power LED will illuminate and the white, green, and red LEDs will cycle
while the system is booting up.
3.
After the system has booted, the green GNSS LED will start a single flash sequence indicating that the
system is searching for satellites.
4.
If the Trigger Mode is set to “Time” and the Trigger Control is set to “Auto
-
start”, the first trigger
command will be sent as soon as the system has completed its boot up sequence.
5.
If the GeoSnap Basic
’s antenna has an unobstructed view of t
he sky, then the green GNSS LED should
begin to double flash in less than 30 seconds (indicating that it is tracking at least one satellite).
6.
If the GeoSnap Basic
’s antenna has an unobstructed view of the sky, then the green GNSS LED should
begin to triple flash within 1 minute (indicating that it is has a 3D fix).
7.
If distance or overlap trigger modes are set to “Auto
-
start”, the first trigger command will
automatically
be sent immediately after the estimated accuracy reaches 3 meters or less OR 1 minute after the system
first acquired a 3D fix (whichever comes first).
8.
If the GeoSnap Basic’s antenna has an unobstructed view of the sky, you will observe the
green
GNSS LED
advance to shining solid
within 1-2 minutes (indicating that it is has a 3D fix with accuracy estimate of 3
meters or less).
This would typically be the time to start your flight.
The estimated accuracy of the
GeoSnap Basic is 2-3 meters.
9.
Once you are done with your session, safely stop logging by pressing and holding the white Session button
(
≈
2 seconds) until the white, green, and red LEDs turn solid. You may now take
one
of the following
actions:
a.
Press the Session button when you are ready to start a new session. If the antenna maintained a
clear view of the sky, the GNSS status should be the same as when the previous session was
stopped.
b.
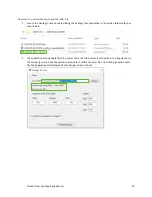
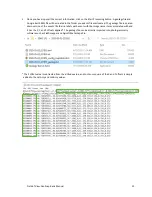
Remove the microSD card and insert it into your computer to check the events log, copy session
folders to your computer, and/or change settings in the CONFIG file. When finished, safely eject
the microSD card from your computer and re-insert it into the GeoSnap (which is still powered
on). Press the Session button when you are ready to start a new session.
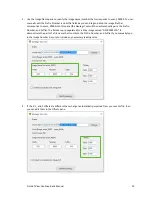
c.
Connect the GeoSnap to a Windows PC using a microUSB cable. The GeoSnap will configure itself
as a mass storage device and act as a USB drive. You can check the events log, copy session
folders to your computer, and/or change settings in the CONFIG file. When finished, safely eject


