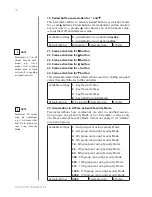
FIBARO KEYFOB FGKF-601 Скачать руководство пользователя страница 8

8

LOCK MODE

#6: Lock Mode

The KeyFob can be protected with a sequence of 2 to 5 button clicks.  

When unlocking sequence is set, the device will lock itself after: 
•  being inactive for time set in parameter 2 (60 seconds by default),
•  pressing and holding selected button (if set in parameter 2). 

Setting the unlocking sequence and locking time-out using  

Home Center configuration interface: 


1.  Go to the device options by clicking the icon: 
2.  Select the „Advanced” tab.
3.  Click the “Configure” button in "Lock Mode" section.
4.  Select sequence of 2 to 5 buttons, click "next".
5.  Select time to lock and locking button, click "next".
6.  Click 


and 


simultaneously to wake up the device.

7.  Wait for the device to configure.

To enable Lock Mode:

•  set sequence in parameter 1,
•  set time and/or locking button in parameter 2 (60 seconds by de-

fault),

•  set PROTECTIOn Command Class to Local Protection by Sequence 

(done automatically by home Center controller).

Lock Mode will be disabled when:

•  parameter 1 and/or parameter 2 is set to 0,
•  PROTECTIOn Command Class is set to Unprotected.

When device is locked:

•  pushing buttons will not activate any actions, 
•  menu is available, but without option of resetting the device.

Содержание KEYFOB FGKF-601

Страница 1: ...n and features 3 2 Basic activation 4 3 Adding removing the device 5 4 Operating the device 6 5 Visual indications 7 6 Lock Mode 8 7 Sequences 10 8 Activating scenes 11 9 Battery 12 10 Associations 13...

Страница 2: ...y the compliance with additional standards General information about the FIBARO System FIBARO is a wireless smart home automation system based on the Z Wave protocol All of available devices can be co...

Страница 3: ...te control Six buttons allow you to control other devices through the Z Wave network and run various scenes defined in FIBARO System Configure actions for one two three clicks holding the button and b...

Страница 4: ...se the battery cover by turning it clockwise 4 Locate the device nearby the main Z Wave controller 5 Set the main Z Wave controller in Security non Security Mode add mode see the controller s manual 6...

Страница 5: ...ssage and green LED colour NOTE Adding in Security Mode must be per formed up to 2 meters from the controller i NOTE In case the device is not added please re set the device and re peat the adding pro...

Страница 6: ...device to factory defaults Reset procedure allows to restore the device back to its factory set tings which means all information about the Z Wave controller and user configuration will be deleted The...

Страница 7: ...o activate scenes associations Green to red transition Device locked using button hold Battery 3 magenta pulses Low battery Replace the battery Configuration 2 white pulses Device woken up Device stat...

Страница 8: ...in Lock Mode section 4 Select sequence of 2 to 5 buttons click Next 5 Select time to lock and locking button click Next 6 Click and simultaneously to wake up the device 7 Wait for the device to config...

Страница 9: ...ed value 3 Click and simultaneously to wake up the device 4 Wait for the device to configure Button Value 1 2 3 4 5 6 Setting time to lock and locking button using advanced parameter 1 Calculate value...

Страница 10: ...g sequences Maximum of six sequences can be created Each sequence must be unique Sequence can consist of two to five button pushes Sequence can contain multiple clicks of the same button Setting a new...

Страница 11: ...n parameters 21 26 Activating a double click will introduce delay to a single click reaction and activating a triple click will introduce delay to a double click reaction Button Scene ID 1 2 3 4 5 6 S...

Страница 12: ...ed battery Estimat ed battery life with device added once default settings direct range and maximum 5 pushes per day is 2 years o s e o s e 1 1 Using included keyring or a coin open the battery cover...

Страница 13: ...th association group Triangle Multilevel is assigned to click ing and holding the button and is used to turn on off and change level of associated devices 10th association group Minus On Off is assign...

Страница 14: ...them off In multilevel association groups 3 7 11 left buttons increase level while holding and right buttons decrease it To pair buttons 1 Change settings of parameters and set parameter 6 to value 1...

Страница 15: ...ck Mode on page 9 for more information Available settings 0 Lock Mode disabled 5 1791 calculated value Default setting 60 60s Parameter size 2 bytes 3 First scene sequence This parameter allows to set...

Страница 16: ...ormation Available settings 0 4th sequence disabled 9 28086 value of sequence Default setting 0 Parameter size 2 bytes 7 Fifth scene sequence This parameter allows to set up sequence that activates sc...

Страница 17: ...ting 255 Parameter size 2 bytes 17 Paired buttons association for and This parameter allows to activate paired buttons association mode for and buttons Paired buttons are dependent and association are...

Страница 18: ...Parameter size 1 byte 29 Associations in Z Wave network Security Mode Parameter defines how commands are sent in specified associa tion groups using Security Mode or not Parameter is active only in Z...

Страница 19: ...16 0 MHz US 921 4 921 42 or 919 8 MHz ANZ 869 0 or 869 02 MHz RU up to 50m outdoors up to 40m indoors Depending on terrain and building structure 70 x 38 x 15 mm CAUTION Using batteries other than spe...

Страница 20: ...separation between the equipment and receiver Connect the equipment into an outlet on a circuit different from that to which the receiver is connected Consult the dealer or an experienced radio TV te...

Страница 21: ...characteristics and func tions of the original design of the certified lower power frequency elec tric machinery Article 14 The application of low power frequency electric machineries shall not affec...

Отзывы: