24
CMS OF Router Table
Note:
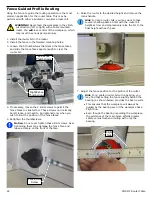
Using the fence prevents the workpiece from
being grabbed by the router bit before the workpiece
contacts the pilot bearing.
6. Adjust the fence position to be slightly behind the router
bit’s pilot bearing. If you are using the optional sliding
table and miter gauge, slide the table back and forth
to help set the fence parallel to the path of the sliding
table.
7. If you do not have the sliding table, you can use an 8”
square piece of plywood to hold the rail perpendicular to
the main fence.
8.
Machine the ends of all of your rail pieces, including the
extra pieces you made for testing your setup.
Miter Gauge
Fence
Workpiece
9. Install the stick cutter and set the height to match the
position of your coped sample pieces.
10. Set up the horizontal and vertical featherboards.
11.
Test your height adjustment using the extra pieces you
made earlier. The tongue and grove portions should line
up.
12.
With the height adjustment set correctly, machine all of
the stile and rail material.
Making the Stick Cuts First
1.
Set up the router table for making the stick cuts as
described in the previous procedure at step 9.
2.
Machine the stick profile on all of the raw stock.
3. After machining the stick profile, cut the components to
length.
►
The stile components are complete and may be set
aside.
►
The rail components need to have the cope profile
machined into the ends.
4.
Set up the cope cutter and match the height of the of
the stick cut from a leftover piece of scrap material.
5.
Make a shaped backer board by machining the cope
profile on a piece of scrap wood lengthwise.
►
If you want a narrow backer board, machine a full width
piece and rip it narrower afterward.
►
If your backer board is a little snug fitting for your stick
profile, you can slightly lower the router bit and make a
second pass to loosen it up.
►
To make it easier to remove the backer board from your
workpiece after machining the part, make a 45
˚
cut on
the far end of the backer board as a finger hold.
6.
Press the shaped backer board into the stick profile of
your workpiece before machining to prevent tearout of
the stick profile while cutting the cope profile.
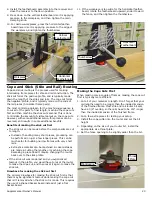
Optional Coping Sled
Instead of using the backing board loose, you can use it
to build a coping sled. By adding a hold-down clamp, you
can cut two rails at the same time, where one rail is a flat
backer for the first rail, and the shaped backer is used for
the second rail.
►
Use a thinner material for the base of the sled, such
as 1/2” plywood. The thicker the base, the higher your
router bit would have to be raised.
►
Reset your router bit height to match the thickness of
your coping sled.
►
If you don’t have a hold-down clamp with a large pad
(such as shown) use 2 clamps.
►
Mount the hold-down clamp far enough away from the
router bit location that you can use it as a handle while
pushing the sled past the cutter.
Hold-Down
Clamp
Shaped
Backer
1
st
Workpiece
2
nd
Workpiece
This edge
against fence


