Supplemental Owner’s Manual
17
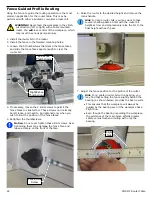
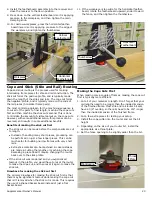
Setting up the Optional Extension Table
The optional extension table is available only for the CMS
GE model, and mounts to the outfeed end of the table.
1. Loosen the adjustment screw on each mounting bracket,
but not enough to remove it.
2.
Loosen the mounting nuts from the mounting screws as
far as you can without removing them.
Adjustment
Screw
Mounting
Screw/Nut
3. Install the right and left brackets to the front and rear
outfeed legs of the table.
►
The square nut slides into a slot on the inside of the
leg. It must be rotated correctly to fit.
►
Slightly snug the mounting screw. It will be fully tight-
ened during the adjustment steps.
Mounting
Slot
Mounting
Screw/Nut
Adjustment
Screw
4. Install the extension table to the base by inserting the
support posts into the keyhole slots, and then the upper
thumbscrews into their mounting slots.
5. While pressing down on the extension table, tighten the
2 clamping nuts and 2 thumbscrews.
Mounting
Slot
Support
Posts
Clamping
Nut
6.
Place a straightedge on the main table and extending
out over the extension table. It is easier to raise the
table into level position than it is to lower it. If the table
is too high, lower it.
7. Begin tightening the adjustment screw to raise the near
side of the table.
8.
When the extension is close to touching the straight
-
edge, tighten the bracket mounting screw originally left
loose in step 3.
9. Continue tightening the adjustment screw until the
nearside touches the straightedge.
10.
Raise the far end of the table until it touches the
straightedge by tightening the adjustment nut. (Loosen
the lock nut as needed.)
11.
Repeat the adjustment for the other side of the table.
12. Verify both sides are properly adjusted and tighten all 4
lock nuts.
Straightedge
Gap
Adjustment
Nut
Lock Nut
Adjustment
Screw& Lock Nut


