13
Conversion
Danger
Risk of injury from items flying around!
If they are not secured well enough, parts under pressure can fly around and
injure people.
Before exchanging wearing parts, depressurise the valve and piping.
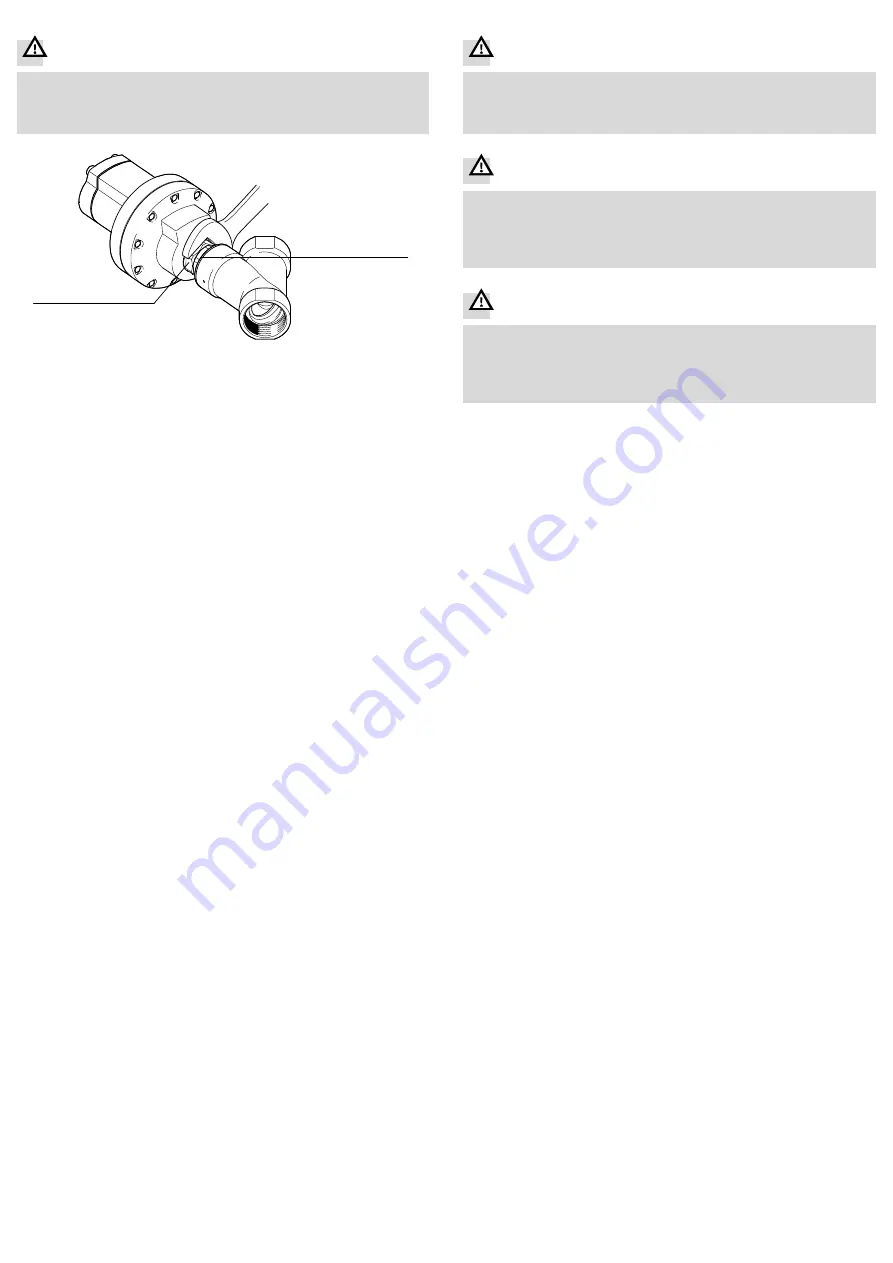
1
2
1
Spanner flats for counter holding
2
SW46 Interface screw
Fig. 9
13.1 Remove the actuator from the valve housing – in built-in state
The actuator can be disassembled from the valve housing without having to re
move the valve from the piping.
1. Depressurise pipelines and let the valve cool off.
2. Secure the actuator from falling or slipping with appropriate means of securing.
3. Extend the actuator rod.
– With double-acting valves: pressurise connection (4) (3 bar).
– With valves with NO control function: pressurise connection (2) (3 bar).
– With valves with NC control function: exhaust the actuator.
4. Loosen interface screw (
è
).
5. Remove actuator from the valve housing.
6. Switch off the operating pressure.
13.2 Remove actuator from the valve housing – in removed state
1. Extend the actuator rod.
– With double-acting valves: pressurise connection (4) (3 bar).
– With valves with NO control function: pressurise connection (2) (3 bar).
– With valves with NC control function: exhaust the actuator.
2. Loosen interface screw (
è
).
3. Remove actuator from the valve housing.
4. Switch off the operating pressure.
13.3 Mount the valve housing onto the actuator
1. Extend the actuator rod.
– With double-acting valves: Pressurise connection (4) slowly (3 bar).
– For valves with NO control function: Pressurise connection (2) slowly (3 bar).
– With valves with NC control function: exhaust the actuator.
2. Slide spindle of the process valve completely into the process valve.
3. Place actuator onto valve housing.
4. Tighten interface screw (
è
).
– Tightening torque: 50 Nm
5. Switch off the operating pressure.
13.4 Turning the actuator
1. Loosen interface screw (max. ½ turn) (
è
2. Turn the actuator into the desired position.
3. Tighten interface screw (
è
).
– Tightening torque: 50 Nm
14
Removal
Danger
Risk of injury from touching hot surfaces!
Valve and actuator can become hot at high temperature of medium. Severe
burns are possible.
Allow the angle seat valve to cool off before working on it.
Danger
Risk of injury due to movement of pressurised parts!
The angle seat valve can switch if there is a drop in pressure. Limbs can be cut or
severed.
Before removal, move the valve to the closed position.
Before removal, depressurise the valve and the piping.
Warning
Risk of injury due to slipping or falling objects!
The angle seat valve can weigh up to 11.5 kg, depending on the product version.
Body parts can be crushed.
Angle seat valve with appropriate means of securing against falling or
slipping.
1. Depressurise the piping and the operating medium connection line. Allow
the valve and piping to cool.
2. Empty the piping and valve completely.
Make sure no one is located in front of the outlet opening.
Catch discharging media in a suitable container.
3. Disconnect connection lines of the operating medium
from the valve.
4. Loosen piping connectors.
5. Remove angle seat valve.
15
Disposal
Observe the local regulations for environmentally friendly disposal.
Dispose of the product in an environmentally friendly manner. When doing this,
also take residual media into account (potential recycling of hazardous waste).


