background image


Page | 26


User Manual – FELIX Pro 1 

Rev 3 

www.FELIXprinters.com 
[email protected]


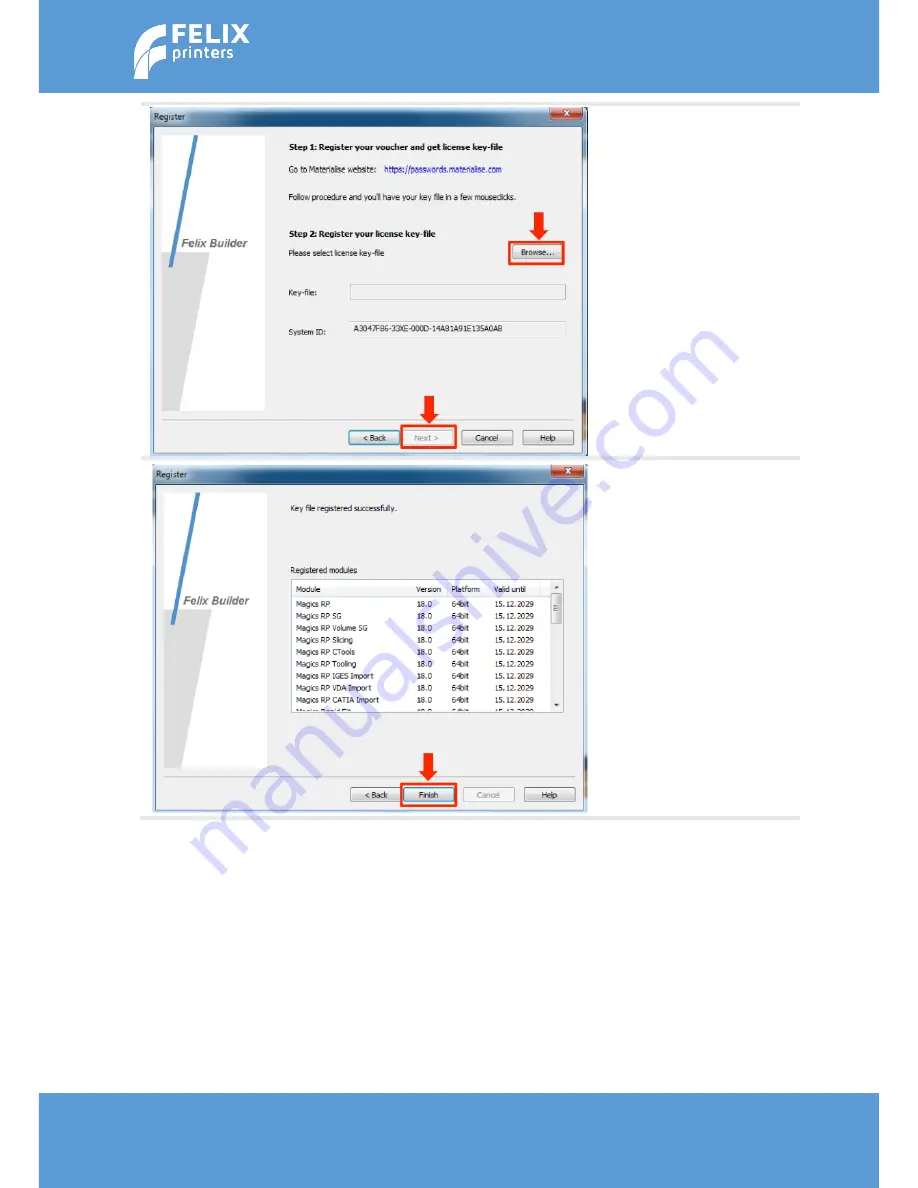
Browse for the license key you 
stored on your computer in the 
previous step and press  
the next button 


Your  license  key  is  registered 
successfully and your software 
is ready to use. Press the  
finish  button  to  exit  the 
registration  wizard.  You  can 
now  use  the  FELIXbuilder 
software. 


Содержание Felix Pro 1

Страница 1: ...ight No part of this document may be photocopied reproduced or translated to another language without the prior written consent of FELIXrobotics BV FELIXrobotics BV Zeemanlaan 15 3401MV IJsselstein Th...

Страница 2: ...ow to make your first print and contains essential tips to operate the printer properly If you are unable to continue or have any questions you can check at the support section of our website or you c...

Страница 3: ...lectronic safety Only use the power supplies and cables supplied by FELIXprinters Always turn off and unplug the printer before perfoming maintenance or modifications The power supply meets all CE mar...

Страница 4: ...profiles 37 10 Print Finished 40 10 1 Remove the 3d printed object 40 11 Automatic CAlibration 42 11 1 What does the calibration do 42 11 2 When to calibrate 42 11 3 How to do the calibration 42 12 Du...

Страница 5: ...er 0 35 mm Internal Voltage 24V Amount of Nozzles 2 Mechanical Software Chassis Aluminum profiles and Steel Software Bundle Bundled FELIXbuilder Optional RepetierHost CuraEngine Slic3r Skeinforge SFAC...

Страница 6: ...LIXprinters com support FELIXprinters com 5 FELIX PRO 1 AT A GLANCE Display unit Nozzles Extruder Detachable Heated Bed Lever for rotating bed Foot Bracket Filament Holder Filament Holder Filament Gui...

Страница 7: ...unt Item Amount Felix Pro 1 1 Filament holder 2 Foot bracket 1 Filament Guide 1 Heated Bed 1 Teflon tubes 2 Display Unit 1 M4x20 bolts 2 Tweezers 1 Allen key 1 Power supply 1 Power cable EU US AU GB 1...

Страница 8: ...Manual FELIX Pro 1 Rev 3 www FELIXprinters com support FELIXprinters com 6 2 Opening the box Take out the foot bracket and leave the printer in the box for now Place the foot bracket on a flat and sta...

Страница 9: ...it Place the foot bracket on a flat and stable surface Place the printer on top of it and fix the parts together with the supplied M4 bolts and Allen key First push the connector into the display unit...

Страница 10: ...Turn table assembly might cost a little force to turn and flip lever back in place Flip lever back to fasten the table assembly NOTE When turning the table very often The pretension on the table lock...

Страница 11: ...dicated with the red line Lower the bed until the three magnets match the positions on the bracket Make sure when looking from above the edge of the bed is in parallel with the y axis bracket edge Not...

Страница 12: ...lament arm and guide Snap in the two spool holders on the right back side of the frame and the filament guide on the right front side of the frame Position the filament guide at least 5 cm from the to...

Страница 13: ...rt FELIXprinters com Take the end of the filament and insert it through the filament guide and then through the Teflon tube Repeat this process for the second spool The filament should come out of the...

Страница 14: ...Never turn off the printer for longer than 20 seconds while heaters are still above 100degC The heat in the heater part of the hot end can travel upwards if the top part is not actively cooled This ca...

Страница 15: ...ll be explained in more detail in this chapter 7 1 Turn On the printer General display unit overview You can control the printer with the display unit To navigate through the menu rotate the button an...

Страница 16: ...ends are slightly loosened To ensure this is not the case please do the following 1 Open front flap 2 Pull out hot end a few mm by pulling on the aluminum flange of the hot end and firmly push it bac...

Страница 17: ...a previous print job Scrape it of or carefully use the supplied tweezers for smaller particles Degrease the bed with a detergent like alcohol blue spirit or acetone by putting it on a cloth or paper...

Страница 18: ...Temp 2 20 1 0 C Turn extr 1 off Turn extr 2 off Turn extr 1 off Turn extr 2 off Select extr 1 Select extr 2 Extr Position Set Origin Turn extr 1 off Turn extr 2 off Select extr 1 Select extr 2 Extr P...

Страница 19: ...e guiding tube and the filament guide The plastic that comes out of the tube it is recommended to cut off the end in a skew manner and throw the just cut off debris away Insert the filament into the l...

Страница 20: ...of the box it is recommended to start a print job from the supplied SD card IMPORTANT Please make sure before leaving your printer without supervision that the first layer is successfully finished 8 1...

Страница 21: ...license and Repetier Host for FELIXprinters which is open source On the supplied SD card including reader there are several items present Printer software Sample slice objects Documentation User manu...

Страница 22: ...ur first print The complete manual of the software can be found on the SD card and also on our website The software is available for MS windows and Mac OS 9 1 1 FELIXBUILDER FOR WINDOWS Run the FELIXb...

Страница 23: ...updated slicing profiles The OEM profiles should indicate version 0 0 After a new install there should be no profiles present If there are profiles from a previous installation please delete the exist...

Страница 24: ...ft should be shown This should be changed for the first print Note the temperatures and the build platform selection Make sure the configuration matches the left picture Important is Make sure the hea...

Страница 25: ...are for the first time this will happen automatically when you start the FELIXbuilder software Select the License Option and click next Copy the system ID from the registration wizard and go to the Ma...

Страница 26: ...com Browse for the license key you stored on your computer in the previous step and press the next button Your license key is registered successfully and your software is ready to use Press the finish...

Страница 27: ...or when you already have a license for a different FELIXprinter Click on the Part button and search for an STL file As example you could use this file http www felixprinters com d ownloads print_files...

Страница 28: ...vanced button Make sure the configuration matches the picture on the left This way the object will re orient and drop the object to the build plate Press Ok or Apply The object will orientate so that...

Страница 29: ...atform settings in the picture from the left Make sure the printer status is Online if this is not the case the USB connection is not established yet Click the preferences button to establish a connec...

Страница 30: ...FELIX Pro 1 Rev 3 www FELIXprinters com support FELIXprinters com Close the configuration menu and press submit job The printer will first slice the object and the printer should start the print job...

Страница 31: ...ll FELIXbuilder by dragging the symbol to the Applications folder Approve the end user license agreement Enter the voucher code that you have received with the FELIX 3D printer and press validate The...

Страница 32: ...bject is printed with which nozzle 1 Click on Print 2 Click on Edit Profiles This will open the Profile Editor screen After a new install there should be no profiles present If there are profiles from...

Страница 33: ...together with your FELIX Pro 1 Now it is time to make a first print First of all it is important to have an STL file As example you could use this file http www felixprinters co m downloads print_fil...

Страница 34: ...will be placed onto the build platform In the menu click on Transform to adjust the object If you want to move an object click on Move in the left hand panel The selected object can be moved to any lo...

Страница 35: ...e 3D printer Go to the Print tab Go to Send to printer Open the selection window and click on refresh Select the Pro 1 Click on connect To ensure the FELIXprinters test file will be printed like inten...

Страница 36: ...nters com support FELIXprinters com The printer will first slice the object and the printer should start the print job shortly after that In the bar displayed below the Pause and Stop button you are a...

Страница 37: ...t is a best practice Below is an overview of the settings Layer Height This determines the layer height of each printed layer The smaller the nicer the object will look but it will take more time to p...

Страница 38: ...t generation with the same material as the object itself 2 Support generation with the 2nd nozzle This can be either a different color or for instance soluble material which can be dissolved afterward...

Страница 39: ...rial like PVA The support is printed as close as possible to the object to obtain the best results Only suitable for dual head printing 3_No Support Extra Part Adhesion This option prints no support b...

Страница 40: ...1 Remove the 3d printed object When the print job is finished the display will indicate that the 3D printer is cooling down To remove large objects larger than about 100x100mm it is recommended to ta...

Страница 41: ...www FELIXprinters com support FELIXprinters com Don t pull the object straight up but twist it and start peeling at the edges edges or use a spatula Remove support material with a small pliers or if y...

Страница 42: ...nes on the first layer significantly differ in thickness When the printer leaves the factory everything is calibrated Due to shipping the chance is present that the bed is not completely level anymore...

Страница 43: ...Page 43 User Manual FELIX Pro 1 Rev 3 www FELIXprinters com support FELIXprinters com 00B_Extruder_Height_Calibration_Pro1 gcode this file calibrates the height difference between the hot ends...

Страница 44: ...l SD card supplied with the printer 2 Navigate to the subfolder 2_printfiles_assembly and start the 00_Full_calibration_routine_P1 gcode The printer will level the bed and also calibrate the height be...

Страница 45: ...to extruder Scroll down and make sure extruder 2 is selected Then set the new x and y offsets The new x offset 16 0 2 16 2mm Then new y offset is 0 0 3 0 3mm After changing values go Back one menu It...

Страница 46: ...s basically a wheel that runs along with the filament The controller constantly compares the amount of flow with the sent out extruder steps If the difference is too large an error will be displayed C...

Страница 47: ...t loaded then goto step 4 If yes from the display unit or PC interface select the correct extruder and heat it up 2 Retract the filament from the hot end 3 Let it cool down 4 Turn off the printer 5 Op...

Страница 48: ...ts a lot of dust and small particles Make sure the filament enters the filament holder through the dust cleaner After a few months of printing it is recommended to replace the dust cleaners 14 4 Motio...

Страница 49: ...ions can occur if there has been printed with some hard filament before make sure it is removed from the barrel of the hot end This can be done by extruding some hard filament and then fully retract i...

Страница 50: ...t end not correctly in place due to shipment or after replacement Make sure the hot end is pushed in properly all the way to the back of the extruder You should hear feel a soft click THen the flexure...

Страница 51: ...jam In this case make sure the cause of the jam is removed before resuming the print job Printer has run out of filament Put a new spool of filament on the printer Cut off the filament so that the en...

Страница 52: ...Filament attracts a lot of dust which can potentially all come into the hot end In some dusty environments this could cause a clogged hot end within a few hours Fragment of previously printed materia...

Страница 53: ...cooled down while there is filament in the printer The filament shrinks when it cools and then pulls up the print heads a bit This is detected by the printer The message does not need to be a problem...

Страница 54: ...nnected The heater catrtridge thermistor temperature sensor is not mounted right A bad thermal contact between components and aluminum body can cause the printer to detect that the temperature is risi...

Страница 55: ...tion of the drivers connecting the 3D printer through FELIXbuilder should be possible Drivers for windows http www felixprinters com downloads software 0_FELIXbuilder Arduino 20drivers 201 6 5 zip Dri...

Страница 56: ...Windows this should work out of the box if the following is met The printer profiles are updated version 11 or later The firmware of the printer is up to date 20160209 firmware_0_92_8_felix or later...

Страница 57: ...ELIX Pro 1 Rev 3 www FELIXprinters com support FELIXprinters com General section and then Baud rate Select the right baudrate and confirm it To store the new settings permanently select Configuration...

Страница 58: ...nd wearing heat resistant gloves is recommended 8 Only operate the FELIXprinter in a sufficiently ventilated environment fumes from ABS and PLA aren t toxic but can cause respiratory irritation 9 Don...

Страница 59: ...Carbon dioxide CO2 Dry chemical Alcohol resistant foams are preferred if available General purpose synthetic foams including AFFF or protein foams may function but much less effectively Extinguishing...

Страница 60: ...tion LD50 oral rat 5000 mg kg Ecological Information Bioaccumulation Does not bioaccumulate Inherently biodegradable Ecotoxicity effects EC50 72h algae 1100 mg L Disposal Considerations Waste from res...

Страница 61: ...conveying and other mechanical handling operations can generate combustible dust To reduce the potential for dust explosions do not permit dust to accumulate Dense smoke is produced when product burn...

Страница 62: ...icipated by skin absorption Estimated LD50 Rabbit 2 000 mg kg Inhalation No adverse effects are anticipated from single exposure to dust Vapors fumes released during thermal processing may cause respi...

Страница 63: ...livered to your delivery address or possession c If you refuse or neglect to take delivery of the Products FELIXprinters reserves the right to charge you for the reasonable cost of storing and shippin...

Страница 64: ...uct manual s or written materials may not be copied except for your own use You may not copy download upload or in any other way reproduce Content except for creating one copy solely for backup or arc...

Страница 65: ...medy in connection with any warranties granted by FELIXprinters hereunder 10 Limitation of Liability a NEITHER FELIXPRINTERS NOR ITS SUPPLIERS SHALL BE LIABLE TO YOU OR TO ANY THIRD PARTY FOR ANY INDI...

Страница 66: ...nvalid unenforceable or illegal the other provisions shall continue in full force and effect You and FELIXprinters are deemed to have agreed to new terms and conditions in substitution for such invali...

Отзывы: