FARMSCAN Jackal v2 Скачать руководство пользователя страница 23


AM-Jackal-2 

more quick guides @ www.farmscanag.com/jackal 

July 2013


21 

Output 

OUTPUT 


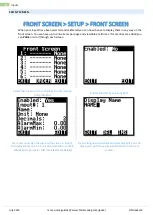
FRONT SCREEN > SETUP > OUTPUT 

 
Use the edit key to select the desired output option available on the desired port 


Select the EDIT button to Disable or choose an output 

function 

When FREQUENCY is selected the Jackal will output a 

pulse frequency that can be adjusted in ratio to a 

selected input 

 i.e.  in the above example, if a GPS was inputting serial 

NMEA messages that contained speed information, the 

output could be configured to pulse at a rate of 100 

pulses / meter, therefore simulating a Radar.  

Please refer to CONNECTION details on Page 3 for 

connecting requirements 


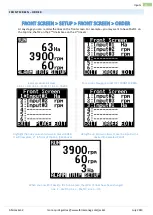
In the above example the Jackal can be selected to 

leave the output disconnected or pull low when an 

alarm on a selected input is active. This can be used to 

provide remote alarm functionality. 

For Batching or Trip functionality the Jackal can be 

used to turn ON or turn OFF a valve / warning or any 

control function when a batch total or trip total has 

been reached. Select your INPUT and the UNITS to be 

measured. 


Содержание Jackal v2

Страница 1: ......

Страница 2: ..._______ 11 Setup __________________________________ 11 Tacho RPM Meter Setup Wizard ______________ 12 Description______________________________ 12 Sensors Required _________________________ 12 Availab...

Страница 3: ...y a suitable signal from the machinery so that periods of machine operation that should not accumulate as a work total can be excluded from trip totals Our onboard calibration wizard makes setup a bre...

Страница 4: ...anual 1 PARTS PICTORIAL MOUNTING INSTALLATION The Jackal is provided with a suction window mount Slide mount onto unit and push sideways to lock into place Make sure you hear a click of the mount lock...

Страница 5: ...witch Alarm A5 IN10 Prox Reed Switch Alarm B5 IN5 Prox Reed Switch Alarm A6 IN9 Prox Reed Switch Alarm B6 IN6 Prox Reed Switch Alarm A7 IN8 Varying volt sensor B7 IN7 Varying volt sensor A8 Not Used B...

Страница 6: ...nals are used for battery connection and the end with Ferrules attached is used to connect to the rear Jackal Refer page 3 for connection instructions 3 Connect Ground to BATT VE Terminal B11 using th...

Страница 7: ...UN mode the unit displays RUN to signify that the monitor is active e When the monitor is in HOLD mode the unit displays HOLD 3 Menu Page Key a The MENU PAGE key is used for setting up the ports as we...

Страница 8: ...time If more than three pieces of information are available the MENU PAGE or LEFT RIGHT can be used to cycle through the available information as described below 1 line of information 1 UP Example Lin...

Страница 9: ...it up to 13 line items on the front screen You can also name the input port select the number of decimal places displayed edit the alarms Other Allows the user to set in implement width m External run...

Страница 10: ...inbuilt wizard function for common tasks Current Wizards include easy setup for a Area Speed Wheel Wheel pickup sensor required b Area Speed GPS No Wheel Senor required GPS only c TachoMeter RPM d Fl...

Страница 11: ...end before continuing with either method Mark bottom centre of tyre on which the sensor is fitted and peg ground in corresponding position CHOOSE CALIBRATION METHOD OF TARGET OR MANUAL RATIO AS DESCRI...

Страница 12: ...ints for a Min Max range to be notified of a problem 9 Select NEXT 10 Create a name for your port if desired by pressing EDIT 11 Use the UP DOWN LEFT RIGHT to change the letters Max 3 letters 12 Selec...

Страница 13: ...ired unit of measure m ft yd in km mi This will show covered area on the main screen 5 Scroll down to enable disable the External Run hold Refer page 3 for inputs a Disabled Normally off Normally on 6...

Страница 14: ...nected to press NEXT 2 Press EDIT to enable the port 3 Using the EDIT KEY select pulse rev Pulse Revolution 4 Using the NAV KEYS scroll to MANUAL RATIO 1 000000 press EDIT 5 Enter the number of magnet...

Страница 15: ...ase refer to page 3 on wiring requirements SETUP FRONT SCREEN SETUP WIZARD FLOWMETER 1 Using the NAV KEYS select the current port the flow sensor input is connected to press NEXT 2 Press EDIT to enabl...

Страница 16: ...oblem 19 Press NEXT 20 Create a name for your port if desired by pressing EDIT 21 Use the UP DOWN LEFT RIGHT to change the letters Max 5 letters 22 Select EXIT when done 23 Select NEXT 24 Select NEXT...

Страница 17: ...Using the NAV KEYS select the current port the wheel sensor input is connect to press NEXT 2 Using the EDIT key select the baud rate of the GPS that is connected a GPS messages will be displayed on t...

Страница 18: ...ines label Unit of measure UOM decimal places alarm points that you wish to be displayed on the front screen NB You can display multiple UOM on the front screen using only one input E g View Ha Ac at...

Страница 19: ...EDIT key allows you to enable disable the port CALIBRATION METHOD TARGET MANUAL RATIO When the port has been enabled using the UP DOWN arrows navigates through the calibration setup Here you can also...

Страница 20: ...page and viewable at all times If more lines are added you can PAGE or scroll through each screen Select the line you wish to display your information and press EDIT Enable the LINE by selecting EDIT...

Страница 21: ...e shaft 2 on the 2nd line Area on the 3rd line etc Example above displays Line 1 HA Line 2 Shaft 1 Line 3 Shaft 2 To re order Navigate to SETUP FRONT SCREEN Highlight the line you wish to move press O...

Страница 22: ...d alarms set in the Jackal It duplicates the operation of the RUN HOLD button available on the front screen NOTE When the EXTERNAL RUN HOLD is active on ANY input the function of the RUN HOLD button o...

Страница 23: ...NMEA messages that contained speed information the output could be configured to pulse at a rate of 100 pulses meter therefore simulating a Radar Please refer to CONNECTION details on Page 3 for conne...

Страница 24: ...AL FRONT SCREEN SETUP GPS SERIAL When an external GPS is connected to Input A11 of the Jackal you can confirm view valid messages are being received In the SETUP screen you can change the Baud Rate co...

Страница 25: ...the Trip Page SETUP FRONT SCREEN TRIP The screen above allows you to SAVE RESET individual trips or view SAVED TRIPS By pressing the SAVE RESET you have the ability to Reset Trip Save Trip Reset All B...

Страница 26: ...PM Manual User setup Alarm points via the FRONT SCREEN SETUP When the alarm point is reach i e over 3000RPM the line will FLASH notifying you of the issue Press ALARM to enter the page showing all Ala...

Страница 27: ...____________________________________________ _______________________________________________________________________________________________ ___________________________________________________________...

Страница 28: ...canag com jackal AM Jackal 2 26 Notes Farmscan Ag Pty Ltd ABN 92 143 803 070 11 493 South Street Toowoomba QLD 4350 AUSTRALIA Ph 61 7 4602 4150 Fax 61 7 4602 4151 sales farmscanag com 2013 Farmscan AG...

Отзывы: