background image

GUIDED SETUP 

Assembling Your Phone 
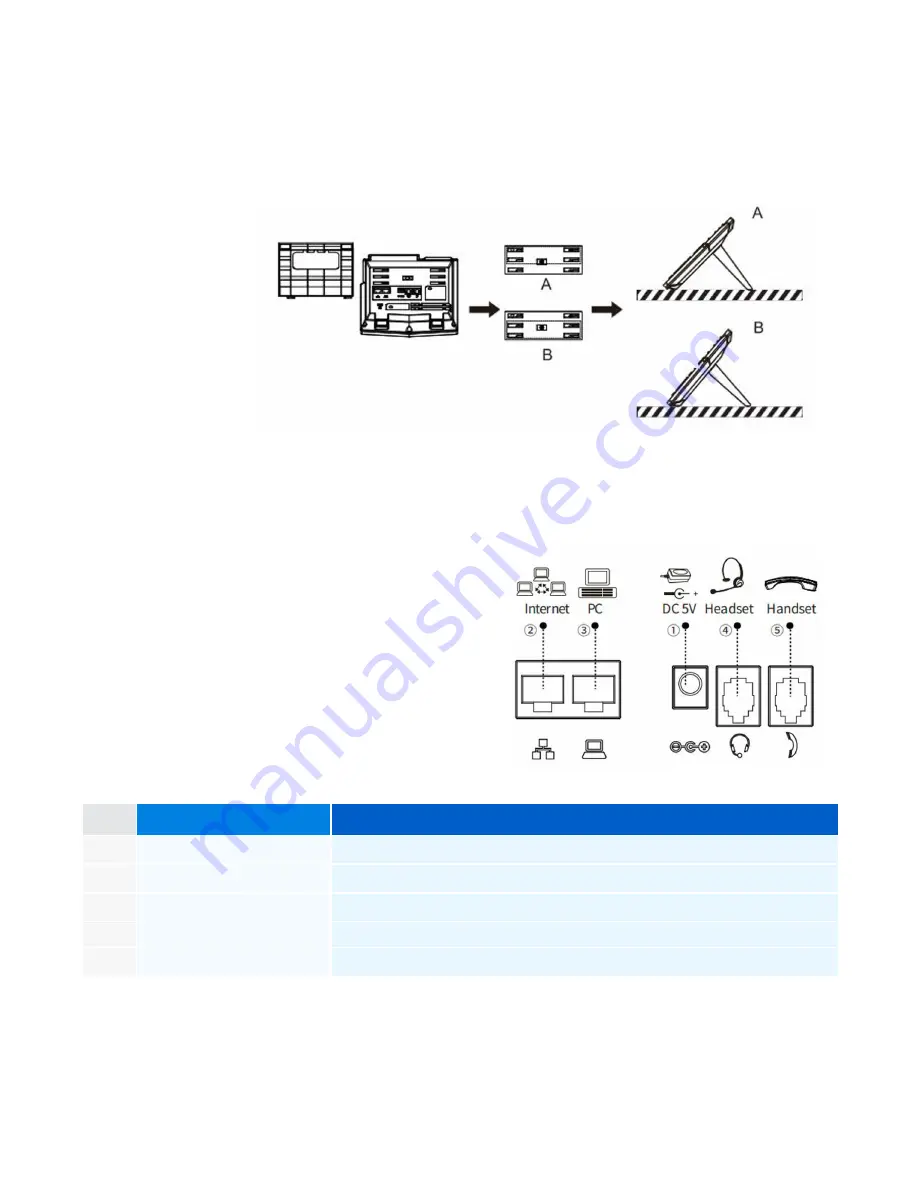
Slot the plinth into the back of the phone, as shown below. Multiple insert 
positions provide the opportunity for multiple viewing angles.

Connect Handset and Optional Headset 
Note: Your phone supports headsets using an RJ-9 cable.
For connection directions, refer to your headset documentation.

3

Connect Cables
Please follow the diagram 
on the right for information 
on your device’s connection 
options.

Once plugged into power & establishing a network connection, the 
phone will automatically download its configuration files & become 
usable. The voicemail box will be functional with a default greeting.

Quick Start Guide - Fanvil V64

NO.

Item

Function

1

DC-5V Port

Connect the power adapter

2

Network Port

Connecting to LAN/Internet via Ethernet. Power over Ethernet capable.

3

PC Port

Pass through the network connection to a PC/MAC

4

Headset Port

Connect any RJ-9 Capable Headset

5

Headset Port

Connect the X303W Handset

Содержание X303W

Страница 1: ...1 5 Must Have Productivity Tools for Remote Workers Fanvil X303W QUICK START GUIDE ...

Страница 2: ...Welcome to Elevate WHAT S IN THE BOX Fanvil V64 A Phone B Ethernet Cable C Handset Cable D Handset E Stand F Power Adapter D E F C 2 B A Quick Start Guide Fanvil V64 ...

Страница 3: ...the right for information on your device s connection options Once plugged into power establishing a network connection the phone will automatically download its configuration files become usable The voicemail box will be functional with a default greeting Quick Start Guide Fanvil V64 NO Item Function 1 DC 5V Port Connect the power adapter 2 Network Port Connecting to LAN Internet via Ethernet Pow...

Страница 4: ...for personal options 4 Select option 2 to change your PIN 5 Enter the new PIN when prompted Press when done 4 Quick Start Guide Fanvil V64 Establishing a Wi Fi Connection 1 Press the Menu soft key 2 Use the navigation arrow keys and OK keys to reach the Basic menu option 3 Scroll down to WLAN option using the navigation keys and press OK 4 Toggle WLAN to Enabled using the right navigation key 5 Sc...

Страница 5: ...e number 5 Resume the original call by pressing the Resume soft key Answering an Incoming Call On the handset Pick up the handset to answer the call On a headset When the headset is connected press the Headset button to answer the call On Speakerphone Press the Speaker button to answer the call Rejecting an Incoming Call Press the Reject soft key to immediately send the caller to voicemail Ending ...

Страница 6: ...nd press the Dial soft key 3 Press the Xfer soft key when the second party answers Call Waiting While already on a call and a new call rings in you will hear a beep tone emitted by your phone To Answer the Second Call 1 Press the Answer soft key to access that call The first call will be placed on hold 2 Once the second call has ended resume the original call by pressing the Resume soft key To Rej...

Страница 7: ...e highlighting Call Forward 4 Press the Ok button or the Enter soft key 5 Select the forwarding option you d like to manipulate and press the Ok button a For example to default calls to always forward select Unconditional 6 Utilize the arrow keys to select options up down and toggle options off and on left right 7 After your changes have been made select the OK button to save changes Redial Press ...

Отзывы: