

Introduction
Sold by: KDDI CORPORATION • OKINAWA
CELLULAR TELEPHONE COMPANY
Manufactured by: KYOCERA Corporation
Setting Guide
Basic Operation
For explanations of basic functions, refer to "Basic Manual".
F
Power button
Power ON
Press and hold
F
(Power button)
until the charging light turns on
Displaying Home
screen
Swipe (slide)/fl ick the start
screen.
[
] Chrome icon
Use Google Chrome to view Web pages.
Navigation bar
C
: Return to the previous screen. When "
" appears in the character entry screen, tap
this button to hide the keyboard or menu.
H
: Display the Home screen. Long-touching or sliding up this button displays the semi-
circular shaped assist ring. Slide it to " "/" "/" " to activate the Notifi cation panel/
Google (Google NOW)/the slide screen.
N
: Show recently-used applications.
《
Home screen
》
Display
Touch directly with your fi nger to operate.
《
Start screen
》
Tap
Lightly touch a
screen and then
immediately
release your fi nger.
Long-touch
Keep touching a
screen.
Slide (Swipe)
While lightly
touching the
screen, trace to the
desired direction.
Flick
Touch the screen
and fl ick up/down/
left/right.
■
Character entry
Use flick input or tap a key several times to enter characters.
Flick input
Tap a key to display enterable characters as shown in the right. Flick to the direction of the
character to enter.
《
Character entry screen
(10-key)
》
Character entry
mode switch key
Tap to switch
character type.
Magnifying characters
To magnify characters of menu items etc. operate as follows.
Home screen
→
[
基本機能
(Basic function)]
→
[Settings]
→
[Accessibility]
→
Turn "Large text" to ON
• Alternatively, from Home screen
→
[
基本機能
(Basic function)]
→
[Settings]
→
[Accessibility]
→
[Magnifi cation gestures] to magnify
the screen. For operation method, see the description on the screen.
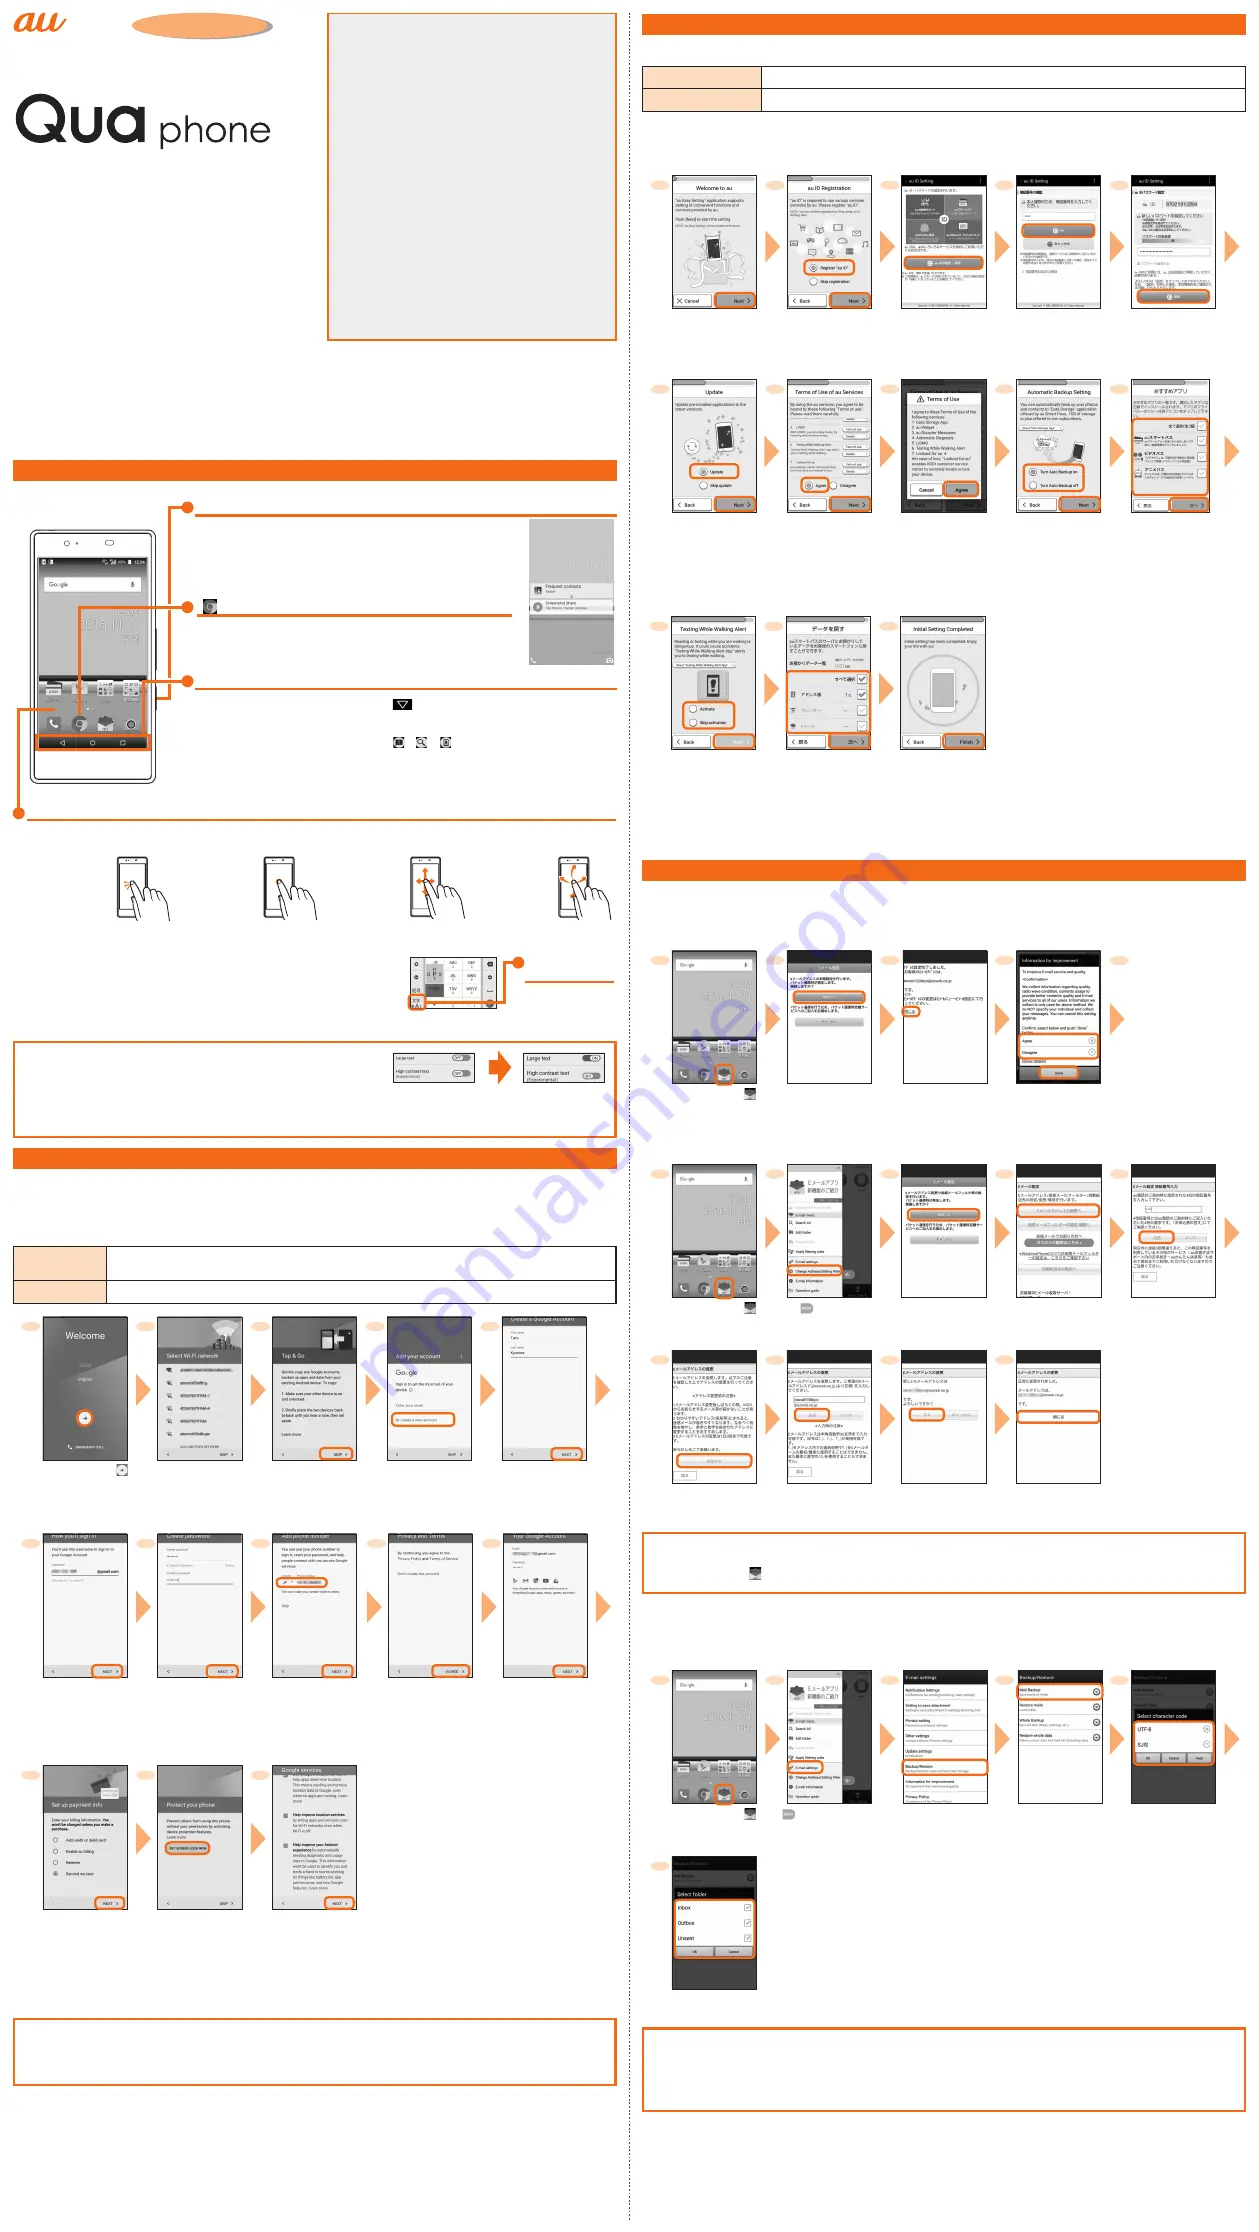
Initial settings
When you turn on the product for the first time after purchasing the product, follow the onscreen instructions to set language,
functions and services.
■
Setting up Google account
Set up Google account to use Google applications such as "Gmail", "Play Store", "Hangouts".
Setting items are as below (besides the items below, register "First" name and "Last" name).
User name
Register your Google account (user ID) and a character string for mail address. You can register a desired
name, but a name already registered by another user cannot be set.
Password
Register password for the Google account.
1
2
3
4
5
Select
"
English
"
, [ ]
* You can change the
display language
even after the initial
settings.
Set up the Wi-Fi
network to connect as
required
*
If you do not set up,
tap "SKIP".
[SKIP]
* For using Tap & Go,
follow the onscreen
instructions.
[Or create a new
account]
* If you have a Google
account, enter a mail
address
→
[NEXT].
Enter "First name" and
"Last name"
→
[NEXT]
6
7
8
9
10
Enter a user name
→
[NEXT]
Checking registration
of user name starts.
Enter a password
and reenter the password
for confirmation
→
[NEXT]
Check/change the
country name and
phone number
→
[NEXT]
*1
→
[VERIFY]
*
If you do not set up,
tap "SKIP".
Check the contents,
then [I AGREE]
Check the contents,
then [NEXT]
11
12
13
Make purchase
settings of Google Play
as required
→
[NEXT]
[SET SCREEN LOCK
NOW]
→
Follow
onscreen instructions
to set security and
notification
* If you do not set up,
tap "SKIP".
Confirm the Google
service settings,
then [NEXT]
*1 Text message for Google verification code will be sent to the set phone number.
Changing display language via Settings menu
Home screen
→
[
基本機能
(Basic function)]
→
[
設定
(Settings)]
→
[
言語と入力
(Language & input)]
→
[
言語
(Language)]
→
Select
"
English
" →
[OK]
《
Character size
changed
》
au Easy Setting
By setting au ID, you can use various services provided by au such as "au Kantan Kessai" which allows you to purchase
applications from the au
スマートパス
(au Smart Pass) or Google Play. Main setting items are as follows.
au ID
*
Register your au phone number or a character string for au ID (user ID).
au ID password
Register password for using au ID.
*
"au ID" which is already used by another user cannot be set.
•
If you skip the operation of "au Easy Setting" at that time, you can set au ID later. In that case, operate from Home screen
→
[
基本機能
(Basic function)]
→
[Settings]
→
[au Settings Menu]
→
[au Easy Setting], or from Home screen
→
[au
フォルダー
(au folder)]
→
[au ID
Setting]
1
2
3
4
5
Welcome to au screen
→
[Next]
[Register "au ID"]
→
[Next]
[au ID
の設定・保存
(Set and save au ID)]
Enter the security code
→
[OK]
* Default value is a four-
digit number written at
subscription.
Enter a security
password
→
[
設定
(Settings)]
→
[
終了
(Exit)]
6
7
8
9
10
[Update]
→
[Next]
Check the terms and
conditions (reading
requires), [Agree]
→
[Next]
[Agree]
*1
[Turn Auto Backup on]/
[Turn Auto Backup off]
→
[Next]
* To back up photos and
contacts to au Smart Pass
automatically using "Data
Storage App", tap "Turn
Auto Backup on".
Select apps to install
→
[
次へ
(Next)]
* If there are apps
to be restored, the
restoration of apps
screen appears.
Follow the onscreen
instructions.
11
12
13
[Activate]/
[Skip activation]
→
[Next]
Select data to restore
→
[
次へ
(Next)]
* When the screen for
checking Wi-Fi
®
connection is
displayed, follow the
onscreen instructions.
[Finish]
* When the screen for
use confirmation or
explanation of au
Basic Home for Qua
app is displayed,
follow the onscreen
instructions.
*1 Configurations for LISMO and Lookout for au are complete when you tap "Agree".
To use E-mail (@ezweb.ne.jp), subscription to LTE NET is required.
If you did not subscribe it when you purchased the product, contact an au shop or Customer Service Center.
Your E-mail address is determined automatically after initial setting. You can change the E-mail address later.
■
Initial settings
1
2
3
4
5
When Outline
of customer
information
for "About use
of customer
information"
appears, tap
"Accept".
Subsequently the
explanation screen
for E-mail function
appears. Confirm
the contents and
then tap "Close".
Home screen
→
[
]
Check the contents,
then [
接続する
(Connect)]
Check your E-mail
address
→
[
閉じる
(Close)]
Check the contents,
then [Agree]/
[Disagree]
→
[Done]
■
Changing your e-mail address
1
2
3
4
5
Home screen
→
[
]
[
]
→
[Change
Address/Setting
Filter]
Check the contents,
then [
接続する
(Connect)]
[E
メールアドレスの
変更へ
(To Change
E-mail address)]
Enter the security code
→
[
送信
(Send)]
6
7
8
9
Check the contents,
then [
承諾する
(I accept)]
Enter E-mail
address
→
[
送信
(Send)]
[OK]
[
閉じる
(Close)]
Checking your E-mail address
Home screen
→
[ ]
→
[MENU]
→
[E-mail information]
■
Backing up E-mail
You can back up E-mail.
Backed up data is saved on a microSD memory card (/SD card/private/au/email/BU/) when a microSD memory card is attached. If a
microSD memory card is not attached, data is saved on the internal storage (/Internal storage/private/au/email/BU/).
1
2
3
4
5
Home screen
→
[
]
[
]
→
[E-mail settings]
[Backup/Restore]
[Mail Backup]
→
Confirm
the notes and [OK]
Select a character code
to make backup data
→
[OK]
6
Select a folder to back up
→
[OK]
Setting other than E-mail
You can use mail addresses except for E-mail (@ezweb.ne.jp).
You need to set up an account to use it. For the first time use, make settings as follows.
Home screen
→
[Google]
→
[Gmail]
→
Follow the onscreen instructions.
Thank you for buying the "Qua phone" (simply called the "product"
from here on). In this guide, settings and precautions for using the
product are described.
For explanations of basic functions, refer to "Basic Manual".
Company names and product names referred to in this manual are
trademarks or registered trademarks of respective companies. The TM,
® marks may be omitted in this manual.
Illustrations/screens shown in this manual may look different from the
actual product/screens. In some cases, minor details or a part of a
screen may be omitted.
December 2015, 1st Edition
■
Basic Operation
Describes the basic operations.
■
Initial settings
Make initial settings when you turn the power on for the fi rst time.
■
au Easy Setting
Set au ID.
■
Make initial settings for E-mail (@ezweb.ne.jp) etc.
■
Making a call
Add a new contact to Contacts to call.
■
Receiving a call
Describes how to receive a call.
■
Setting Wi-Fi
®
Describes how to connect Wi-Fi
®
network.
■
Viewing/playing data
Describes how to view/play still images or video data.
■
Saving battery power
Describes the setting to save battery consumption using "Eco
Mode".
■
Transferring data from au Settings Menu
Restore/back up data from/to your previously used au phone to/
from this product using microSD card or the au Smart Pass
server.


