background image

42

»Car System 2« software

EN


ƒ

As soon as a new module has been detected, it will appear in the syn-
opsis on the left.

Removing modules


ƒ

Only the last module in the list can be removed! Thus, should you want 
to remove for instance the fourth module of a total of five, you will have 
to remove first module 5 and then, module 4.


X

Start the »Car System 2« software.


X

Select menu point Allgemein >> Modul Werkseinstellungen [General 
>> Module Default settings].


X

Now disconnect the connection cable of the module concerned.

Settings

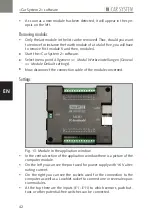
Fig. 13: Module in the application window


ƒ

In the central section of the application window there is a picture of the 
computer module.


ƒ

On the left you can see the port used for power supply with 16 V alter-
nating current.


ƒ

On the right you can see the sockets used for the connection to the 
computer as well as a LocoNet socket to connect one or several expan-
sion modules.


ƒ

At the top there are the inputs (E1 - E11) to which sensors, push but-
tons or other potential-free switches can be connected.

Содержание 161352

Страница 1: ...161351 161352 PC Grundmodul Erweiterungsmodul Bedienungsanleitung Instruction Manual DE EN 161351 161352 PC standard module Expansion module...

Страница 2: ...tromversorgung anschlie en 9 R ckmeldekontakte anschlie en 10 Funktionselemente anschlie en 11 PC Verbindung herstellen 13 Weitere LocoNet Module anschlie en 14 5 Treiber und Softwareinstallation 16 S...

Страница 3: ...e welches den Anschluss an einen PC erm glicht Das Modul ist mit einer LocoNet Schnittstelle ausger stet an der beliebig viele weitere verschiedene LocoNet Module angeschlossen werden k nnen Mit jedem...

Страница 4: ...n Sie das Produkt nur im Innenbereich und vermeiden Sie Witterungseinfl sse Jede andere Verwendung gilt als nicht bestimmungs gem F r Sch den oder M ngel die hierdurch oder durch Nichtbeachtung der Be...

Страница 5: ...rzeit aktuellen Fassung X X Trennen Sie bei einer Entnahme von Batterien oder Akkus das Produkt von der Spannungsversorgung X X Entnehmen Sie vor einer Verschrottung des Produkts ggf enthaltene Batter...

Страница 6: ...6 Produkt bersicht DE 3 Produkt bersicht Lieferumfang PC Grundmodul nur in Artikel 161351 Erweiterungsmodul nur in Artikel 161352 CD ROM nur in Artikel 161351 Anleitung...

Страница 7: ...Grundmodul Anschl sse Beschreibung 16 VAC Anschluss f r die Spannungsversorgung 16 V Wechselspannung USB USB PC Anschluss LocoNet LocoNet Schnittstelle E 1 E 11 11 Eing nge 0 V 0 V f r Eing nge A 1 A...

Страница 8: ...ls Abb 2 Erweiterungsmodul Anschl sse Beschreibung 16 VAC Anschluss f r die Spannungsversorgung 16 V Wechselspannung LocoNet LocoNet Schnittstelle E 1 E 11 11 Eing nge 0 V 0 V f r Eing nge A 1 A 12 12...

Страница 9: ...sorgung anschlie en Die Module werden mit 16 V Wechselspannung betrieben Die notwendige Wechselspannung k nnen Sie zum Beispiel mit dem FALLER Transformator 50 VA 50 60 Hz Artikelnummer 180641 erzeuge...

Страница 10: ...dern angeschlossen werden F r die R ck meldung aus der Stra e verwenden Sie FALLER Sensoren Artikel nummer 161773 TIPP ACHTUNG Schlie en Sie niemals spannungsf hrende Komponenten wie z B die Aus g nge...

Страница 11: ...t nde Diese k nnen Sie in der Software Car System 2 ber den Men punkt Allgemein Vorwiderstandsrechner ermitteln Schlie en Sie Parkplatz und Stopp Stelle an 20 V an Schlie en Sie im Unterschied dazu Ab...

Страница 12: ...hraubklemme 20 V Abb 7 Schraubklemme Ausgang A1 A12 Bsp 20 V X X Schlie en Sie eines der Anschlusskabel des Verbrauchers an die daf r vorgesehene Spannung 15 V 20 V an siehe Abb 5 und Abb 6 X X Schlie...

Страница 13: ...talliert werden da es sonst zu fehlerhaften Einstel lungen im Betriebssystem kommen kann Dies w rde dazu f hren dass die Software das Modul nicht ordnungsgem erkennt und somit auch nicht steuern kann...

Страница 14: ...e LocoNet Module an einem vorhandenen Modul anzuschlie en Hinweis Die Reihenfolge der angeschlossenen Module ist unabh ngig von ihrer sp teren Nummerierung X X Achten Sie darauf dass alle Module nache...

Страница 15: ...der Loco Net Anschl sse des ersten Moduls siehe Abb 10 X X Verbinden Sie dann das LocoNet Kabel mit einem der LocoNet Anschl sse des zweiten Moduls siehe Abb 11 LocoNet Kabel z B von Uhlenbrock erhalt...

Страница 16: ...kommen kann Dies w rde dazu f hren dass die Software das Modul nicht ordnungsgem erkennt und somit auch nicht steuern kann X X Legen Sie die CD ROM in das Laufwerk Der Installationsprozess star tet au...

Страница 17: ...den Modulen fortlaufende Nummern zuweist Sollten zuvor schon mehrere Module zusammengesteckt worden sein kann dieser Automatismus sonst zu widerspr chlichen Ergebnissen f hren X X Trennen Sie alle Loc...

Страница 18: ...ten Module mit den dazugeh rigen Modulnummern Auf der rechten Seite befindet sich ein Hilfefenster in welchem zu jedem Arbeitsschritt wichtige Informationen angezeigt werden Module hinzuf gen Wenn die...

Страница 19: ...13 Modul im Anwendungsfenster Im mittleren Bereich des Anwendungsfensters befindet sich eine Dar stellung des PC Moduls Auf der linken Seite ist der Anschluss f r die Stromversorgung mit 16 V Wechsels...

Страница 20: ...20 V Abzweigung 15 V Lichtsignale 15 V mit Vorwiderstand X X Sensoren oder Taster verbinden Sie mit einem Anschluss an einem Ein gang E1 E11 und mit dem anderen Anschluss mit 0 V Eing nge konfigurier...

Страница 21: ...des ausgew hlten Moduls gelangen Sie in die dazugeh rigen Einstellungen Abb 15 Ausg nge konfigurieren Die dargestellte Tabelle zeigt eine Zusammenfassung der aktuellen Konfigu ration des ausgew hlten...

Страница 22: ...ten Sie diese Einstellungen ver ndern wollen m ssen Sie den Expertenmodus aktivieren Stopp Stelle Parkplatz Abzweigung Schaltausgang Schaltadresse Die Schaltadresse ist die Adresse in Ihrem Digitalsys...

Страница 23: ...mpeln korrekt nachzubilden Hierzu wird nur eine Digitaladresse ben tigt welche bis zu vier Ausg nge steuert Die ersten drei Ausg nge bil den hier das Lichtsignal f r die Ampel der vierte Ausgang wird...

Страница 24: ...ich 50 60 Hz Leistungsaufnahme 3 2 W Tab 1 Elektrische Werte Symbole Symbol Bedeutung Das Produkt unterliegt der europ i schen WEEE Richtlinie CE Konformit tskennzeichen RoHS CE Konformit t inkl RoHS...

Страница 25: ...cting the supply voltage 32 Connecting checkback contacts 33 Connecting functional elements 34 Building up a connection with a computer 36 Connecting additional LocoNet modules 37 5 Driver and softwar...

Страница 26: ...connect the module to a computer It is also equipped with a LocoNet interface allowing to expand the system with as many other LocoNet modules as you want Each expansion module will add 11 inputs and...

Страница 27: ...be in conformity with the proper use or intended purpose Gebr FALLER GmbH will assume no responsibi lity for any damage or defect resulting from improper use or the non obser vance of the directions g...

Страница 28: ...on currently applicable X X Before removing batteries rechargeable or not disconnect the product from the power supply X X Remove any batteries rechargeable or not that may be present in a product bef...

Страница 29: ...ral view of product EN 3 General view of product Articles supplied PC standard module only in article no 161351 Expansion module only in article no 161352 CD ROM only in article no 161351 Instruction...

Страница 30: ...d module Fig 1 PC standard module Ports Description 16 VAC Port for supply voltage 16 V alternating voltage USB USB computer port LocoNet LocoNet interface E 1 E 11 11 inputs 0 V 0 V for inputs A 1 A...

Страница 31: ...he Expansion module Fig 2 Expansion module Ports Description 16 VAC Port for supply voltage 16 V alternating voltage LocoNet LocoNet interface E 1 E 11 11 inputs 0 V 0 V for inputs A 1 A 12 12 outputs...

Страница 32: ...e supply voltage The modules are powered by 16 V alternating current The required alternating current can be generated using FALLER s 50 VA 50 to 60 Hz transformer bearing the article number 180641 fo...

Страница 33: ...ree outputs of switching decoders For checkback signals coming from the road use FALLER sensors article number 161773 TIP NOTICE Never connect to the inputs of the modules any live components such as...

Страница 34: ...e Car Sys tem 2 software via menu point Allgemein Vorwiderstandsrechner General Protective resistor calculator Connect parking spaces and stop points to 20 V On the contrary con nect branch off juncti...

Страница 35: ...minal 20 V Fig 7 Screw terminal output A1 A12 For instance 20 V X X Connect one of the connection cables of the consuming device to the voltage intended for that purpose 15 V or 20 V see Fig 5 and Fig...

Страница 36: ...d from the enclosed CD otherwise the operating system might fea ture faulty settings This would result in the software not identifying the module correctly and thus not being able to control it either...

Страница 37: ...ect additional LocoNet modu les to any module already existing ADVICES The order in which the modules are connected is independent of their subsequent numbering X X Make sure you connect all modules o...

Страница 38: ...oNet ports of the first module see Fig 10 X X Next connect the LocoNet cable to one of the LocoNet ports of the second module see Fig 11 You will find LocoNet cables e g by Uhlenbrock in well assorted...

Страница 39: ...his would result in the software not identifying the module correctly and thus not being able to control it either X X Insert the CD ROM into the drive The installation procedure will start automatica...

Страница 40: ...umbers to the modules Should previously several modules be connected already that automa tism might result in contradictory data being stored X X Disconnect any existing LocoNet connections X X Make s...

Страница 41: ...side of the application window you can see the modu les already detected along with the corresponding numbers On the right hand side there is an help window in which important information on each pro...

Страница 42: ...ellungen General Module Default settings X X Now disconnect the connection cable of the module concerned Settings Fig 13 Module in the application window In the central section of the application wind...

Страница 43: ...he functional element you want to use one of its wire will have to be connected to the output A1 A12 and its other wire to 15 V or 20 V Stop point 20 V Parking space 20 V Branch off junction 15 V Ligh...

Страница 44: ...ts make sure that no value is used several times Configuring outputs By clicking on the outputs shown in the picture of the selected module you go to the relevant settings to be performed Fig 15 Confi...

Страница 45: ...ose settings you have to activate the Exper tenmodus Expert mode Stop point parking space branch off junction switching output Switching address The switching address is the address in your digital sy...

Страница 46: ...ersections and pedestrian stop go lights Such procedure requires only one digital address that will control up to four outputs The first three outputs will form the light signal for the traffic light...

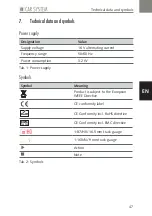
Страница 47: ...nt Frequency range 50 60 Hz Power consumption 3 2 W Tab 1 Power supply Symbols Symbol Meaning Product is subject to the European WEEE Directive CE conformity label RoHS CE Conformity incl RoHS directi...

Страница 48: ...br FALLER GmbH Sachnr 161 351 1 161 352 1 nderungen vorbehalten 09 04 2019 Gebr FALLER GmbH Kreuzstra e 9 78148 G tenbach Telefon 49 0 77 23 651 0 Telefax 49 0 77 23 651 123 www faller de info faller...

Отзывы: