English
26
After a few seconds the
display will revert to show the
time of day.
The ovens can now be used
normally.
Cooking using the timer
The timer can be used to turn just one oven or both on and
off automatically. The start and stop time must be the same
for both ovens but different cooking temperatures can be set.
If you want to turn one of the ovens on at the same time as
the timer is set for automatic cooking, you must wait until the
timer has turned on the oven/ ovens first. Then you can adjust
either of them manually in the normal way.
You can set the oven to turn on any time over the following
24-hour period.
If you want to cook more than one dish, choose dishes that
require approximately the same time. However, dishes can be
‘slowed down’ slightly by using small containers and covering
them with aluminium foil, or ‘speeded up’ slightly by cooking
smaller quantities or placing in larger containers.
Very perishable foods such as pork or fish should be avoided
if a long delay period is planned, especially in hot weather.
Don’t place warm food in the oven.
Don’t use an oven already warm.
Don’t use if an adjoining oven is warm.
Avoid using wine or beer if there is a delay period, as
fermentation may take place.
To avoid curdling, cream should be added to dishes just
before serving.
Fresh vegetables, which may discolour during a delay period,
should be coated in melted fat or immersed in a water and
lemon juice solution.
Fruit pies, custard tarts or similar wet mixtures on top of
uncooked pastry are only satisfactory if there is a short delay
period. Dishes containing left over cooked meat or poultry
should not be cooked automatically if there is a delay period.
Whole poultry must be thoroughly defrosted before placing
in the oven.
Check that meat and poultry are fully cooked before serving.
Storage
The bottom drawer is for storing oven trays and other
cooking utensils.
It can get very warm, don’t store anything in it that may melt
or catch fire.
The drawer can be removed completely for cleaning etc.
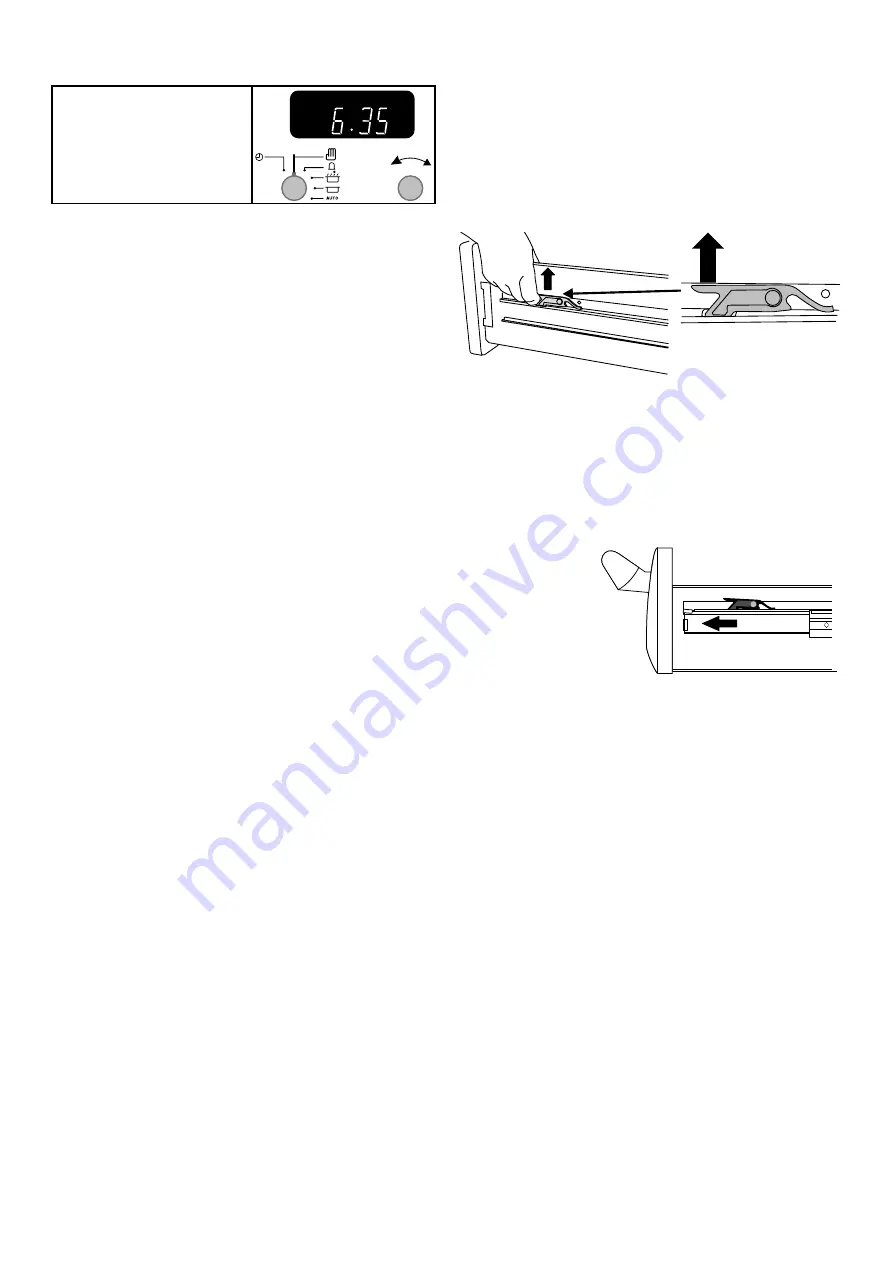
To remove the drawer pull forward.
Lift up the ends of the plastic clips (one each side) to release
the catches holding the drawer to the side runners and at the
same time pull the drawer forward and away from the side
runners. For safety’s sake push the drawer runners back out of
the way.
To refit the draw
Pull the side rails fully out. Carefully move the drawer back
between the rails and rest it on the side rails.
At each side hold the
front of the drawer
and pull the side rail
forward so that the
clips click into position
holding the drawer to
the side rails.
Cleaning your cooker
Before thorough cleaning, isolate from the electricity supply.
Remember to switch on the electricity supply before use.
Never use paint solvents, washing soda, caustic cleaners,
biological powders, bleach, chlorine based bleach cleaners,
coarse abrasives or salt. Don’t mix different cleaning products
- they may react together with hazardous results.
If you want to move your cooker for cleaning, see the section
called ‘Moving your cooker’.
All parts of the cooker can be cleaned with hot soapy water
- but take care that no surplus water seeps into the appliance.
Hotplate burners
The burner heads and caps can be removed for cleaning.
n
n
DO NOT put the burner heads in a dishwasher.
Make sure they are absolutely dry before replacing.
Griddle
Always clean the griddle after use. Allow it to cool completely
before removing. Immerse the griddle plate in hot soapy
water. Use a soft cloth or, for stubborn stains, a nylon washing
up brush.
NEVER USE CAUSTIC OR ABRASIVE CLEANERS AS THESE WILL
DAMAGE THE SURFACE.


