background image

G

ETTING

 S

TARTED


WITH

 MAMBO2-B6 EVALKIT

V

ERSION

 1.0.3

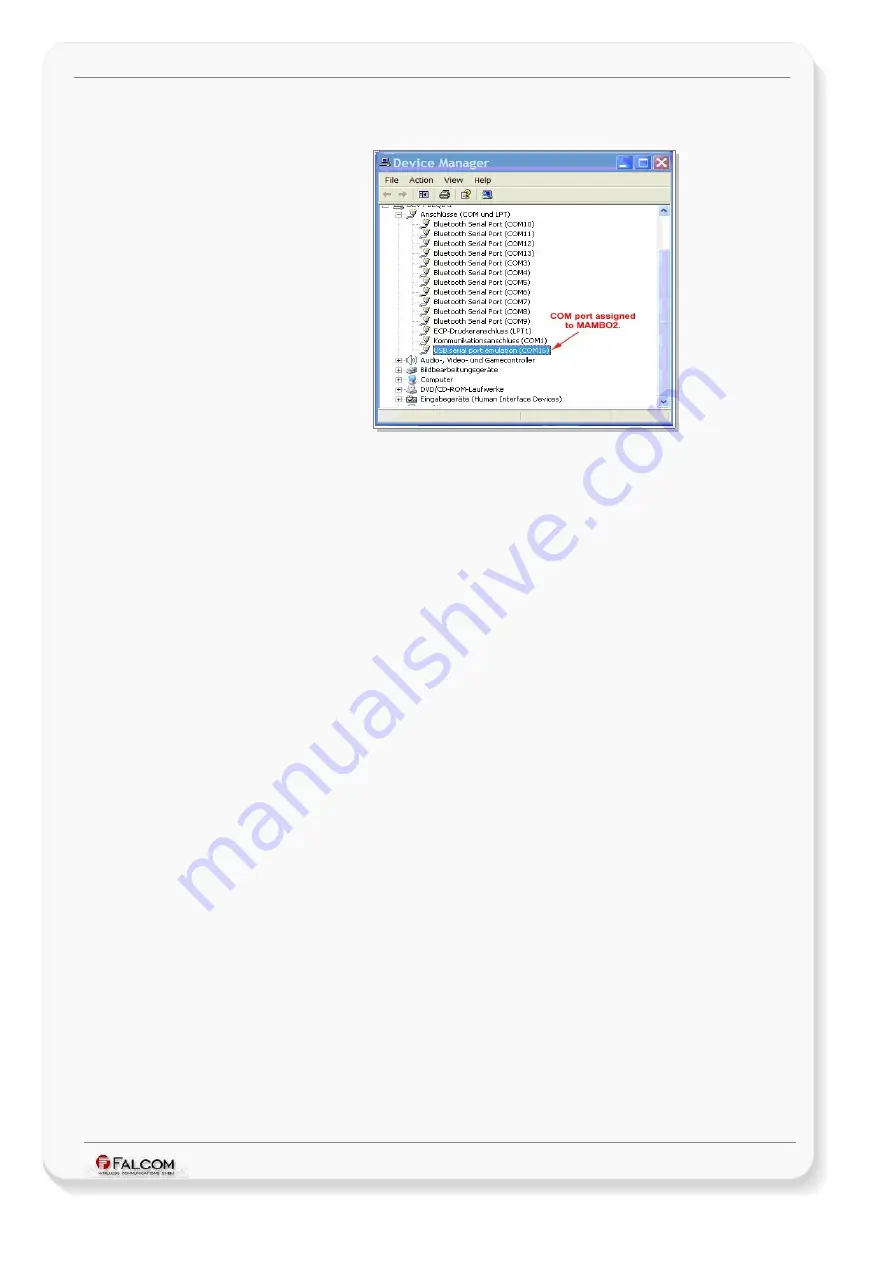
9. When the device is properly installed, the windows device manager will look as shown 

below:

Figure 5:


COM port assigned in 

Device Manager

To open the 

Device Manager 

under 

Win 2000 or XP

, just right click on 

My Computer 

icon and go to 

Properties -> Hardware tab- > 

click on 

Device Manager 

button and expand 

Ports 

item.

After the USB driver is installed, you can disconnect and reconnect the MAMBO2-B6 device without 
performing any additional steps.

Note:  Whenever you want to reset your MAMBO2-B6 unplug it first from the USB port of the PC and 

when the device boots up completely plug it again on the PC's USB port.

This confidential document is a property of FALCOM and may not be copied or circulated without previous permission.

Page 14 of 24

Содержание MAMBO2-B6

Страница 1: ...THIS DOCUMENT IS AVAILABLE AT HTTP WWW FALCOM DE MAMBO2 B6 EVALKIT GETTING STARTED Version 1 0 3 Modified Wednesday 15 August 2012 ...

Страница 2: ...ment adapted to the MAMBO2 B6 device 15 08 2012 1 0 2 F Beqiri Document adapted to the MAMBO2 UXFS device 20 01 2009 1 0 1 F Beqiri Removed chapter 4 description of factory preloaded configuration 20 01 2009 1 0 0 F Beqiri Initial version 17 09 2008 This confidential document is a property of FALCOM and may not be copied or circulated without previous permission Page 2 of 24 ...

Страница 3: ...ements 10 3 2 MAMBO2 B6 EVALKIT hardware set up 10 3 3 MAMBO2 B6 operating software 17 3 4 FALCOM Trace4You application software 18 4 APPENDIX 19 4 1 How to upgrade MAMBO2 B6 to a new firmware 19 4 2 Bike and Car Mounting Kit 20 4 2 1 Bike Mounting Kit 20 4 2 2 Car Mounting Kit 21 4 3 Factory Preloaded Configuration 23 This confidential document is a property of FALCOM and may not be copied or cir...

Страница 4: ...emarks Some mentioned products are registered trademarks of their respective companies Copyright This document is copyrighted by FALCOM WIRELESS COMMUNICATIONS GmbH with all rights reserved No part of this documentation may be produced in any form without the prior written permission of FALCOM WIRELESS COMMUNICATIONS GmbH FALCOM WIRELESS COMMUNICATIONS GmbH No patent liability is assumed with resp...

Страница 5: ...uide consists of following chapters Chapter 2 Overview gives an overview of the MAMBO2 B6 EVALKIT and describes the EVALKIT contents Chapter 3 Getting started provides instructions for setting up and getting started with the EVALKIT It also summarizes how the MAMBO2 B6 s operating software runs and how to login to the FALCOM application server and request or apply the configuration remotely Chapte...

Страница 6: ...rdwareManual pdf Contains information about the hardware of the MAMBO2 B6 device 3 AppNotes_Transform_history_data pdf Contains information of how to convert history data that are being transmitted from MAMBO2 B6 via TCP connection 4 AppNote_Remote_update pdf Contains information of how system integrators can integrate the source code in a TCP server and upgrade their devices remotely 5 AppNoteRem...

Страница 7: ...6 EVALKIT make sure that your package includes the following items listed in table 1 below If any item is missing or damaged please contact your vendor immediately The list of the items included in the MAMBO2 B6 EVALKIT Article name Quantity Description MAMBO2 B6 1 Shipped with factory pre loaded configuration and pre installed pre paid SIM card not available for all countries with 6 month access ...

Страница 8: ... bike Fits handlebars from 22 mm 26 mm and 27 32 mm No other tools required to attach or remove Base Plate 1 Used to connect the clamp to the cradle Cardan bracket 1 The Cardan bracket in this box attaches with a removable base to any flat surfaces such as those found on the dashboard of your car Holding Cradle 1 Holds your MAMBO2 B6 in place while riding Set screws Hex key 4 1 Includes different ...

Страница 9: ...ort Internet connection Keyboard and Mouse 3 2 MAMBO2 B6 EVALKIT hardware set up This chapter explains how to connect and set up the items in the MAMBO2 B6 EVALKIT Installing the MAMBO2 B6 EVALKIT in eight step process 1 Unpack the MAMBO2 B6 EVALKIT 2 Charge the internal battery 3 Insert the SIM card 4 Connect the MAMBO2 B6 to a PC USB port 5 Turn on your MAMBO2 B6 6 Install the FALCOM Workbench s...

Страница 10: ...he MAMBO2 B6 EVALKIT given in Table 1 chapter 2 1 and unpack the contents see Fig 1 If any item is missing or damaged please contact your vendor immediately Figure 1 Unpack the MAMBO2 B6 EVALKIT This confidential document is a property of FALCOM and may not be copied or circulated without previous permission Page 10 of 24 ...

Страница 11: ...into the 5V Mini USB connector of the device 2 Unpack the AC DC Adapter USB from the box and plug the other end A type plug of the USB to Mini USB retractable cable into the USB jack connector of the AC DC Adapter USB and finally plug this adapter into an EU socket outlet to access a US or UK socket outlets or car s cigarette lighter use the corresponding US or UK adaptor or USB car charger The st...

Страница 12: ... is no SIM card included then follow the steps below After the MAMBO2 B6 has been fully charged disconnect it from the USB Desk Cradle and position it so that the display is facing up and the SIM Charge cover is facing you Open the the SIM cover 1 With SIM microchip facing upward and with the bevelled corner oriented on the right side of SIM insert your SIM card into the SIM card slot in the upper...

Страница 13: ...erwise it will not be possible to place the MAMBO2 B6 on the cradle if the connector has been rotated 4 To prevent accidental removal of the USB cable from the docking station when tacking the MAMBO2 B6 out it is necessarily to fix the cable into the slot in the base 5 The assembled docking station can now be connected directly to a computer through USB port 6 To connect the device to a wall outle...

Страница 14: ...ties Hardware tab click on Device Manager button and expand Ports item After the USB driver is installed you can disconnect and reconnect the MAMBO2 B6 device without performing any additional steps Note Whenever you want to reset your MAMBO2 B6 unplug it first from the USB port of the PC and when the device boots up completely plug it again on the PC s USB port This confidential document is a pro...

Страница 15: ...enerally this takes place automatically each time you turn the device on Necessary satellites information will be retrieved to compute a position fix Each time you turn on the device there are some differences in obtaining a GPS fix depending on the how long the device has been turned off and how far you have traveled since the last time you turned on The MAMBO2 B6 will probably need a clear unobs...

Страница 16: ... then go to Connection view and click on Console1 4 To send commands to the MAMBO2 B6 device type them on the Editor and then click on Start sending configuration or double click with left mouse each configuration line on the Editor individually 5 To see all events generated by the MAMBO2 B6 device either open a new console Console2 or on the Console1 click Add 11 activate Show filter on the menu ...

Страница 17: ...andsReferenceGuide pdf When turning on your MAMBO2 B6 included in the EVALKIT it connects automatically to the FALCOM application server without making any changes inside the device configuration To get connected to the FALCOM application server only a computer PC client with a pre installed web browser and internet connection is necessary from the user side Furthermore how to login to this server...

Страница 18: ...ys how to upgrade a new firmware into the MAMBO2 B6 With the help of Workbench software for local via USB and remote via TCP upgrade Refer to the application note AppNoteRemoteUpdateWithWorkbench pdf This confidential document is a property of FALCOM and may not be copied or circulated without previous permission Page 18 of 24 ...

Страница 19: ...late should be facing out when attached on the back of the cradle Step 2 Insert the 4 screws into the holes on the cradle side and secure them by the hex key Figure 9 Bicycle mounted kit Step 3 Select one of two included handlebar clamps that fits to the handlebar of your bike The large clamp is for handlebars with a diameter of 27 32mm while the smaller one is ideal for handlebars from 22 27mm Op...

Страница 20: ... into the cradle by inserting first the two slots located on the bottom of the MAMBO2 into the two latches on the cradle Apply light pressure on the MAMBO2 toward the cradle until you hear it snaps into the cradle Figure 10 Quick release clamp Step 6 To remove the cradle from the handlebar clamp just push the latch lock at the front of the clamp downward and slide the cradle rearward until it is f...

Страница 21: ...wo slots on the bottom of the MAMBO2 into the two latches on the cradle Thereafter apply light pressure on the MAMBO2 toward the cradle until you hear it snaps into the cradle To adjust right left position turn both knobs the left and the right ones clockwise Then turn back to fix that position To adjust the viewing angle of MAMBO2 B6 turn the middle knob clockwise Then turn back to fix that posit...

Страница 22: ...d date will be displayed on the screen PFAL CNF Set DISP TZ UTC 1 0 Specifies the time zone local time i e for Berlin is 1 0 hour To get the time in your city add or subtract the number of hours to from your city time PFAL CNF Set GSM PIN 1111 The PIN of the SIM card is set to 1111 If you are going to use another SIM card please specify the correct PIN before before starting up the device with a n...

Страница 23: ...PFAL CNF Set ALIAS SYS TIMER0 _2SEC To have a better overview of the configuration inside the MAMBO2 device it is recommended to define alias names to some parameters that will be most used in your configuration For example here the alias name for the TIMER0 is defined to _2SEC it means the the TIMER0 has an OnTime of 2000 msec This Timer can be used in your configuration as SYS TIMER_2SEC and its...

Страница 24: ...the TIMER e_7SEC occurs the device has a valid GPS fix and the distance between the current and saved position in the slot 1 is greater than 50 meter the device will save its current GPS position into the slot 1 and write this position in the history PFAL CNF Set AL11 SYS TIMER e_20SEC GPS Nav Position s0 100 GPS Nav sFix valid GPS Nav Posi tion0 current TCP Client Send 8 sfal pos Every 20 seconds...

Отзывы: