Fabtech FTS22179 Скачать руководство пользователя страница 14

REAR SUSPENSION

52.  Jack up the rear end of the vehicle and support the frame 

rails with jack stands.  Release the parking brake at this 
time. Supporting the rear differential, remove the rear 
shocks, u-bolts, blocks and lower axle down. Use care 
not to over extend the brake hose.

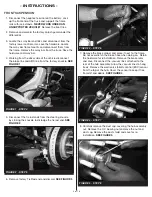
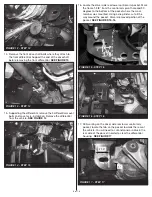
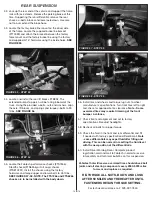
53.  Locate the factory brake line mount on the driver side 

of the frame. Locate the supplied brake line bracket 
(FT70033) and attach the bracket between the factory 
fame mount and the factory brake line using the factory 
and supplied 5/16” hardware using the inside holes. 

SEE 

FIGURE 55

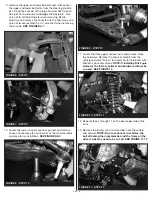
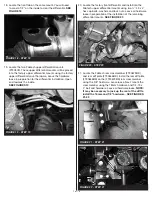
54.  Locate and install the rear lift blocks FTBK52. The 

extended bump stop perch will be facing inboard of the 
truck. Using the provided u-bolts, nuts and washers, align 
the axle, lift blocks, and springs and torque u-bolts to 90 
ft-lbs. 

SEE FIGURE 56

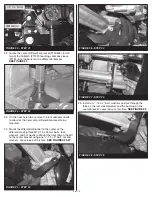
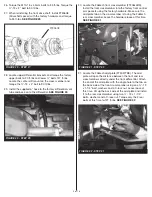
55.  Locate the Fabtech performance shocks (FTS7266), 

Stealth shocks(FTS6266) or Dirt Logic shocks 
(FTS810291). Install the shocks using the factory 
hardware and torque upper and lower bolts to 45 ft-lbs. 

SEE FIGURES 57-58. NOTE: The FTS7266 and FTS6266 
shocks are to be installed with the body down. 

56.  Install tires and wheels and torque lug nuts to wheel 

manufacturer’s specifications. Turn front tires left to right 
and check for appropriate tire clearance. 

Note - Some 

oversized tires may require trimming of the front 
bumper & valance.

57.  Check front end alignment and set to factory 

specifications. Readjust headlights.

58.  Recheck all bolts for proper torque. 

59.  Check the fluid in the front and rear differential and fill 

if needed with factory specification differential oil. 

Note 

- some differentials may expel fluid after filling and 
driving. This can be normal in resetting the fluid level 
with the new position of the differential/s.

60.  Install Driver Warning Decal. Complete product 

registration card and mail to Fabtech in order to receive 
future safety and technical bulletins on this suspension.

Vehicles that will receive oversized tires should check ball 

joints and all steering components every 2500-5000 miles  

for wear and replace as required.

RE-TORQUE ALL NUTS, BOLTS AND LUGS

AFTER 50 MILES AND THEREAFTER UNTIL 

FASTENERS RETAIN TORQUE SETTING.

For technical assistance call:  909-597-7800

14 of 16

FIGURE 55 - STEP 53

FIGURE 56 - STEP 54

FIGURE 57 - STEP 55

FIGURE 58 - STEP 55

Содержание FTS22179

Страница 1: ...s 4331 Eucalyptus Ave Chino CA 91710 Tech Line 909 597 7800 Fax 909 597 7185 Web www fabtechmotorsports com INSTALLATION INSTRUCTIONS 2015 18 FORD F150 4WD FTS22179 6 BASIC SYSTEM FTS22181 6 PERFORMAN...

Страница 2: ...AS16 DRIVER WARNING DECAL 1 FTREGCARD REGISTRATION CARD FT30603 HARDWARE KIT LOCATION 6 5 16 SAE WASHER G5 ZINC BRAKE LINE 3 5 16 18 STOVER NUT G5 Z1 3 5 16 18 X 1 HEX BOLT G8 ZINC 8 7 16 SAE WASHER G...

Страница 3: ...nter of gravity of the vehicle and may increase roll over as compared to stock On EcoBoost 3 5L and 2 7L models discard all air shields OEM Wheels and tires cannot be used after the installation of th...

Страница 4: ...t the tie rod ends from the steering knuckle by striking the knuckle to dislodge the tie rod end SEE FIGURE 2 6 Remove factory Tie Rod end and discard SEE FIGURE 3 FIGURE 3 STEP 6 FIGURE 2 STEP 5 7 Re...

Страница 5: ...rs and save for re installation SEE FIGURES 8 9 11 Locate the three upper coilover nuts and remove Save the hardware Remove the shock assembly from the vehicle and mark Driver for assembly to install...

Страница 6: ...s the rear of the vehicle You will need to cut and sand a radius in the rear side of the pocket in order to clear the differential housing SEE FIGURE 17 14 Remove the front drive shaft bolts where the...

Страница 7: ...Fabtech upper differential mounts using two 13 x 4 hex cap bolts washers and lock nuts Leave all hardware loose in preparation of the installation of the remaining differential mounts SEE FIGURE 20 2...

Страница 8: ...24 23 On the front axle tube remove the rear and lower bolts to allow for the new center differential bracket to be mounted 24 Mount the differential bracket to the center of the differential using th...

Страница 9: ...factory front control arm pockets using the factory hardware Make sure the skid plate tab on the crossmember is facing the Fabtech rear crossmember Leave the hardware loose at this time SEE FIGURE 31...

Страница 10: ...and FT30605BK Pass shock spacers 35 Locate the factory coilovers Using a press press the factory studs out of the bar pins SEE FIGURE 34 36 Install the Driver side spacer on the driver side coilover u...

Страница 11: ...30600D and install the factory hub Torque the four 14mm bolts to 160 ft lbs SEE FIGURE 40 41 Re install the 4WD actuator using the 3 factory bolts Torque to 29 ft lbs SEE FIGURE 41 42 Install the Fabt...

Страница 12: ...Fabtech bracket Using the factory hardware mount factory brake line bracket to the side of the Fabtech knuckle After installing the factory brake line bracket check to insure full movement by steerin...

Страница 13: ...hardware install the factory sway bar to the frame using the FT30591 driver side bracket and the FT30590 passenger side bracket When mounting the sway bar will be offset towards the rear of the truck...

Страница 14: ...nd FTS6266 shocks are to be installed with the body down 56 Install tires and wheels and torque lug nuts to wheel manufacturer s specifications Turn front tires left to right and check for appropriate...

Страница 15: ...roper installation of HUB actuator The IWE system uses vacuum hubs that engage the front wheel hubs to the front halfshafts or disengage the front wheel hubs from the front halfshafts The IWE solenoid...

Страница 16: ...el sizes listed in Fabtech s website are only a guideline for street driving with noted fender trimming Fabtech is not responsible for damages to the vehicle s body or tires Fabtech is not responsible...

Отзывы: